098 Find Painted Elements
Chris McKeown / July 1, 2025
Painting
Overview
Find Painted Elements scans every element in the selected scope and checks whether any of its geometry faces are painted. Matching elements are listed in a grid with their ID, name, category, and level. From the grid, you can isolate specific elements in the active view or bulk-remove paint from all faces — including sub-faces created by split-face operations. This is the essential cleanup tool for removing unwanted paint, auditing what has been painted, and preparing models for handover or coordination.
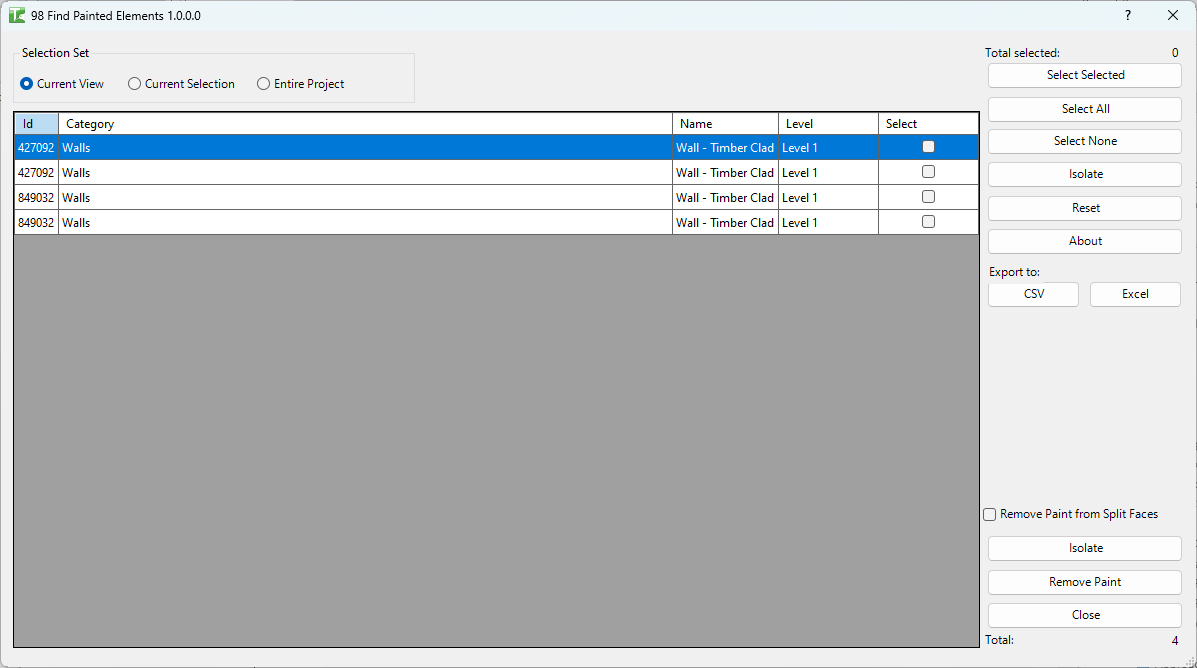
Table of Contents
Key Features
- Scans elements for painted faces including split-face sub-regions (
face.GetRegions()) - Grid columns: Id, Name, Category, Level, Select
- Three scope options: Current View (default), Current Selection, Entire Project — scope changes auto-reload the grid
- Select Selected — toggles the Select state of highlighted rows
- Select All / Select None — bulk check/uncheck
- Isolate — isolates selected elements temporarily in the active view (transaction: "Isolate")
- Filter (Isolate grid) — hides unselected rows from the grid for focused review
- Reset — reloads the grid
- Remove Paint button — removes all paint from faces of selected elements (transaction: "Remove Paint")
- Remove Split Faces checkbox — when enabled, also removes paint from
face.GetRegions()sub-faces - Progress bar with Cancel — cancelling on Remove Paint performs a full rollback of unpainted changes
- Export CSV / Export Excel
- Completion message: "X passed. Y failed."
Requirements
- Must be run in a project document (not a Family document)
- The selected scope must contain elements with solid geometry faces
- A valid Kiwi Codes Bonus Tools licence must be active
Running the Tool
Launch
Find Find Painted Elements on the Bonus Tools Ribbon or use 115 Search Tools.
Step 1 — Set the scope
Choose which elements to scan:
| Option | Behaviour |
|---|---|
| Current View | Scans elements visible in the active view (default) — grid reloads automatically |
| Current Selection | Scans only elements in the current Revit selection — grid reloads automatically |
| Entire Project | Scans all elements in the model — may take longer on large projects |
The grid populates automatically when you change the scope selection.
Step 2 — Review and select elements
Each row in the grid represents one element that has at least one painted face. Columns:
| Column | Description |
|---|---|
| Id | Revit element ID |
| Name | Element name |
| Category | Revit category of the element |
| Level | Level the element is associated with |
| Select | Tick to include this element in operations |
Use the helper buttons to manage selection:
- Select Selected — toggles the Select state on highlighted rows (click a row then click this button)
- Select All / Select None — checks or clears all rows
- Isolate (grid) — removes unchecked rows from the grid display to focus on your selection
- Reset — reloads the grid from the current scope
Step 3 — Isolate in view (optional)
Click Isolate to temporarily isolate the checked elements in the active view. This uses Revit's Isolate Elements Temporary mode (transaction: "Isolate") so you can visually inspect the painted elements in context.
Step 4 — Remove paint
Enable Remove Split Faces if you want to remove paint from sub-faces created by split-face operations in addition to the primary faces.
Click Remove Paint. The tool processes each selected element using a SubTransaction per element:
- Iterates over all solid faces of the element
- Calls
RemovePainton any face whereIsPaintedreturns true - If Remove Split Faces is enabled, also calls
RemovePainton each sub-face fromface.GetRegions()
The outer transaction is named "Remove Paint". If Cancel is clicked during processing, the entire transaction rolls back — no partial changes are retained.
When complete: "X passed. Y failed."
If the transaction could not be committed due to a worksharing conflict: "Paint Rooms failed. Gain ownership of elements and try again."
Tips and Best Practices
- Use Current View scope for targeted cleanup. Open a view that shows only the elements you want to clean, run the tool, select all, and remove paint — without touching the rest of the project.
- Enable Remove Split Faces when cleaning up after split-face workflows. The Split Face command creates sub-regions on faces that may be painted independently. Enable this checkbox to catch all painted sub-faces.
- Use Isolate in view before removing paint. Confirm visually which elements will be affected before clicking Remove Paint. The temporary isolation lets you check the element set in context.
- Cancel is fully safe. If you accidentally start a Remove Paint run, clicking Cancel will roll back all changes, leaving the model exactly as it was.
- Export the grid before cleaning. Export CSV/Excel to create a record of which elements had paint before the cleanup — useful for audit trails or if you need to re-apply paint later.
Common Use Cases
Cleaning up paint before model handover — Run on the Entire Project scope, select all, and remove paint to deliver a clean model without remnant paint from development work.
Auditing painted elements in a received model — Open a consultant model, run on Entire Project, and review the grid to understand what faces have been painted and why.
Removing stale Room Paint Bomb results — After room layouts change and boundaries shift, old paint may remain on boundary faces that are no longer relevant. Find Painted Elements locates them all so you can clean up efficiently.
Checking for accidental paint on structural elements — Filter the grid by Category or Level to identify structural elements with unexpected paint that might cause rendering or quantity takeoff discrepancies.
Split face cleanup — After a design change, faces that were split and painted no longer match the design intent. Enable Remove Split Faces and run to remove both primary and sub-face paint in one pass.
Troubleshooting
Grid is empty after loading No elements in the selected scope have any painted faces. Try switching to Current View or Entire Project scope, or check that Room Paint Bomb has been run.
Some expected elements are missing from the grid Elements must have solid geometry faces accessible via the Revit geometry API. Some system family elements or abstract elements may not expose solid geometry and will not appear even if they have paint.
"Paint Rooms failed. Gain ownership of elements and try again." A worksharing conflict prevented the Remove Paint transaction from committing. Gain ownership of the affected elements using Revit's SWC/Relinquish workflow, then re-run.
Paint is removed from some elements but not others after running Each element uses a SubTransaction. If a specific element's SubTransaction fails (e.g. read-only element), that element's paint is not removed but others succeed. Check the Output log for red entries identifying which elements failed.
"Operation Failed." An unexpected exception occurred outside the SubTransaction handling. Check the Output log for details. Try running on a smaller scope or a single element to isolate the problem.