097 Room Paint Report
Chris McKeown / July 1, 2025
Painting
Overview
Room Paint Report reads the painted materials on room boundary faces and aggregates them into a per-room grid showing what is painted on Walls, Floors, Ceilings, and Roofs. You choose which material property to report (Name, Mark, or any other material parameter), and can also write the discovered material names back to room text parameters — enabling you to populate room finish schedules directly from the painted face data, or verify that Room Paint Bomb (tool 96) was applied correctly.
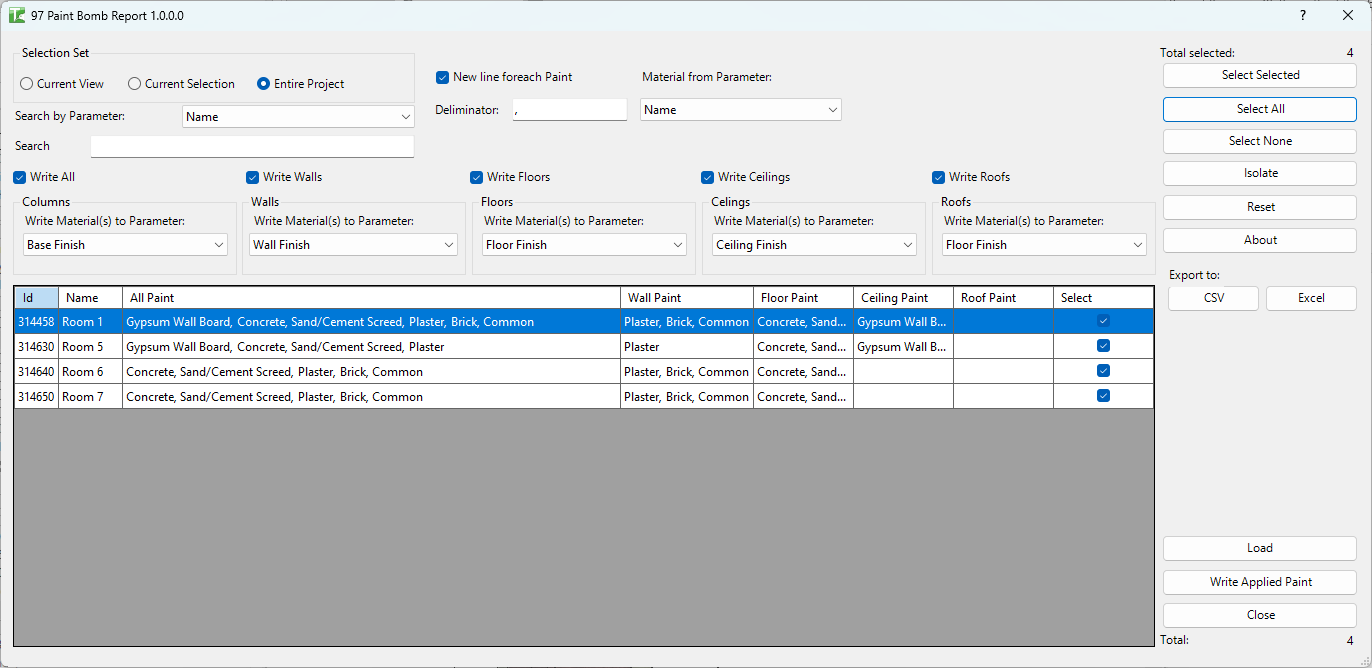
Table of Contents
Key Features
- Reports painted materials per room across Walls, Floors, Ceilings, and Roofs
- Material parameter dropdown — choose which material property to read (defaults to Name)
- Room parameter dropdown — optionally include a specific room parameter value in the report
- Delimiter field — configure the separator between multiple material names on the same surface type
- Return line checkbox — use a line break as delimiter instead
- Write-back section: for each surface type, select a room text parameter to write the discovered material names into
- Room grid: Id, Name, AllPaint, WallPaint, FloorPaint, CeilingPaint, RoofPaint — populated after running
- Three scope options: Current View, Current Selection, Entire Project
- Progress bar with Cancel
- Transaction: "Paint Rooms Report"
- Completion message: "X passed. Y failed."
Requirements
- Must be run in a project document (not a Family document)
- Rooms must exist and have boundary elements with painted faces
- For write-back: target room parameters must be of type Text
- A valid Kiwi Codes Bonus Tools licence must be active
Running the Tool
Launch
Find Room Paint Report on the Bonus Tools Ribbon or use 115 Search Tools.
Step 1 — Set the scope
Choose which rooms to include in the report:
| Option | Behaviour |
|---|---|
| Current View | Reports rooms visible in the active view (default) |
| Current Selection | Reports only rooms in the current Revit selection |
| Entire Project | Reports all rooms across the whole model |
Step 2 — Configure the report
Material parameter — Select the material property to read for each painted face. The default is Name. Other options include Mark, Description, or any material-level parameter available in the project.
Room parameter — Optionally select a room parameter whose value will be included in the report alongside the paint data.
Delimiter — Set the separator used when a surface type has multiple different materials painted on it (e.g. a room with two different wall materials). Default is a comma. Enable Return line to use a newline character instead.
Step 3 — Configure write-back (optional)
In the Write-back section, for each surface type (Walls, Floors, Ceilings, Roofs), select a room text parameter from the dropdown. When the report runs, the discovered material names for that surface type will be written into the selected room parameter.
Write-back modifies room parameter values. Only use this if the target parameters are intended for finish schedule population and are not used for another purpose.
Step 4 — Execute
Click OK. The tool scans each room in the selected scope, examines the painted faces of all boundary elements, and populates the report grid.
The room grid shows:
| Column | Description |
|---|---|
| Id | Room element ID |
| Name | Room name |
| AllPaint | All unique materials found across all boundary surfaces |
| WallPaint | Materials painted on wall boundary faces |
| FloorPaint | Materials painted on floor boundary faces |
| CeilingPaint | Materials painted on ceiling boundary faces |
| RoofPaint | Materials painted on roof boundary faces |
Transaction: "Paint Rooms Report". If write-back parameters are configured, room parameter values are updated as part of the same transaction.
When complete: "X passed. Y failed."
Tips and Best Practices
- Run without write-back first. Review the grid to verify the report data looks correct before committing the material names to room parameters.
- Use Name as the material parameter for finish schedules. Material names are the most human-readable and match what appears in Revit's material library. Mark is useful if your material management workflow uses marks as unique identifiers.
- Use delimiter carefully for rooms with mixed finishes. If a room has three different wall materials (e.g., due to painted wainscoting), the WallPaint field will contain all three names separated by the delimiter. Make sure the target write-back parameter is long enough to store the combined string.
- Combine with 96 Room Paint Bomb. Use Room Paint Bomb to apply materials from room parameters, then use Room Paint Report to verify the result by writing the painted materials back to a different room parameter and comparing.
- Use the Return line delimiter for multi-material rooms. When a room has multiple different finishes on the same surface type, a newline separator makes the written parameter value more readable in the Properties panel.
Common Use Cases
Verifying Room Paint Bomb results — After running Room Paint Bomb, run Room Paint Report to confirm that every room's boundary faces were painted with the expected materials. Look for gaps (empty cells) in the grid.
Populating a room finish schedule from painted faces — Set up write-back parameters (e.g., "Wall Finish Actual", "Floor Finish Actual") and run the report to populate them from the current painted state. Add these parameters to a room schedule for a live finish report.
Auditing paint consistency — Run the report on the entire project to identify rooms where a surface type has no paint, multiple conflicting materials, or material names that don't match the project standard.
Cross-checking specification against as-painted — A specification document defines required finishes per room. Run Room Paint Report and compare the WallPaint/FloorPaint values against the specified materials to identify discrepancies.
Troubleshooting
"No Rooms found in this Project." The project contains no placed room elements in the selected scope. Place rooms or change the scope.
"No Material parameters attached to Rooms." No material-type parameters exist on rooms. This message may appear if the tool cannot find any relevant room parameters. Ensure text parameters are attached to the Rooms category.
"Paint Rooms Report failed. Gain ownership of elements and try again." A worksharing conflict prevented the transaction from committing. Gain ownership of the room elements and re-run.
"X passed. Y failed." with failures Check the Output log for details. Failed rooms may have boundary elements with geometry that cannot be analysed by the spatial element calculator, or with painted faces that cannot be read.
WallPaint / FloorPaint cells are empty even though paint was applied Painted faces on elements that are not recognised as room boundary faces by the spatial element calculator will not appear in the report. This can occur with non-standard room bounding elements. Verify that all boundary elements have Room Bounding set to Yes.
Write-back did not update room parameters Confirm the selected write-back parameter is of type Text and is bound to the Rooms category. Read-only parameters will be silently skipped.