094 View And Family Selection
Chris McKeown / July 1, 2025
Highlight Elements
Overview
View And Family Selection presents a hierarchical tree of family instances in the model — organised by Category, then Family name (with instance count), then Family Type — making it easy to locate and select specific families without hunting through the project browser or clicking elements in views. Check the categories, families, or types you want, then click Select to add all matching instances to the Revit selection set for bulk parameter edits, tagging, or any other selection-dependent operation.
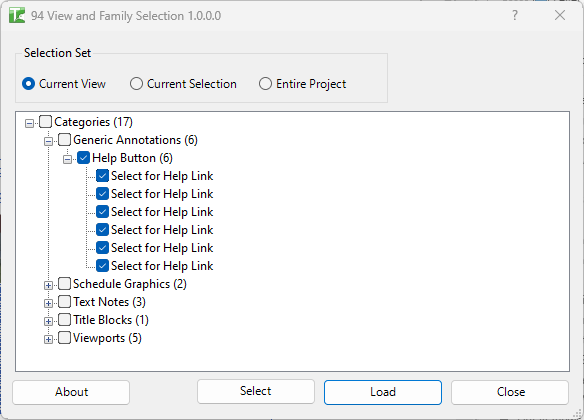
Table of Contents
Key Features
- Hierarchical tree view grouped by Category → Family Name (instance count) → Family Type Name
- Three scope options: Current View, Current Selection, or Entire Project
- Load button — opens the element list viewer (WPF Elements) showing detailed properties of checked items
- Select button — passes all checked family instances to the Revit UI selection set via
RevitUI.addElementsToUISet - Checkboxes at every tree level — checking a Category checks all its families and types; checking a Family checks all its types
- Works with any loadable family category in the project
Requirements
- Must be run in a project document (not a Family document)
- The selected scope must contain at least one family instance
- A valid Kiwi Codes Bonus Tools licence must be active
Running the Tool
Launch
Find View And Family Selection on the Bonus Tools Ribbon or use 115 Search Tools.
Step 1 — Set the scope
Choose how broadly the tool should scan for family instances:
| Option | Behaviour |
|---|---|
| Current View | Lists only family instances visible in the currently active view (default) |
| Current Selection | Lists only family instances within your current Revit selection |
| Entire Project | Lists all family instances across the whole model |
The tree refreshes automatically when you change the scope.
Step 2 — Browse and check families
The tree groups instances as:
▶ Category
  ▶ Family Name (count)
    ▶ Family Type Name
Check any node to include all its children. Uncheck to exclude. The count next to each Family Name shows how many instances of that family exist within the current scope.
Step 3 — Select or load
After checking your desired families:
- Click Select to add all checked instances to the Revit selection set. You can then use Revit's Properties panel, keyboard shortcuts, or any selection-dependent tool on the result.
- Click Load to open the element list viewer with detailed properties of the checked instances.
Tips and Best Practices
- Use Entire Project scope for a full family inventory. The tree gives you an overview of every loaded family type and its usage count across the model.
- Use Current View scope to select what you see. When you want to select all doors on a specific floor plan, switch to that view, set scope to Current View, check the Doors category, and click Select.
- Check at the Category level for broad selections. Checking the top-level category node selects all families and types within it — efficient for selecting all elements of a category in bulk.
- Check at the Type level for surgical selections. If you only want instances of one specific door type, expand to the type level and check only that type.
- Combine with Revit filter tools after selecting. Once a selection is in Revit's selection set, use Filter (in the status bar) to refine further if needed.
Common Use Cases
Selecting all instances of a specific family type for parameter editing — Open the tree, expand to the exact family type, check it, and click Select. The Revit Properties panel then shows the shared parameters for all those instances simultaneously.
Finding how many instances of each family are in use — Run with Entire Project scope and expand the tree. The count next to each family name gives an instant usage summary without needing a schedule.
Selecting all furniture in the active view for isolation — Set scope to Current View, check the Furniture category, click Select, then use Revit's Isolate Element command.
Selecting specific equipment types before tagging — Browse the Mechanical Equipment category, check only the pump types that need tags, click Select, and run a tag-all tool on the selection.
Troubleshooting
Tree is empty No family instances exist in the selected scope. Change scope to Entire Project, or check that the active view or selection contains family instances.
Selection does not update in Revit After clicking Select, click anywhere in the Revit canvas to confirm the selection set has been passed. If elements are still not selected, verify the dialog did not close with an error.
A family type I expect does not appear The family may not have instances placed in the selected scope. Switch to Entire Project to confirm whether instances exist at all, or check that the family is loaded and has placed instances.