090 Copy View Templates
Chris McKeown / July 1, 2025
Sheet & View Manipulation
Overview
Copy View Templates scans every open Revit project document and lists all View Templates available across those files. Select the templates you want and click Copy — they are imported into the active document in one step. This is far faster than opening the Manage tab, locating each template, and transferring it individually, especially when migrating standards from a reference project or setting up a new project template.
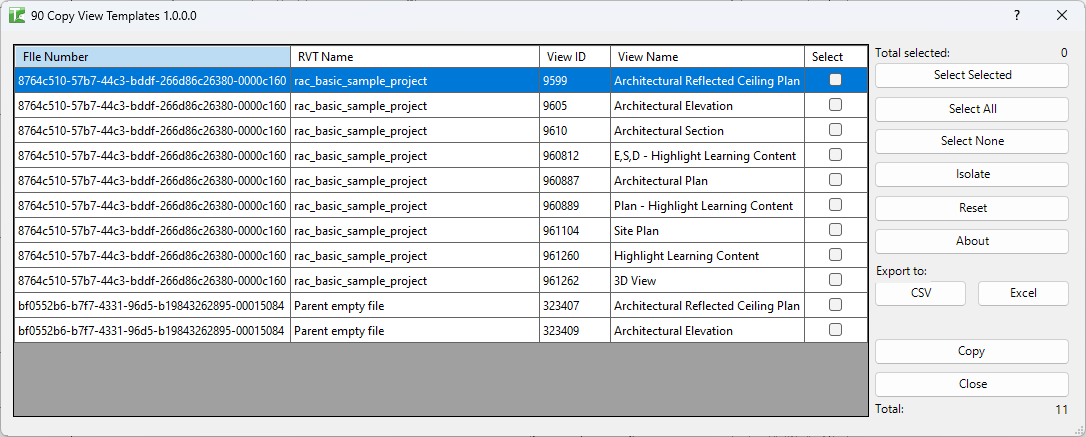
Table of Contents
Key Features
- Aggregates View Templates from all currently open project documents into a single grid
- Grid columns: File Number (document GUID), RVT Name, View ID, View Name, Select
- Select Selected / Select All / Select None buttons for fast multi-selection
- Isolate button — hides unselected rows to focus on your selection
- Reset button — reloads the grid from all open documents
- Export CSV / Export Excel for exporting the template list
- Progress bar with Cancel during the copy operation
- Completion message: "X passed. Y failed." with per-template log entries
Requirements
- Must be run in a project document (not a Family document)
- At least one other project document must be open simultaneously — the grid will be empty if only one document is open
- Family documents are automatically excluded from the list
- A valid Kiwi Codes Bonus Tools licence must be active
Running the Tool
Launch
Find Copy View Templates on the Bonus Tools Ribbon or use 115 Search Tools.
Open all source models before launching the tool. Only documents already open in the current Revit session are listed.
Step 1 — Review the template grid
The grid populates automatically on launch, showing every View Template from every currently open project document. Each row displays:
| Column | Description |
|---|---|
| File Number | Unique document GUID identifying the source file |
| RVT Name | File name of the source project document |
| View ID | Element ID of the View Template in the source file |
| View Name | Name of the View Template |
| Select | Tick to include this template in the copy |
Step 2 — Select templates to copy
Tick the Select checkbox for each template you want to copy. Use the helper buttons to speed up selection:
- Select Selected — toggles the Select state of highlighted rows
- Select All — ticks all rows
- Select None — clears all rows
- Isolate — hides rows with Select unchecked so you can focus on your chosen templates
- Reset — reloads the grid (clears your selection and re-scans all open documents)
Step 3 — Copy
Click Copy. A progress bar tracks each template. For each selected template:
- Retrieves the View Template element from the source document
- Copies it into the active document using
ElementTransformUtils.CopyElements - Logs "Copied [name] View Template." (green) on success, or "Failed to copy [name] View Template." (red) on failure
When all selected templates have been processed, the Output log shows "X passed. Y failed."
Tips and Best Practices
- Open all source files before launching. The grid only shows templates from documents already open in the session. If a source file is not open, its templates will not appear.
- Use Isolate to verify your selection. After ticking templates, click Isolate to see only the selected rows before running the copy.
- Rename templates after copying if names conflict. Revit may append numbers to duplicate template names. Check the View Templates list after running to confirm names.
- Use as part of a project setup workflow. Run Copy View Templates early in a new project to bring across discipline-specific templates from a standards model.
- Re-run after opening additional documents. If you open another model mid-session, click Reset to refresh the grid and include its templates.
Common Use Cases
Migrating templates from a standards model — A practice maintains a master Revit file with approved view templates. Open the standards file alongside the new project, run Copy View Templates, select all relevant templates, and copy them across in one operation.
Consolidating templates across disciplines — A multi-model project has view templates spread across architectural, structural, and MEP models. Open all models, copy all templates into the coordination model, and standardise in one pass.
Onboarding a received model — A client model arrives with custom view templates that the team needs. Open it in Revit, run Copy View Templates, and import only the required templates rather than copying the entire model.
Refreshing templates after a standards update — When drawing standards change, open the updated standards model, select the revised templates, and copy them into active project files.
Troubleshooting
Grid is empty on launch Only the active document is open. Open the source project document in Revit (File → Open) so it appears in the session, then re-launch or click Reset.
"Failed to copy [name] View Template." The copy operation for that template failed. Common causes include a worksharing conflict (another user owns that element), or the template references a view filter that does not exist in the active document. Check the Output log for details.
"Copy View Templates failed. Gain ownership of elements and try again." The overall transaction failed, typically due to a worksharing ownership conflict. Use Revit's SWC/Relinquish tools to release ownership, then re-run.
Copied template has a different name than expected If a template with the same name already exists in the active document, Revit appends a number suffix. Rename the template after copying via Manage → View Templates.
Templates from a linked file do not appear Only documents open in the current Revit session are listed — linked files that are not separately open are not included. Open the file as a standalone project to access its templates.