085 Line Patterns
Chris McKeown / July 1, 2025
Lists
Overview
Line Patterns accumulate in Revit projects over time — imported from families, linked files, or past team members — leaving dozens of unused or non-standard patterns cluttering the project. The Line Patterns tool lists every line pattern in the project in a sortable grid, shows a usage count for each one, and lets you drill down to see exactly where each pattern is applied (categories, views, view templates, or filters). Select unwanted patterns and bulk delete them in a single operation, or use the Excel Overlay Standard feature to automatically flag patterns that are not in your practice's approved list.
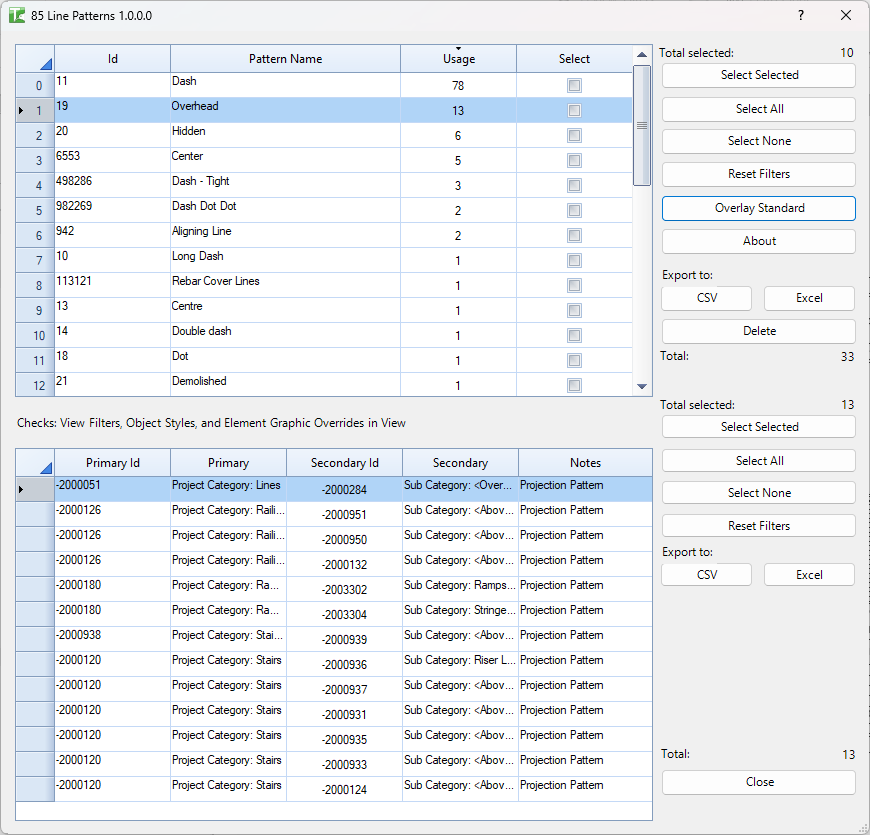
Table of Contents
Key Features
- Lists every line pattern in the project with its Revit Element Id and name
- Usage count per pattern — see at a glance which patterns are used and which are orphaned
- Usage detail panel — click any pattern to see every location it is applied: project categories, subcategories, view category overrides, view template overrides, element-specific overrides, and filter overrides
- Bulk delete — select multiple patterns and delete them all in one transaction, with individual sub-transactions so a single failure does not roll back the whole batch
- Overlay Standard — load an Excel file with your approved pattern list; patterns not in the list are automatically selected for review or deletion
- Export to CSV or Excel for both the pattern list and the usage detail panel
- Column filtering on both grids — filter by name, usage count, or any column
- Settings (Excel file and tab) saved per-document so the standard overlay is remembered between sessions
- Progress bar with Cancel button for both detail loading and deletion operations
Requirements
- Any Revit project document (no specific view type required)
- An open, active project document — the tool reads from the current document
- Optional: An Excel file containing approved line pattern names (one per row in the first column) for the Overlay Standard feature
Running the Tool
Launch
Find Line Patterns on the Bonus Tools Ribbon or use 115 Search Tools.
On launch, all line patterns in the project are loaded into the top grid. A prompt asks whether to Load details — loading details scans every view, category, and filter in the project to calculate usage counts and populate the usage panel. For large projects this scan can take a minute or two; you can skip it if you only need the pattern list.
Step 1 — Review the pattern list
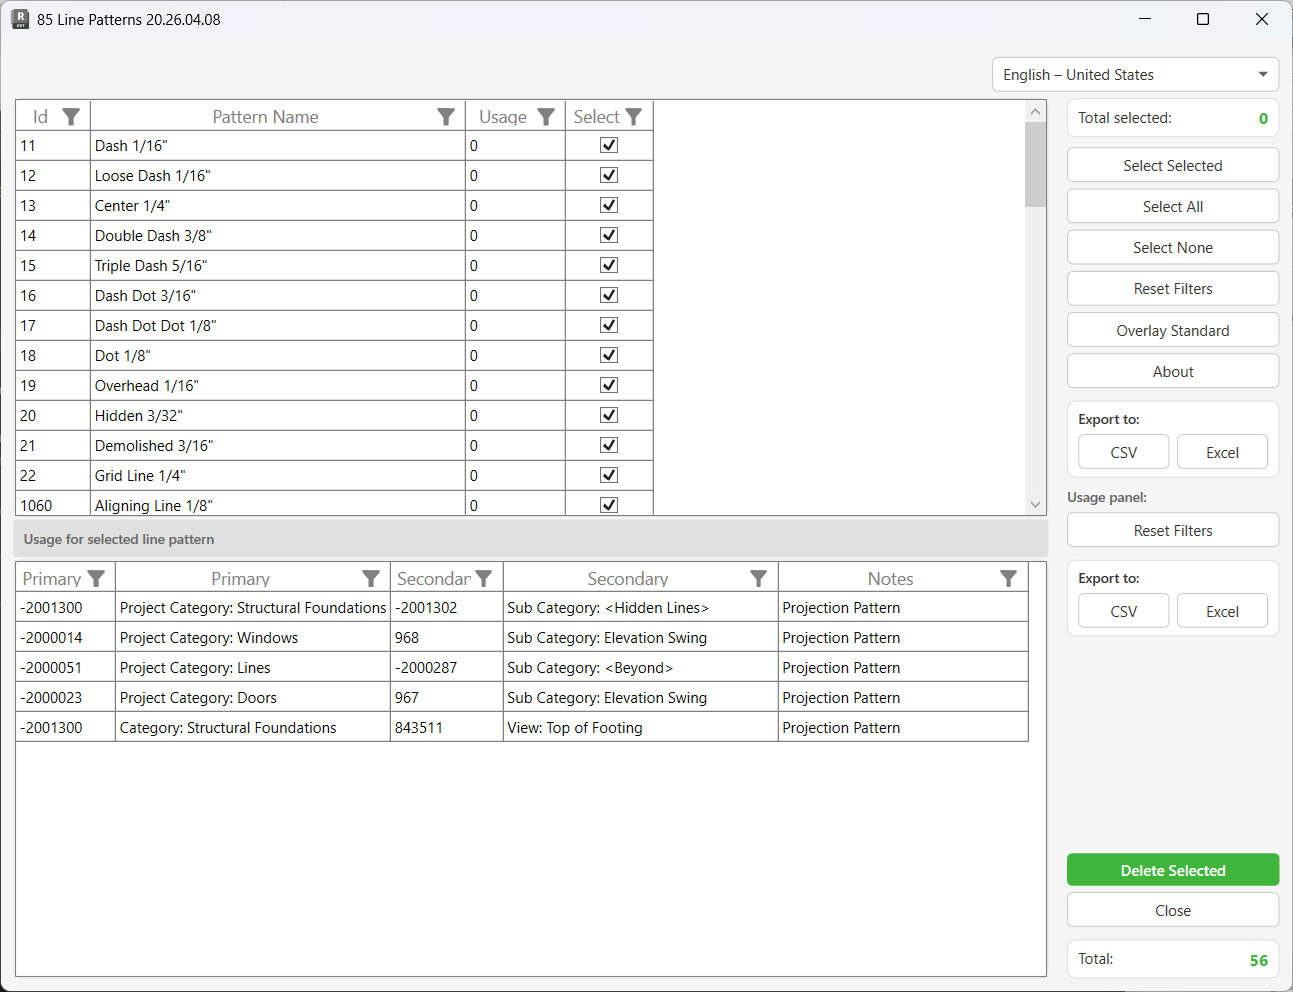
The top grid shows all line patterns in the project:
| Column | Description |
|---|---|
| Id | Revit Element Id of the line pattern |
| Pattern Name | The name of the line pattern as it appears in Revit |
| Usage | Number of places this pattern is applied (populated if details were loaded) |
| Select | Checkbox — tick to mark the pattern for deletion |
Click any column header to sort. Use the column filter icons to narrow the list by name or usage count.
The Total counter shows the total number of patterns in the project. The Total selected counter updates as you check or uncheck patterns.
Step 2 — Inspect usage details
Click any row in the top grid to see where that pattern is applied. The Usage for selected line pattern panel below shows every reference:
| Column | Description |
|---|---|
| Primary Id | Element Id of the primary context (e.g. the Category or Filter) |
| Primary | Description of the primary context (e.g. "Project Category: Walls") |
| Secondary Id | Element Id of the secondary context (e.g. the View or View Template) |
| Secondary | Description of the secondary context (e.g. "View Template: CD Plan") |
| Notes | How the pattern is applied: Projection Pattern, Cut Pattern, or View specific Projection/Cut Pattern override |
Usage references include:
- Project Category projection patterns (all categories and subcategories)
- View and View Template category overrides (both projection and cut)
- View and View Template filter overrides (both projection and cut)
- Element-specific graphic overrides within views
A pattern with a Usage count of 0 is safe to delete — it is not applied anywhere in the project.
Step 3 — Select patterns for deletion
Use the selection buttons in the right panel to choose which patterns to delete:
| Button | Action |
|---|---|
| Select Selected | Toggle the checkbox for the currently highlighted row(s) |
| Select All | Check all patterns in the list |
| Select None | Uncheck all patterns |
| Reset Filters | Clear any column filters applied to the top grid |
Tick individual checkboxes directly in the Select column, or use the buttons above for bulk selection.
Step 4 — Overlay Standard (Optional)
If your practice maintains an approved list of line patterns in an Excel file, click Overlay Standard to load it.
- Browse to the Excel file containing your standard pattern names
- Select the worksheet tab that contains the list
- Click OK
The tool reads the first column of the selected worksheet. Any line pattern in the project whose name is not in the Excel list is automatically checked (selected) in the grid. Patterns that match the standard list are unchecked. This gives you an instant view of which patterns fall outside your approved set.
The selected Excel file and tab are saved to the Revit document. The same standard will be re-applied automatically the next time you open the tool.
Step 5 — Delete selected patterns
When your selection is ready, click Delete Selected at the bottom of the right panel.
A confirmation prompt asks: "Are you sure you want to delete selected items?" — click Yes to proceed.
A progress bar appears while the deletion runs. Each pattern is deleted in its own sub-transaction, so if one fails (e.g. it is still referenced), the others continue. Results are shown in the output panel:
- Each successfully deleted pattern is listed in green
- A summary reports: "X items deleted. Y items failed."
If ownership of an element cannot be obtained (workshared projects), the deletion for that pattern is skipped and counted as a failure.
Click Cancel in the progress bar at any time to stop the deletion mid-run. Patterns already deleted before you cancel are not restored.
Step 6 — Export (Optional)
Both grids support export at any time:
- Export to CSV or Export to Excel (top section) — exports the line patterns list
- Export to CSV or Export to Excel (usage panel section) — exports the usage detail rows for the currently selected pattern
Use the Reset Filters button in the usage panel section to clear any filters on the detail grid before exporting to ensure all rows are included.
Tips and Best Practices
- Skip detail loading on first pass. If you just want to see what patterns exist, click No when prompted to load details — the list loads instantly. Load details later when you want to investigate specific patterns.
- Filter by Usage = 0 before deleting. Patterns with zero usage are safe candidates. Sort the Usage column ascending to bring them to the top, select them all, and delete.
- Overlay Standard before bulk deleting. Use the Excel standard overlay to automatically flag non-standard patterns rather than manually reviewing each one. This is especially useful after importing families from external sources.
- Keep your standard Excel file on a shared drive. If the file is accessible to all team members, everyone runs the same standard check. The path is saved per-document, so it auto-loads for anyone who opens the same project.
- Check the usage panel before deleting low-usage patterns. A pattern with usage count 1 or 2 may still be applied to a critical view template — confirm the context before deleting.
- Workshared projects: check out elements first. If deletions fail in a workshared model, borrow or check out the relevant elements before retrying.
- Export the full list to Excel for a pattern audit. Export the grid after loading details for a full report of every pattern and its usage count — useful for BIM standards documentation.
Common Use Cases
Project clean-up after family import — Importing Revit families often brings in dozens of extra line patterns. Run Line Patterns, load details, filter for Usage = 0, and delete all unused patterns in a single pass. Use Overlay Standard to catch patterns that have usage but are not in your approved list.
Enforcing a practice standard — Maintain an Excel file listing your approved line pattern names. Before issuing a project, run Line Patterns with Overlay Standard to instantly identify and remove any non-standard patterns introduced during the project.
Identifying where a pattern is used — A team member wants to know which views or view templates use a specific line pattern before modifying it. Load details, locate the pattern, and click it to see every reference in the usage panel.
Post-link-management clean-up — After detaching or removing a linked file, run Line Patterns to identify orphaned patterns that came from the link and are now unused.
Documenting the line pattern library — Export the full pattern list with usage counts to Excel for BIM standards documentation or handover records.
Troubleshooting
"No Line Patterns in the Project." The project contains no line pattern elements. This is unusual — check that the correct document is active and that the project is fully loaded.
Usage counts are all 0 after loading You clicked No when prompted to load details. Close and reopen the tool, then click Yes at the load details prompt. Note that detail loading may take several minutes on large projects.
"X items failed" after deletion Some patterns could not be deleted. Common causes:
- The pattern is still referenced somewhere (check the usage panel — detail loading may not have been run)
- In a workshared model, the element is owned by another user. Borrow or check out the relevant elements and retry.
"Deletion failed. Gain ownership of elements and try again." The entire deletion transaction failed to commit. In a workshared model, check out or borrow the line pattern elements before deleting. In a local file, ensure the model is not read-only.
"Worksheet: [tab] not found." The Excel tab name saved in the document no longer exists in the selected file (it may have been renamed or deleted). Click Overlay Standard again and reselect the correct worksheet tab.
Detail loading is very slow The tool scans every view, every category, every filter, and every element in the project. Large projects with many views and heavily overridden categories will take longer. Use the Cancel button in the progress bar if needed and work with the pattern list without detail counts.
Patterns reappear after deletion If the project is workshared and another user has the same patterns locally, they may re-sync patterns back into the central file. Coordinate with your team and ensure all users synchronise before and after running the clean-up.