079 Grid Alignment
Chris McKeown / July 1, 2025
Sheet & View Manipulation
Overview
The Grid Alignment tool copies the 2D extent positions of Grid lines from a source view to one or many target views. Grids are frequently adjusted on individual plans to control bubble visibility and positioning, but aligning them manually across dozens of views is time-consuming. This tool automates the process, using a nominated reference plan as the source of truth for all grid positions. View mappings are persisted between sessions so the configuration does not need to be re-entered.
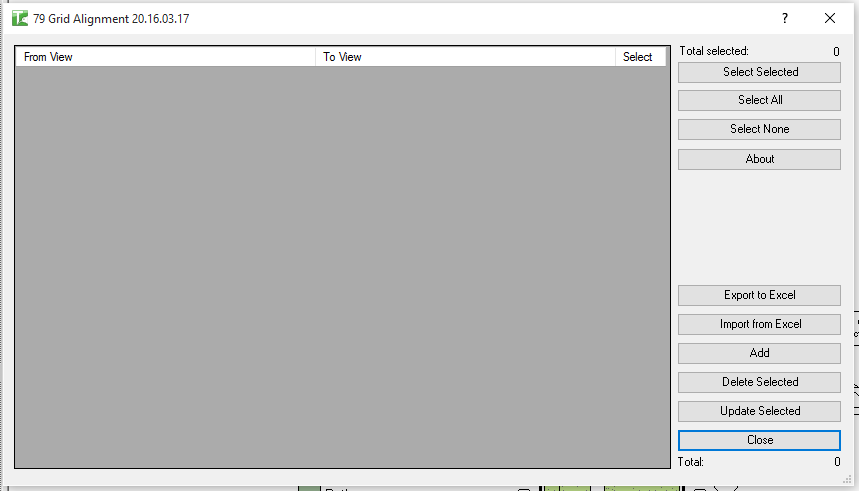
Table of Contents
Key Features
- Copies 2D Grid extents (positions and bubble visibility) from a source view to one or more target views
- Works on Floor Plan, Engineering Plan, Ceiling Plan, and Area Plan views
- Both From and To View dropdowns list all eligible plan views
- Supports multiple From/To mappings in a single grid — add as many rows as needed
- View mappings are saved using Extensible Storage and reloaded between sessions
- Select All / Select None / Toggle Selected buttons for batch selection
- Add button inserts a new row; Remove Selected deletes checked rows
- Update Selected copies grid extents for all checked rows
- Delete Selected removes 2D extent overrides from target views (resets to model extents)
- Export the mapping grid to CSV; import new rows from Excel
- Progress bar with cancel support
- Requires at least one Grid element in the project to open
Requirements
- At least one Grid must exist in the project
- Source and target views must be Floor Plan, Engineering Plan, Ceiling Plan, or Area Plan types
- The From View and To View cannot be the same
- The source view should have its grid 2D extents already set correctly before running
- In workshared projects, ownership of target view elements may be required
Running the Tool
Launch
Find Grid Alignment on the Bonus Tools ribbon or use 115 Search Tools. The dialog opens and loads any previously saved From/To mappings. If no Grids exist in the project, the dialog closes automatically.
Step 1 — Add Mapping Rows
Click Add to insert a new row. Each row has:
- Select — checkbox for batch operations
- From View — select the reference view whose grid extents you want to copy (format:
ViewFamilyType : ViewName) - To View — select the target view to receive the grid extents
Repeat for as many From/To pairs as needed.
Step 2 — Select Rows to Process
Use the Select checkboxes to mark rows. Use Select All, Select None, or Toggle Selected for batch operations. The Count label shows the total rows; the Selected label shows how many are checked.
Step 3 — Update or Delete
Click Update Selected to copy grid 2D extents from each From View to its corresponding To View.
Click Delete Selected to remove the 2D extent overrides in the To Views, resetting grids to their model (3D) extents in those views.
The From View and To View must be different. Rows where both are the same will be skipped and counted as failed.
Step 4 — Review Results
Two dialogs appear after the operation:
- Summary — total views updated and failed.
- Detail — per-row breakdown showing which pairs succeeded or failed.
Step 5 — Manage Mappings
Mappings are saved automatically on close and reloaded next session. Use Remove Selected to clean up obsolete rows. Export to CSV for documentation; import from Excel to load new rows in bulk.
Tips and Best Practices
- Set up the reference view correctly first. Adjust all grid bubble positions, visibility, and 2D extents on the reference (From) view before running the tool. This view defines the standard for all others.
- Use a single reference plan per grid configuration. On multi-building or multi-core projects, you may need different reference plans for different building sections. Create one row per reference configuration.
- Copy to the same View Family Type. Grid behaviour in Floor Plans and Ceiling Plans differs slightly. For most cases, copy from Floor Plan to Floor Plan within the same family type.
- Update after grid additions. When new grids are added to the model, run the tool again to extend the 2D extents to match the reference view.
- Save mappings as a project template. Set up From/To rows once at project start. They persist across sessions, so running grid alignment after each design change takes seconds.
Common Use Cases
Consistent grid bubble positions across all levels — Set up the correct bubble positions and visibility on the ground floor plan, then copy to all other level plans in a single run.
Coordinating grids after level setup — After all levels and plan views are created, use the tool to align every plan view's grids to the reference before the first sheet issue.
Updating after grid additions — New grids are added mid-project and need to match the existing standard. Update the reference view with the new extents and re-run to push to all target views.
Ceiling plan coordination — Copy the floor plan grid configuration to all ceiling plans so grids appear consistently across both plan types.
Section and area plan alignment — Use the same reference view to align grids in Engineering Plans and Area Plans alongside standard floor plans.
Troubleshooting
Dialog closes immediately on opening No Grid elements exist in the project. Add at least one Grid before launching the tool.
From View and To View must differ The tool detects when both dropdowns have the same view selected and skips that row with a failure. Choose a different target view.
Grids do not appear aligned in the target view after running Verify that the grids in the target view have their 2D extent mode active. If grids are set to 3D extents in the target, the 2D extent values may not display correctly. Use the Propagate Extents workflow in Revit alongside this tool if needed.
Rows are missing from the grid after reopening Extensible Storage write errors can occur if the model was read-only or ownership was not held when closing. Ensure the model is editable before closing the dialog for mappings to be saved.
"Operation Failed" error in Output window Check the Output panel for specific errors. Common causes: the target view is locked, the user does not own the view-specific elements, or the grid does not exist in the target view's scope. Ensure all relevant elements are editable and retry.