074 View Renamer
Chris McKeown / July 1, 2025
Standards
Overview
The View Renamer renames one or many Views at once by building a new name from a configurable sequence of View parameters and fixed text fields. Modifiers let you crop, find-and-replace, insert, and change the case of the name before it is applied. Views placed on Sheets are shown in red as a warning — they can still be renamed but the change will affect the Sheet viewport label.
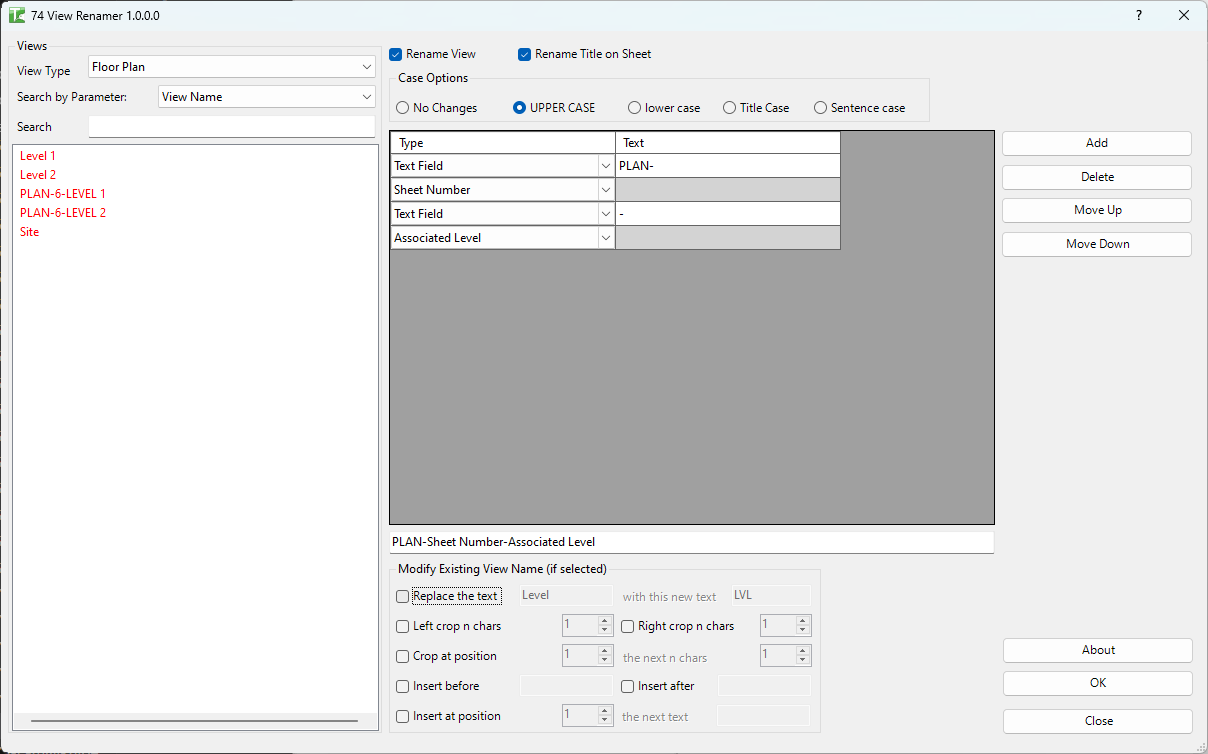
Table of Contents
Key Features
- Filter views by View Family Type using the View Type dropdown
- Filter view list by name using the Search field
- Build the new name from a sequence of rows — each row is either a Text Field (fixed text) or a View Parameter value
- Add and reorder name segment rows in the grid
- Find and Replace in the View Name parameter value before assembling
- Left Crop N Chars — remove N characters from the start of the current view name
- Right Crop N Chars — remove N characters from the end
- Crop at Position — remove N characters starting at a specific character position
- Insert Before / Insert After — prepend or append fixed text to the view name
- Insert at Position — insert text at a specific character index
- Case conversion: No Changes, UPPERCASE, lowercase, Title Case, Sentence case
- Option to rename the View Name and/or the Title on Sheet independently
- Views placed on Sheets are shown in red as a warning
- Live Example preview of the assembled name based on a sample view
- Progress bar with cancel support for bulk operations
Requirements
- The project must be open and contain at least one View of the selected type
- Cannot be run from a Family document
- Views on Sheets can be renamed but the change affects the viewport title — confirm with the documentation team before bulk-renaming issued views
Running the Tool
Launch
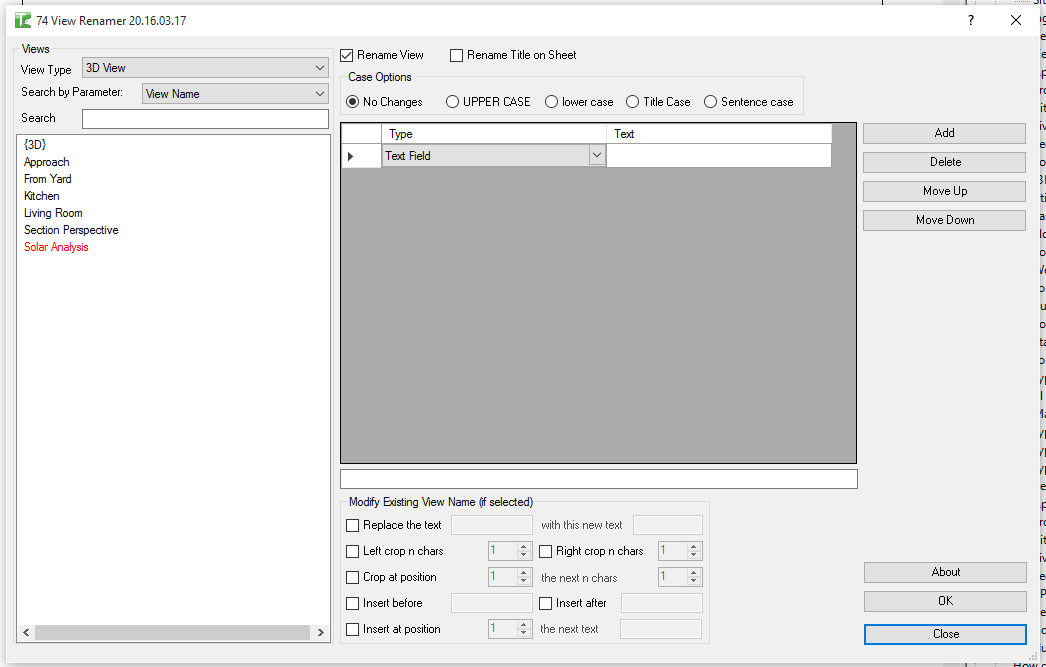
Find View Renamer on the Bonus Tools ribbon or use 115 Search Tools. The dialog opens showing the View Type selector and an empty name-building grid.

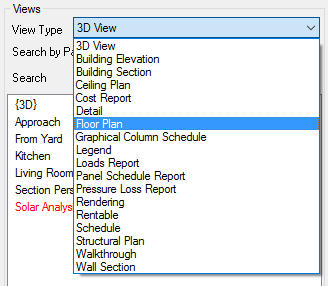
Step 1 — Select the View Type
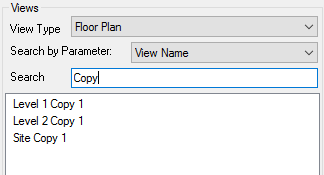
Use the View Type dropdown to select which family type of views to work with (e.g. a specific Floor Plan type, a Section type). The Views list on the left populates with all non-template views of that type. Views shown in red are already placed on Sheets.
Use the Search field to filter the view list by name.
Step 2 — Select Views to Rename
Click individual views in the list to select them, or use Ctrl+Click / Shift+Click for multi-select. Selected views will be renamed when you click OK.
Step 3 — Build the Name
The grid in the centre of the dialog defines how the new name is assembled. Each row contributes one segment to the final name in sequence:
- Change the Type column dropdown to Text Field to enter a fixed string in the Text column.
- Change the Type dropdown to a View parameter name to insert that parameter's value at this position.
- Add rows to build more complex names. The Example field at the bottom shows a live preview.
Step 4 — Apply Modifiers (Optional)
Use the modifier checkboxes to transform the View Name parameter value before it enters the assembled name:
| Modifier | Effect |
|---|---|
| Replace the text | Find/replace within the existing view name |
| Left Crop N Chars | Remove N characters from the start |
| Right Crop N Chars | Remove N characters from the end |
| Crop at position / N chars | Remove N characters starting at character index |
| Insert Before | Prepend fixed text |
| Insert After | Append fixed text |
| Insert at position | Insert text at a specific character index |
These modifiers only apply to the View Name parameter segment. Other parameter values are used as-is.
Step 5 — Set Case and Rename Target
Select the case conversion radio button:
- No Changes — keeps the assembled name as-is
- UPPERCASE — converts the entire result to uppercase
- lowercase — converts to lowercase
- Title Case — capitalises the first letter of each word
- Sentence case — capitalises only the first letter of the first word
Use the Rename View and Rename Title on Sheet checkboxes to control which name fields are updated. Both can be active simultaneously.
Step 6 — Apply
Click OK to rename all selected views. A progress bar tracks the operation. On completion, a summary reports how many views passed and failed. The view list refreshes to show the updated names.
Tips and Best Practices
- Use the Example field to verify before running. The live preview updates as you change the grid — check it against several view names before applying to a large selection.
- Views in red are on Sheets. Renaming them changes the viewport title on every sheet the view appears on. Confirm this is intentional before proceeding.
- Crop and insert modifiers only affect the View Name parameter. If you are using other parameters as name segments, those values are used verbatim.
- Use Sentence case for readable names. When migrating from all-caps names to a more readable format, Sentence case is the quickest conversion to apply in bulk.
- Filter the view list before selecting. Use the Search field to narrow the list to a specific series or level, then Select All visible items to avoid accidentally renaming unrelated views.
- Rename Title on Sheet independently. If you want the internal view name to follow a code-based convention but the Sheet viewport title to be human-readable, use Insert After or a separate Text Field row to build a descriptive title.
Common Use Cases
Standardising existing names — Select all Floor Plans, use Find and Replace to swap an old prefix for a new one, and run. Hundreds of views are updated in seconds.
Inserting a project code prefix — Add a Text Field row as the first segment with the project number, followed by a separator Text Field (_), then the View Name parameter. All selected views are prefixed with the project code.
Converting to UPPERCASE — Select all views of a type, leave the name grid as a single View Name row, and choose the UPPERCASE radio button. Applies casing consistently across the set.
Cropping redundant prefixes — If views were created with an extra prefix (e.g. COPY OF from a duplicate operation), use Left Crop with N = 8 to strip it from all affected views at once.
Renaming Title on Sheet only — Uncheck Rename View and check Rename Title on Sheet only. The internal view name remains unchanged while the sheet viewport titles are updated for a documentation issue.
Troubleshooting
Views list is empty after selecting a View Type No non-template views of that type exist in the project. Select a different View Type or create views of the required type first.
Example field is blank No rows have been added to the name grid. Add at least one row (View Name parameter or Text Field) for the preview to populate.
"Renaming Views failed. Gain ownership of elements and try again" In a workshared model, another user has ownership of the views. Synchronise with central, resolve ownership, and retry.
Some views fail with an error about duplicate names The assembled name already exists for another view of the same type. Use the Insert After modifier to add a unique suffix, or the Find and Replace modifier to make names distinct before running.
Red views are renamed even though I expected a warning The red colour is a visual warning that the view is on a sheet — it does not prevent renaming. Deselect red rows before clicking OK if you do not want to rename views currently placed on sheets.