073 Unused Elevation Markers
Chris McKeown / July 1, 2025
Review Views
Overview
Unused Elevation Markers lists all Elevation Markers in the project that have no associated elevation views. These orphaned markers are invisible in most workflows but can accumulate over time and cause confusion during model coordination. The tool lets you review them, navigate to their location in the model, and delete them in bulk.
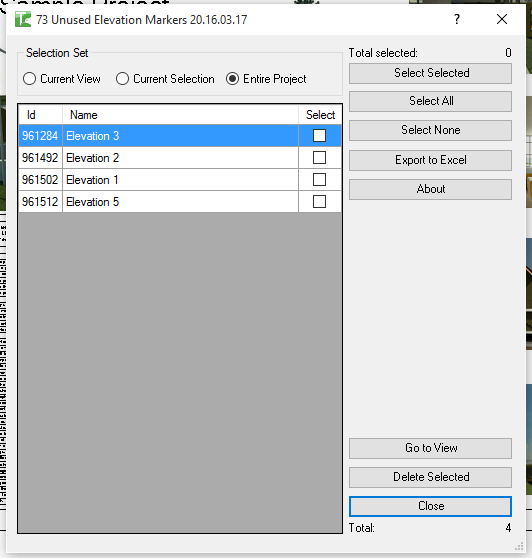
Table of Contents
Key Features
- Finds all Elevation Markers in the project that have no elevation views (
HasElevations() == false) - Scope filter: search the Entire Project, the Current View, or the Current Selection
- Grid display shows Element ID and Marker Name for each unused marker
- Select All / Select None / Toggle Selected buttons for batch selection
- Count and Selected labels update dynamically as you check rows
- Go to View navigates to the selected marker(s) in the Revit canvas
- Delete Selected removes chosen markers after a confirmation prompt
- Isolate hides non-selected rows to focus on the current subset
- Reset reloads the grid from the project
- Export to Excel or CSV for external review
- Progress bar with cancel support during loading and deletion
Requirements
- The project must be a non-Family document
- For Current View filtering, a view must be active
- For Current Selection filtering, elements must be selected in Revit before launching the tool
- To delete markers, the user must have ownership of the affected elements (in a workshared environment)
Running the Tool
Launch
Find Unused Elevation Markers on the Bonus Tools ribbon or use 115 Search Tools. The dialog opens and immediately loads all unused markers from the Entire Project into the grid.
Step 1 — Choose a Scope
Use the radio buttons to filter which markers are shown:
| Option | Description |
|---|---|
| Entire Project | All unused markers in the model |
| Current View | Only markers in the currently active view |
| Current Selection | Only markers within the current Revit selection |
Changing the radio button immediately reloads the grid.
Step 2 — Review the Markers
The grid lists the Element ID and Name of each unused marker. Click any column header to sort. Use Go to View with a row checked to navigate to that marker in Revit and confirm it is safe to delete.
Step 3 — Select Markers to Delete
Use the checkboxes to mark markers for deletion. Select All and Select None provide fast batch options. The Selected count updates as you check rows. Use Isolate to hide unchecked rows and focus on the current selection.
Step 4 — Delete Selected
Click Delete Selected. A confirmation dialog asks you to confirm before proceeding. The tool then iterates through each selected row and deletes the corresponding marker. Each successful deletion is logged to the Output window in green. Failed deletions (e.g. ownership conflicts) are logged in red.
On completion, a summary shows the count of passed and failed deletions, and the grid is updated to remove the deleted rows.
Step 5 — Export (Optional)
Click Export to Excel or Export to CSV to save the current grid contents for documentation or coordination. This is useful before deletion to record what was removed.
Tips and Best Practices
- Run at project milestones. Unused elevation markers accumulate silently. Schedule a cleanup before each issue to keep the model tidy.
- Use Go to View before deleting. Navigate to each marker to confirm it is truly unwanted — an unused marker may be intentionally placed and awaiting a view to be added.
- Filter by Current View for targeted cleanup. When reviewing a specific area of the building, scope to Current View to avoid scrolling through project-wide results.
- Export before bulk deletion. Save a CSV record of the deleted elements for audit purposes, particularly on BIM-managed projects.
- In workshared projects, ensure ownership first. If deletion fails, use the Synchronise with Central and check out the elements before retrying.
- Reset after changes. If you delete markers outside the tool, click Reset to refresh the grid and avoid attempting to delete already-deleted elements.
Common Use Cases
Pre-issue model audit — Before issuing for coordination or construction, run the tool to find and remove all unused elevation markers, reducing visual clutter in plan views.
Model hand-over preparation — Clean up the model before handing over to a client or contractor by removing orphaned annotation elements that serve no documentation purpose.
Design development cleanup — During early design, teams place elevation markers to explore options and then delete the views when options are abandoned. The markers often remain. This tool catches them all at once.
Quality control reporting — Export the list to Excel as part of a model health report, documenting the number of unused markers found and removed.
Troubleshooting
Grid loads but shows zero rows There are no unused elevation markers in the selected scope. Either all markers have associated elevation views, or the scope (Current View / Current Selection) contains no relevant elements.
"Are you sure" confirmation does not appear on Delete Ensure at least one row is checked. The Delete button only prompts for confirmation when one or more rows are selected.
"Elevation Marker Deletion failed. Gain ownership of elements and try again" In a workshared model, another user has ownership of the markers. Synchronise with central, request or borrow the elements, and retry.
Go to View navigates to the wrong location The element ID is used to locate the marker. If the active view does not contain the marker, Revit may open a different view. The tool selects the element in the active session — switch to a plan view that shows the marker's location if navigation does not centre on it.
Export produces an empty file The grid is empty or no rows are visible due to the Isolate function. Click Reset to reload all rows, then export.