072 Workset Creator
Chris McKeown / July 1, 2025
Power
Overview
The Workset Creator enables worksharing and creates multiple Worksets in a single operation, based on a reusable XML template. Each workset entry includes a name and a default visibility setting. Templates can be saved, loaded, and shared across projects to ensure consistent workset structures are applied to every model from the start.
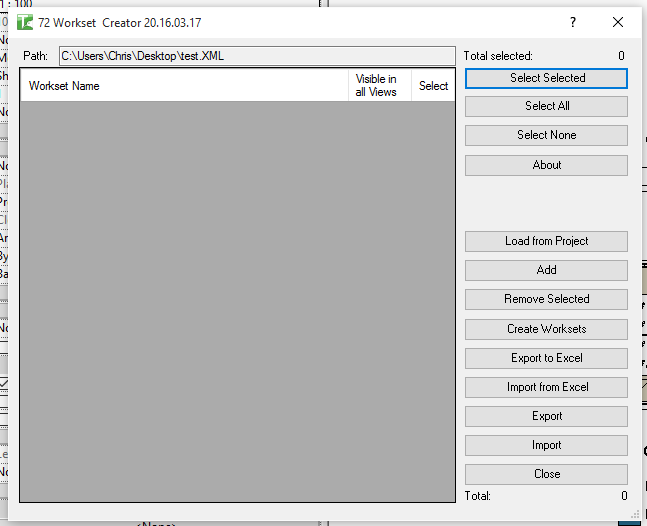
Table of Contents
Key Features
- Creates multiple Worksets in a single transaction
- Automatically enables worksharing if the project is not yet workshared
- Per-workset Visible in All Views toggle controls the workset's default visibility setting
- Load from Project button imports the existing worksets from the current project into the grid
- Add worksets manually via the Add button
- Remove selected worksets via the Remove Selected button
- Export the workset list as an XML template for reuse across projects
- Import a previously saved XML template to populate the grid
- Select All / Select None / Toggle Selected buttons for batch operations
- Progress bar with cancel support for large workset sets
- Skips worksets that already exist, preventing duplicate creation errors
Requirements
- Requires Revit 2016 or newer
- The project must be open and saved before enabling worksharing
- Only User Worksets are created — system worksets (Shared Levels and Grids, etc.) are managed by Revit automatically
- The first workset name created when enabling worksharing becomes the initial user workset name
Running the Tool
Launch
Find Workset Creator on the Bonus Tools ribbon or use 115 Search Tools. The dialog opens showing the workset grid. If the tool finds a previously saved template path, it loads those worksets automatically.

Step 1 — Populate the Workset List
There are three ways to populate the grid:
Import from XML template — Click Import and browse to a previously saved XML file. The grid populates with all worksets from that template.
Load from Project — Click Load from Project to pull the existing worksets from the current Revit model into the grid. Useful for auditing or updating an existing workset structure.
Add manually — Click Add to insert a blank row. Type the workset name directly in the WorksetName column and toggle the Visible in All Views checkbox as required. Click Remove Selected to delete unwanted rows.
Step 2 — Review Visibility Settings
The Visible in All Views column controls each workset's default visibility. Check this box for worksets that should be visible in all views by default (e.g. structural elements, primary building fabric). Uncheck for worksets that are hidden by default (e.g. annotation, temporary elements).
Step 3 — Select Worksets to Create
Use the checkboxes in the Select column to mark which worksets to create. Use Select All, Select None, or Toggle Selected for batch operations. The Selected and Count labels update dynamically.
Step 4 — Create Worksets
Click Create Worksets. The tool:
- Checks if the project is workshared. If not, it automatically calls Revit's Enable Worksharing function using the first selected workset name as the initial workset.
- Iterates through all selected rows and creates each workset.
- Sets the default visibility as configured.
- Skips worksets that already exist by name.
A progress bar tracks progress. Click Cancel to stop early. On completion, a confirmation message reports the count of worksets created.
Step 5 — Export the Template (Optional)
Click Export to save the current grid as an XML file. Store this file in a shared location so the team can use the same workset structure on all future projects.
Tips and Best Practices
- Define the standard workset structure in the XML template before starting a project. Import it on day one to ensure consistent worksets are applied across all disciplines from the beginning.
- Use the Visible in All Views setting deliberately. Worksets that are hidden by default must be explicitly turned on per-view — useful for phasing or temporary scope items, but can cause confusion if applied too broadly.
- The first workset enables worksharing. When the project is not yet workshared, the tool uses the first selected workset to call Enable Worksharing. Ensure the first row is a meaningful workset name (e.g.
Architecture). - Load from Project before re-running. If you need to add new worksets to an existing workshared model, load the current worksets first to avoid unintentional duplicates.
- Store XML templates in the BIM Standards folder. Keeping templates with other standards files ensures the whole team uses the same workset names and spellings.
- Skipped worksets are not an error. If a workset already exists, the tool silently skips it. The count reported at the end reflects only newly created worksets.
Common Use Cases
New project setup — Import the studio XML template immediately after creating a new Revit file. Worksharing is enabled and all standard worksets are created in seconds.
BIM Execution Plan compliance — Define worksets per the BIM Execution Plan requirements and save as an XML. All project models are set up with identical workset structures, supporting federated model coordination.
Workset audit — Use Load from Project to export the current workset structure of an existing model to XML for review or comparison against the standard template.
Federated model coordination — Use identical XML templates across architectural, structural, and MEP models so workset names and visibility defaults are consistent when models are linked together.
Troubleshooting
"Can not enable Worksets, please try manually enabling worksets to proceed" Revit cannot enable worksharing automatically. This can happen if the file is a linked file, read-only, or has not been saved. Save the file and try again, or enable worksharing manually via the Collaborate tab before running the tool.
"Operation Failed" / "Workset Creation failed. Gain ownership of elements and try again" Another user has ownership of the model elements needed to create worksets. Synchronise with central, resolve ownership conflicts, and retry.
Worksets not appearing after creation Revit may require a synchronise-with-central or save operation before newly created worksets are fully visible. Save the file and check the Worksets dialog (Manage → Worksets).
Import button does nothing The XML file selected does not contain valid workset data. Verify the file was exported by the Workset Creator tool and has not been manually edited in a way that breaks the XML structure.
"Settings Exported" message but file not found Check that the export path is accessible and that you have write permissions to the selected directory.