053 Show Warnings
Chris McKeown / July 1, 2025
Power
Overview
Show Warnings imports a Revit warnings HTML export, displays every warning with its associated element IDs in a filterable grid, then isolates and colour-highlights the flagged elements in the active view. Optionally it writes the Element ID and warning description to custom shared parameters — making warnings visible directly on elements and taggable with multi-category tags.
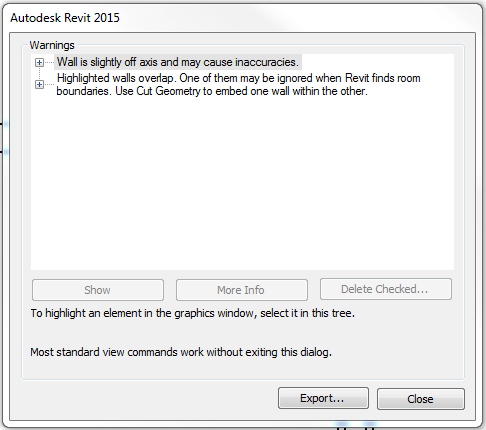
Table of Contents
Key Features
- Imports Revit's exported warnings HTML file to populate the grid
- Displays Warning description and Elements (element IDs) for every warning in the file
- Configurable override colours for cut fill, cut line, projection fill, and projection line independently
- Isolates flagged elements temporarily in the active view
- Writes the Element ID to a selected shared parameter for later filtering or tagging
- Writes the warning description to a second shared parameter — multiple warnings for the same element are concatenated
- Clear Elements in View button resets parameter values back to empty for all elements in the current view
- Bulk selection: Select All, Select None, Select Selected (toggle highlighted rows)
- Isolate button hides unchecked warning rows to narrow focus
- Reset reloads the warnings file
- Compatible with Revit 2014 and newer
Requirements
- A Revit warnings export HTML file must be generated first via Manage Tab → Review Warnings → Export
- An active view must be open to receive the element isolation and colour overrides
- To use the parameter-writing features, the project must contain at least one writable shared or project parameter on the affected element categories
- Elements inside Groups cannot have parameters written to them (they are skipped)
- Compatible with Revit 2014 and newer
Running the Tool
Step 1 — Export Warnings from Revit
Before launching the tool, export the current warnings from Revit:
- Go to the Manage tab → Review Warnings
- Click Export and save the file as an HTML file to a known location
Step 2 — Open a Suitable View
Navigate to a view that contains the elements you want to highlight. The tool will apply a temporary isolation and graphic overrides to this view, so use a working view rather than a sheet view.
Step 3 — Launch the Tool
Find Show Warnings on the Bonus Tools Ribbon (Power Tab) or use 115 Search Tools.
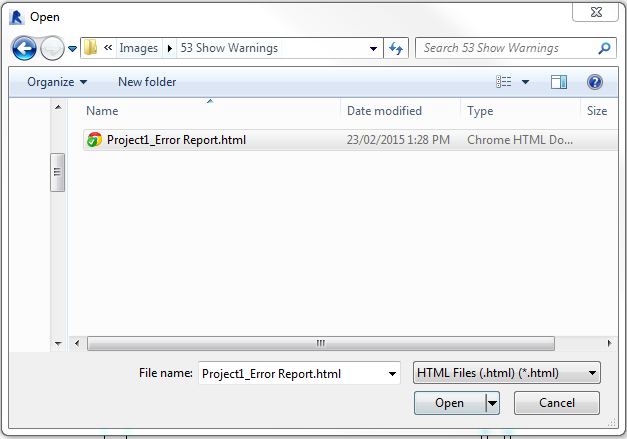
A file browser opens immediately — select the HTML warnings file exported in Step 1.
The dialog loads with the warnings grid populated.
Step 4 — Select Warnings to Highlight
Review the grid which shows Warning (description) and Elements (element ID references). Check the Select checkbox for each warning to process:
- Select All — checks every warning row
- Select None — unchecks all rows
- Select Selected — toggles highlighted rows
- Isolate — removes unchecked rows from the visible list
Step 5 — Configure Highlight Colours
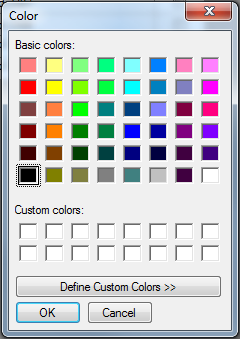
Choose colours for the graphic override applied to flagged elements:
- Line Colour — sets the line colour (default: red)
- Filled Colour — sets the fill colour (default: green)
In the Cut group, toggle Fill Color and Line Color to control which cut graphics are overridden.
In the Projection group, toggle Fill Color and Line Color to control which projection graphics are overridden.
Step 6 — Configure Parameter Writing (Optional)
In the panel on the right side:
- Add Element Id to Parameter — enable this checkbox, then select the target shared parameter from the dropdown. The Element ID of each flagged element is written to this parameter.
- Add Warning to Parameter — enable this checkbox, then select the target parameter for the warning text. Multiple warnings per element are concatenated with " - " separators.
These parameters can then be used with multi-category tags to display warnings directly on the affected elements in the view.
Step 7 — Apply
Click OK. The tool:
- Isolates all flagged elements temporarily in the active view
- Applies the chosen colour overrides to each element
- Writes parameter values (if enabled) to each non-grouped element
- Adds the flagged elements to the Revit selection set
A message reports the total number of elements found with warnings, plus a count of any grouped elements that were skipped for parameter writing.
Clearing Parameter Values
To reset the written parameters back to empty for all elements visible in the current view, click Clear Elements in View before clicking OK.
Tips and Best Practices
- Use a dedicated working view. Graphic overrides and temporary isolation persist in the view. Use a view created specifically for warning review rather than a production view.
- Export warnings immediately before running. The HTML file is a snapshot — if the model changes after export, the file may reference elements that no longer have warnings or no longer exist.
- Set up shared parameters before running. The parameter dropdown is populated from existing project/shared parameters. Add the target parameters to your template or project before launching.
- Grouped elements are skipped for parameter writing. Ungroup elements if you need parameters written to them, then re-group after.
- Sort the grid by Warning column. Click the Warning column header to group similar warnings together, making it easier to select all instances of a specific warning type.
- Combine with tool 120 Dynamic Warnings for a live warning workflow — use Show Warnings for batch highlighting and Dynamic Warnings for real-time monitoring.
Common Use Cases
Highlighting all duplicate Mark warning elements on a floor plan — Export warnings, open the relevant floor plan view, run Show Warnings, select only the "Elements have duplicate 'Mark' values" warning rows, and click OK. All affected elements are isolated and coloured red, making them immediately identifiable for manual correction.
Tagging elements with their warning descriptions — Set up a shared text parameter (e.g. BT_Warning) on the relevant categories, enable Add Warning to Parameter, and run the tool. Place multi-category tags referencing BT_Warning to show the warning text directly on elements in the view.
Auditing a model before issue — Run Show Warnings before each project milestone to visually inspect and categorise all outstanding warnings. Export the grid to Excel for a record of warning counts per type.
Troubleshooting
The file browser opens but no warnings appear after selecting the file The exported file may be empty (no warnings in the project) or may not be the correct Revit HTML warnings export format. Re-export from Manage → Review Warnings and ensure you save as HTML.
Elements are not isolated / colours not applied The element IDs in the warnings file may not correspond to elements visible in the current view, or those elements may be in a category with overrides locked. Try switching to a view that contains all model elements (e.g. a 3D view).
"X Elements are within Groups. Parameters have not been set." Elements in Revit Groups cannot have parameters written to them. Ungroup the elements, re-run, then re-group if needed.
The parameter dropdown is empty No shared or project parameters exist in the project yet. Add the required parameters to the project before running the tool.
Colour overrides are applied but the view looks unchanged The view may have View Template overrides preventing graphic changes. Detach the View Template from the view, apply the tool overrides, then re-attach the template.