051 Copy Areas
Chris McKeown / July 1, 2025
Time Saving
Overview
Copy Areas bridges a gap in native Revit functionality by allowing Areas to be duplicated from one Area Scheme to another. Select Areas from the current view or from a manual selection, then choose the target Area Scheme and destination view — the tool places new Areas at the same XY positions and copies all parameters across in a single operation.
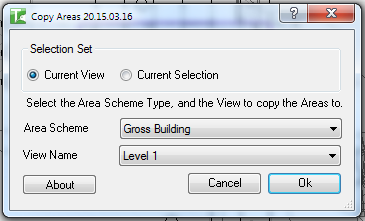
Table of Contents
Key Features
- Copies Areas between different Area Schemes — a task not possible natively in Revit
- Two scope modes: Current View (all Areas in the active Area Plan) or Current Selection (manually pre-selected Areas)
- Target Area Scheme and destination view selected via dropdowns, populated automatically from the project
- Copies all parameter values from source to destination Area
- Progress bar with cancel support for large sets
- Reports passed and failed counts on completion
- Handles workshared ownership gracefully — reports individual failures without aborting the entire operation
Requirements
- Must be run in a project file (not a Family document)
- The project must contain at least one Area Plan view
- Area Boundary Lines must already exist in the destination Area Plan view to contain the new Areas
- For Current Selection mode, Areas must be pre-selected in Revit before launching the tool
- Compatible with Revit 2014 and newer
Running the Tool
Launch
Find Copy Areas on the Bonus Tools Ribbon or use 115 Search Tools.
Step 1 — Choose the Selection Scope
In the Selection Set group at the top of the dialog, choose how to identify the Areas to copy:
- Current View — copies all Areas visible in the currently active Area Plan view (default)
- Current Selection — copies only the Areas you pre-selected in Revit before opening the dialog
Step 2 — Select the Target Area Scheme
Use the Area Scheme dropdown to select the destination Area Scheme. The list is populated from all Area Schemes that have Area Plan views in the project. Changing this selection automatically refreshes the View Name list below.
Step 3 — Select the Destination View
Use the View Name dropdown to pick the specific Area Plan view within the chosen scheme where the copied Areas will be placed.
Step 4 — Run the Copy
Click Ok. A progress bar appears while Areas are copied one by one. Click Cancel at any time to stop — completed Areas are retained, remaining Areas are not processed.
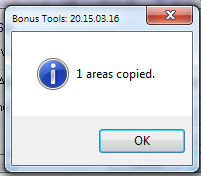
A message box reports the number of Areas that passed and failed.
Tips and Best Practices
- Prepare area boundaries first. The destination Area Plan view must have closed Area Boundary Lines at the same XY positions as the source, otherwise Area placement will fail.
- Use Current Selection for partial copies. Pre-select only the Areas you need before launching to avoid copying the entire scheme.
- Gain ownership before running in workshared models. Areas owned by another user will fail individually and be counted in the failed total. Synchronise and obtain ownership first.
- All parameters carry over. Custom shared parameters are copied alongside built-in ones. Confirm the destination Area type supports the same parameters.
- Run from the source Area Plan. For Current View mode, the active view must be the Area Plan you want to copy from.
Common Use Cases
Duplicating a Gross Area scheme into a Net Area scheme — Draw Area Boundary Lines in the target Net Area Plan, then run Copy Areas from the Gross Area Plan to replicate all Areas with names and numbers in one pass.
Migrating Areas after a project phase change — When a new Area Scheme is added for a later phase, use Copy Areas to seed it with existing boundaries and data rather than re-creating each Area manually.
Copying a subset of Areas across schemes — Pre-select only the Areas for a specific zone or floor in Current Selection mode, then copy them into the equivalent Area Plan for another scheme.
Troubleshooting
No Area Schemes appear in the dropdown The project has no Area Plan views. Create an Area Scheme and at least one Area Plan view under that scheme before running the tool.
High failed count in the result message The destination Area Plan view lacks closed Area Boundary Lines at the positions of the source Areas. Add the required boundary lines and re-run.
"Copy Areas failed. Gain ownership of elements and try again." Another user owns the elements in a workshared model. Reload Latest, synchronise, and gain ownership before running the tool.
Progress completes but no new Areas appear in the destination view Check that the selected View Name belongs to the selected Area Scheme. A mismatch means no valid target is found and all copies fail silently.