050 Import/Export Points
Chris McKeown / July 1, 2025
Time Saving
Overview
Import/Export Points lets you move point coordinate data in and out of a Revit project via a plain-text file. Export collects the X, Y, Z positions of elements from a chosen category and writes them to a comma-separated text file. Import reads that file (or any compatible CSV) and places a selected family type at each coordinate, applying an optional rotation. This eliminates manual coordinate entry and makes it straightforward to round-trip survey data or coordinate lists between Revit and external tools.
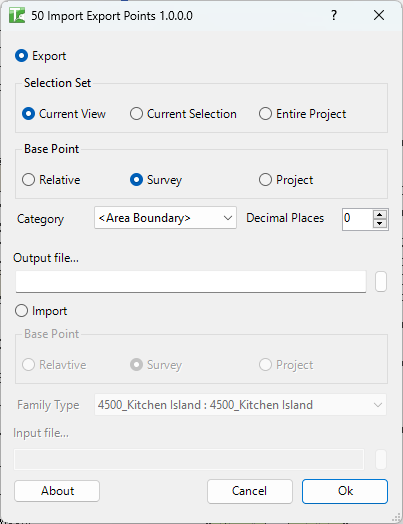
Table of Contents
Key Features
- Two-mode operation — Export and Import switchable via radio buttons
- Scope selection for export: Current View, Current Selection, or Entire Project
- Category dropdown populated from elements in the selected scope
- Configurable coordinate system for both export and import: Survey Point, Project Base Point, or Relative
- Adjustable decimal places for exported coordinates
- Import places any loaded family type chosen from a dropdown (listed as
FamilyName : TypeName) - Optional fourth column in the input file sets per-point rotation in degrees
- Progress bar with cancel support for large datasets
- Completion message reports count of exported points or placed/failed placements
Requirements
- Must be run in a project document — not available in the Family Editor
- Export: at least one element with a point-based location in the selected scope and category
- Import: the target family must already be loaded in the project; input file must be a
.txtfile with comma-separated values - Output file for export must be a valid writable path (use the browse button to create or select the file)
Running the Tool
Launch
Find Import/Export Points on the Bonus Tools ribbon or use 115 Search Tools.
The dialog opens in Export mode by default.
Step 1 — Choose Mode
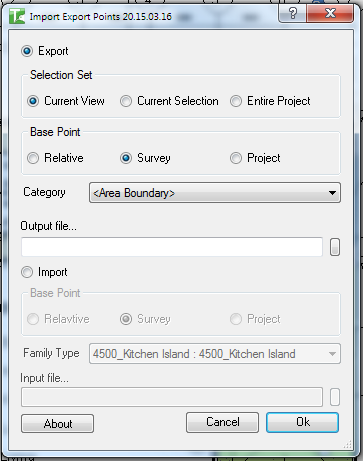
Select either the Export or Import radio button at the top of the dialog.
- Export enables the Selection Set, Category, decimal places, and Output File controls.
- Import enables the Input File and Family Type controls.
Step 2 (Export) — Configure Export Options
Selection Set — choose which elements to include:
| Option | Description |
|---|---|
| Current View | Elements visible in the active view |
| Current Selection | Elements currently selected in Revit |
| Entire Project | All elements in the document |
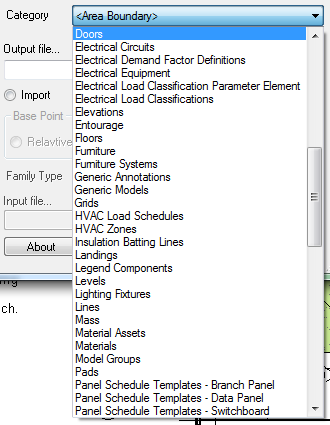
Category — the dropdown lists every category found in the selected scope. Select the category whose elements you want to export.
Decimal Places — set the number of decimal places for the exported coordinates.
Base Point — choose the coordinate origin:
| Option | Description |
|---|---|
| Survey Point | Coordinates relative to the project Survey Point (true coordinates) |
| Project Base Point | Coordinates offset by the Project Base Point E/W, N/S, and Elev values |
| Relative | Internal Revit coordinates with no project location transform |
Output File — click the browse button and choose or create a .txt file. The path is shown in the text box.
Click OK to run the export. A progress bar tracks each element. A message confirms the number of points exported.
Step 3 (Import) — Configure Import Options
Input File — click the browse button and select the prepared .txt file. Each line must contain X,Y,Z or X,Y,Z,Rotation (rotation in decimal degrees; omit for 0°).
Base Point — choose the coordinate system the input file coordinates are expressed in (Survey Point, Project Base Point, or Relative).
Family Type — select the loaded family type to place at each coordinate. The dropdown lists all FamilyName : TypeName combinations in the project.
Click OK to run the import. A progress bar tracks each line. A message reports how many points were placed and how many failed.
Tips and Best Practices
- Match base points on round-trips. If you export using Survey Point, import using Survey Point. Mixing base point modes will shift all placed elements.
- Prepare the import file carefully. Each line must have exactly three or four comma-separated numeric values. Extra spaces, blank lines, or non-numeric values will cause individual point failures counted in the "failed" total.
- Load the destination family before importing. The family must be loaded and the type must appear in the Family Type dropdown. Import will fail entirely if no matching symbol is found.
- Use decimal places appropriate for your units. For metric projects in metres, 3–4 decimal places gives sub-millimetre accuracy.
- Current Selection scope is fastest for spot-checking. Select a handful of elements before launching the tool, switch to Current Selection, and export to verify coordinates before running the full project export.
- Rotation is in decimal degrees. If your source data includes a rotation angle (column 4), the placed family instance will be rotated about the Z axis by that amount. Ensure angles are in decimal degrees, not radians.
Common Use Cases
Exporting survey peg locations — Set scope to Entire Project, select the survey marker category, choose Survey Point coordinates, and export. The resulting file can be sent to a surveyor or imported into civil engineering software.
Placing site elements from a civil survey CSV — Convert a surveyor's coordinate list to X,Y,Z format (one point per line), import using Survey Point base, and select a generic marker family. All pegs appear at their correct true-coordinate positions.
Copying element locations between models — Export point locations from one model using Relative coordinates, then import into the receiving model with the same Relative setting to place elements at equivalent internal positions.
Verifying setout points — Export a category, open the file in a spreadsheet, and compare values against design coordinates to spot discrepancies before construction.
Batch placing repetitive families — Prepare a coordinate list for repetitive elements (e.g. light fittings, column bases) and import them all in one operation rather than placing each one manually.
Troubleshooting
"Please select a valid file." The path in the Output File (export) or Input File (import) box does not point to an existing file. For export, use the browse button to create a new file. For import, browse to an existing file.
"File is in use. Please check." The selected input file is locked by another application (e.g. open in Excel). Close the file in the other application and try again.
"Family not found."
Import could not locate a family matching the selected Family Type. Ensure the family is loaded and the correct FamilyName : TypeName entry is selected in the dropdown.
High failure count on import Each failed line is counted but does not abort the import. Check the input file for non-numeric values, extra columns, missing commas, or lines with fewer than three values.
Points appear in the wrong location The Base Point setting used during import does not match the coordinate system of the file. Re-run the import with the correct Base Point mode.
Tool not available The tool cannot run in the Family Editor. Open or switch to a project document and try again.