049 Room/Area Location Point
Chris McKeown / July 1, 2025
Time Saving
Overview
Room/Area Location Point moves the location point of Rooms, Areas, and MEP Spaces to the centre of their bounding box. In Revit, room and area tags follow the element's location point, which can drift off-centre after boundary changes or imports. This tool corrects all affected elements in one operation, eliminating the tedious manual work of repositioning each tag individually. Results are reported separately for areas, rooms, and spaces.
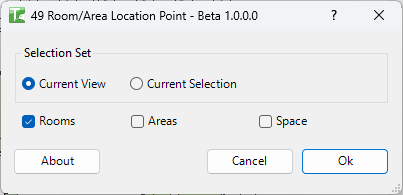
Table of Contents
Key Features
- Bounding box centring — calculates the geometric centre of each element's bounding box and moves the location point to that position
- Rooms, Areas, and Spaces — process any combination of the three spatial element types independently
- Selection Set scope — Current View or Current Selection
- Separate pass/fail counts — results reported independently for Areas, Rooms, and Spaces
- Progress bar with cancel — tracks operation and allows stopping mid-run
Beta: This tool is marked as Beta. Elements whose centroid falls outside the room/area boundary (e.g., L-shaped rooms or rooms with irregular boundaries) may not be repositioned successfully, and no change will be made to those elements.
Requirements
- Project document (not available in the Family Editor)
- Rooms, Areas, or Spaces must be placed and bounded in the project
- The active view must be a plan view showing the relevant elements
- A valid Kiwi Codes Bonus Tools licence must be active
Running the Tool
Launch
Find Room/Area Location Point on the Bonus Tools Ribbon or use 115 Search Tools.

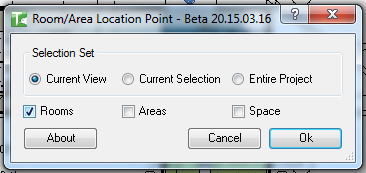
Step 1 — Choose Selection Set
| Option | Elements included |
|---|---|
| Current View | Rooms/areas/spaces visible in the active view |
| Current Selection | Rooms/areas/spaces currently selected in Revit |
Step 2 — Choose element types
Tick one or more of Rooms, Areas, and Space to include that element type in the operation.
Step 3 — Click OK
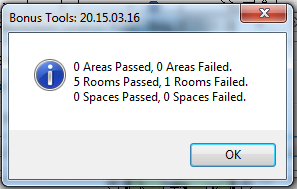
Click OK. A progress bar tracks the operation as the tool processes each selected element type.
A confirmation reports results for each type:
X Areas Passed, Y Areas Failed. Z Rooms Passed, W Rooms Failed. V Spaces Passed, U Spaces Failed.
Tips and Best Practices
- Run on Current View for targeted control. Open a plan view showing only the rooms you want to centre and use Current View to limit processing to those elements.
- Use Current Selection for specific rooms. Select only the rooms whose tags are visibly off-centre rather than running on the entire project, especially in large or complex projects.
- Non-rectangular rooms may not centre correctly. For L-shaped, T-shaped, or irregularly bounded rooms, the bounding box centre may not be inside the room boundary. The tool will skip those elements (the "Failed" count). Reposition those tags manually.
- Run after boundary changes. Whenever room boundaries are modified (walls moved, room separations adjusted), re-run this tool to correct any location points that shifted as a result.
- Undo is available. Each room is processed in its own transaction ("Center Room Area Points"). Multiple Ctrl+Z presses are needed to fully undo a run across many elements.
Common Use Cases
Post-import tag correction — After importing a model or migrating from another file, room and area tags are often misplaced. Run Room/Area Location Point on the Current View to centre all tags at once rather than moving each one manually.
Bulk tidy-up after design changes — After a round of room boundary modifications, run the tool across the full floor plan to reset all location points to their centres simultaneously.
MEP space coordination — For MEP models with spaces that have drifted off-centre, run on the Spaces checkbox to correct all space reference points used for load calculations and equipment scheduling.
Documentation issue preparation — Before issuing drawings, run Room/Area Location Point to ensure all room tags are centred in their rooms for a clean, professional sheet presentation.
Troubleshooting
"No Elements found." No rooms, areas, or spaces matching the selection set and checked types were found. Verify the active view contains the expected elements, or switch to Current View from Current Selection.
"Operation Failed." An unexpected error occurred during processing. Check the Revit journal for details.
"Y Rooms Failed." with failures Rooms whose calculated bounding box centre falls outside the room boundary cannot be repositioned — the transaction is rolled back for those elements. Common causes: very irregular room shapes, L-shaped rooms, rooms with internal voids, or rooms owned by another user in a workshared model.
Tags still appear off-centre after running The room tag may be pinned or the tag's position may be set independently of the location point. Unpin the tag in the view and re-run, or manually drag the tag to the centre after running.
Room/Area elements exist but tool reports 0 processed The elements may be in a different phase, not visible in the active view, or owned by another user. Check the view's phase settings and gain ownership if needed in a workshared model.