048 Location Point
Chris McKeown / July 1, 2025
Parameters
Overview
Location Point reads the location point (or start point of a location curve) and rotation of elements in a selected category and writes the coordinates to parameters. You choose Survey, Project, or Relative coordinates, and whether to store XYZ as a single combined value or in separate X, Y, Z parameters. Rotation is written independently to a chosen parameter. This is useful for structural and civil coordination, asset management databases, and any workflow that requires element positions in a parameter-readable format.

Table of Contents
Key Features
- Three coordinate systems — Relative (internal Revit), Survey (real-world survey), or Project (relative to Project Base Point)
- Combined or separate XYZ — store X, Y, Z as a single "X, Y, Z" string in one parameter, or store each axis in a dedicated parameter
- Rotation capture — optionally write the element's rotation (derived from Project Base Point angle) to a separate parameter
- Decimal places control — configurable rounding from 0 to 12 decimal places
- Location curve support — for curve-based elements (walls, beams, etc.), uses the start point of the curve and calculates angle from start to end
- Selection Set scope — Current View, Current Selection, or Entire Project
- Progress bar with cancel — shows progress and allows cancellation mid-run
Requirements
- Project document (not available in the Family Editor)
- Target parameters must exist on the elements (shared or project parameters of type Text or compatible numeric type)
- A valid Kiwi Codes Bonus Tools licence must be active
Note: Elements without a location (e.g., some annotation elements) will be skipped. Curtain wall doors and other complex hosted elements may fail.
Running the Tool
Launch
Find Location Point on the Bonus Tools Ribbon or use 115 Search Tools.
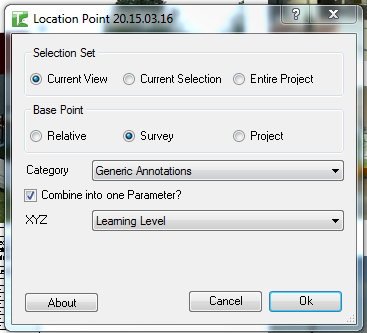
Step 1 — Choose Selection Set
| Option | Elements included |
|---|---|
| Current View | Elements visible in the active view |
| Current Selection | Elements currently selected |
| Entire Project | All elements in the project |
Step 2 — Choose Base Point (coordinate system)
| Option | Coordinate basis |
|---|---|
| Relative | Internal Revit coordinates (no project base point offset) |
| Survey | Transforms coordinates using the project location (true world coordinates relative to the Survey Point) |
| Project | Coordinates relative to the Project Base Point (E/W, N/S, Elevation) |
Survey is the default and is recommended for most coordination workflows. It applies the full project location transform to produce real-world survey coordinates.
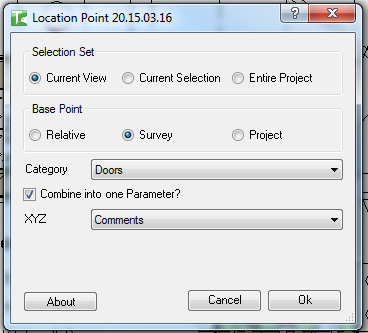
Step 3 — Select a category
Choose the element category to process from the Category dropdown. The dropdown is populated from elements in the chosen scope.
Step 4 — Configure XYZ output
Tick Include XYZ to write coordinates. Then choose how to store them:
Combined (Combine into one Parameter ticked):
The XYZ value is stored as a comma-separated string "X, Y, Z" in a single parameter. Select the parameter from the XYZ dropdown.
Separate (Combine into one Parameter unticked):
Select individual parameters for X, Y, and Z from the X, Y, and Z dropdowns respectively.
Step 5 — Configure Rotation output
Tick Include Rotation to also write the element's rotation angle to a parameter. Select the target parameter from the Rotation dropdown.
For point-located elements, rotation is derived from the Project Base Point angle minus the element's LocationPoint rotation. For curve-based elements (walls, beams), rotation is calculated from the angle between the start and end points of the location curve.
Step 6 — Set Decimal Places
Enter the number of decimal places (0–12) for rounding the coordinate and rotation values before writing.
Step 7 — Click OK
Click OK. A progress bar tracks the operation.
A confirmation reports:
X passed. Y failed.
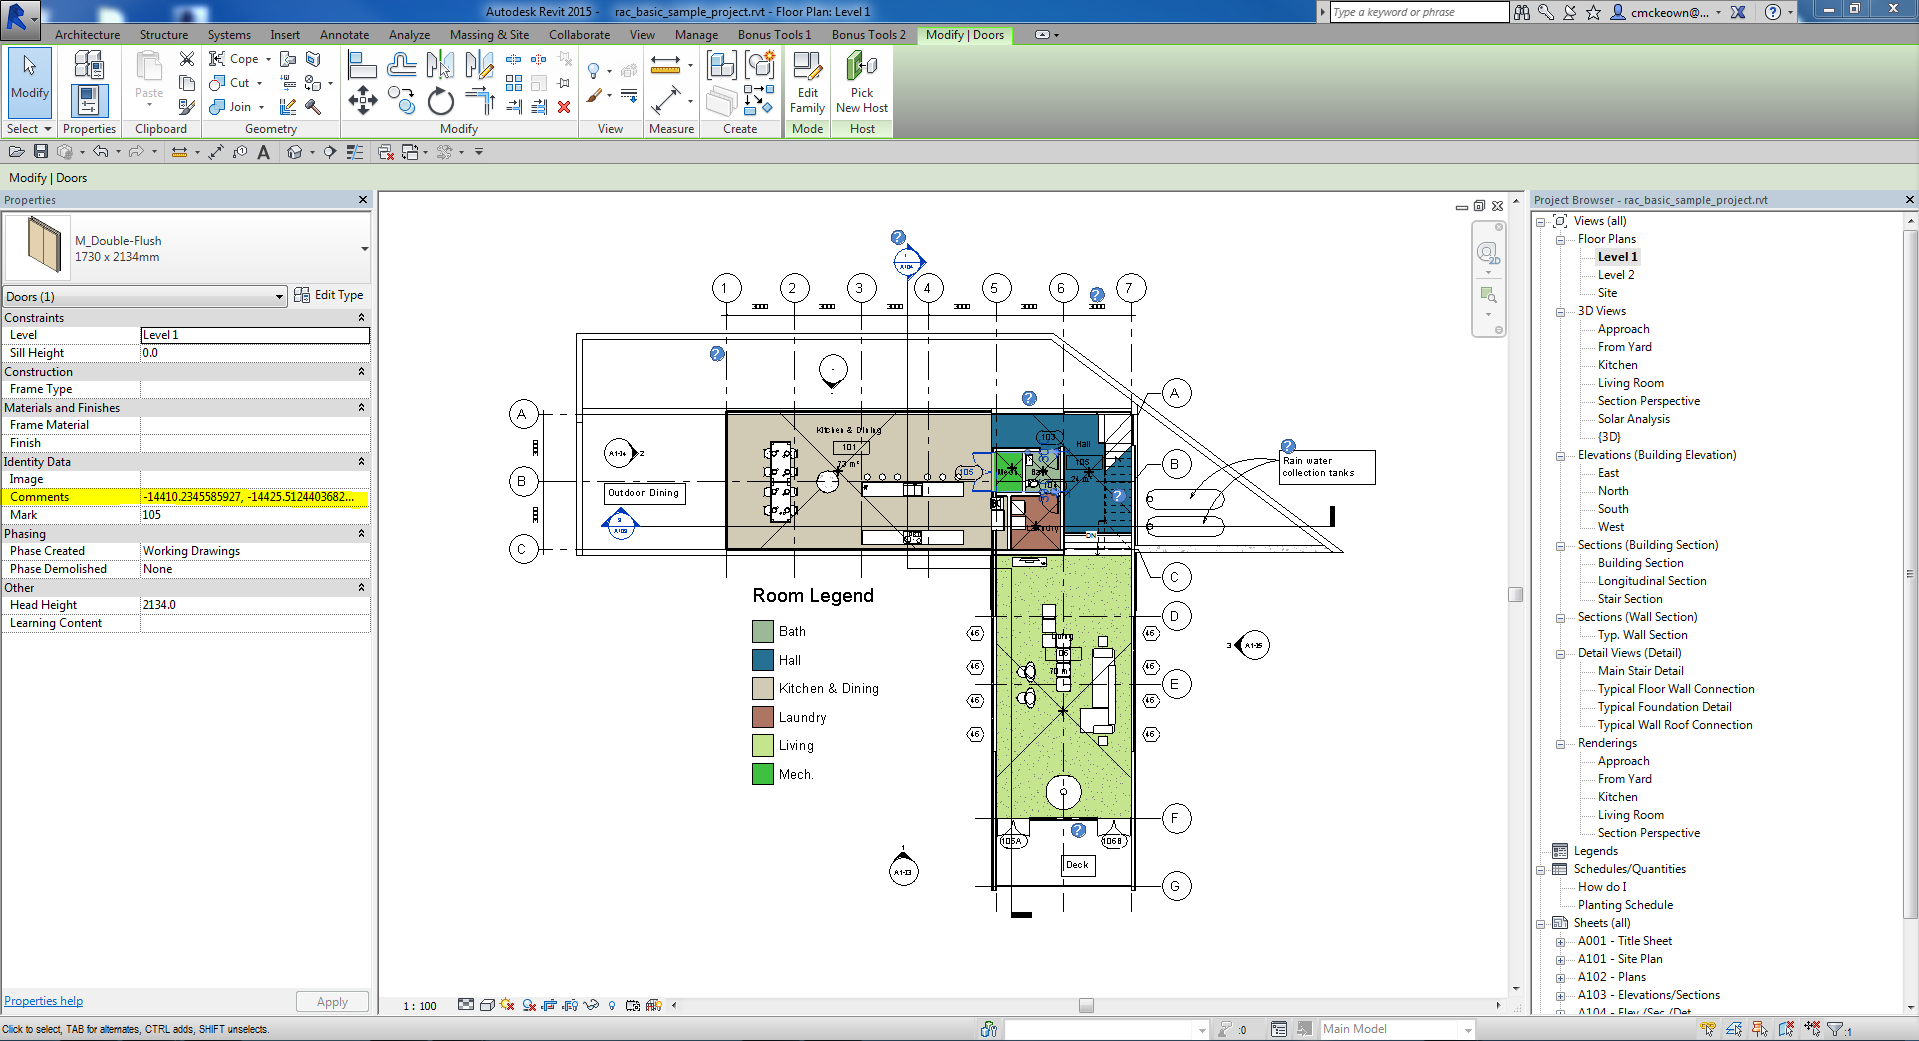
After running, you can verify the written coordinates directly in element properties or via a Revit schedule:
Tips and Best Practices
- Use Survey coordinates for most projects. Survey coordinates align with the project's real-world position and are the most useful for coordination and asset management.
- Use a Text parameter for combined XYZ. The combined "X, Y, Z" format is a string — assign it to a Text shared parameter. For numeric parameters, use separate X, Y, Z parameters with a Number or Length type.
- Use Decimal Places to match your project's reporting precision. Two or three decimal places is typical for millimetre-precision projects. Excessive decimal places add noise to the data.
- Include Rotation for elements with directional significance. Columns, structural members, and equipment items often need rotation data for fabrication or structural analysis exports.
- Run on Current Selection to test first. Select a handful of elements and verify the written values match expectations before running on the Entire Project.
- Re-run after elements are moved. Location Point writes a static snapshot — if elements are moved, re-run the tool to update the parameter values.
Common Use Cases
Structural column coordinate schedule — Select all structural columns and write their Survey XYZ coordinates to a set of shared parameters, then create a Revit schedule of column coordinates for structural documentation.
Equipment asset management — Write the location and rotation of all mechanical equipment to Text parameters for export to a facility management database that requires real-world coordinates.
Civil coordination — Write survey coordinates to elements before exporting to a civil design or site survey tool that expects real-world positions.
QA check of element positions — After placing elements to survey control points, write their coordinates to parameters and review the values in a schedule to confirm placement accuracy.
Troubleshooting
"X passed. Y failed." with failures Some elements could not be updated. Common causes: the target parameter is read-only, the element has no location point, or the element is owned by another user in a workshared model. Check the Revit output window for details on which elements failed.
"Location Point failed. Gain ownership of elements and try again." The Revit transaction could not be committed. Gain ownership of all elements in scope via Worksets or Editing Requests.
"Operation Failed." An unexpected error occurred. Check the Revit journal file for details.
"No elements in the project of Category type: X" No elements of the selected category exist in the current scope. Change the scope or select a different category.
Coordinate values look wrong Verify the Base Point selection. Relative returns internal Revit units; Survey and Project apply real-world offsets. Also check the project's Shared Coordinates setup — if the survey point is not correctly positioned, Survey coordinates may appear incorrect.
Curtain wall doors or windows fail These element types have complex host-based location logic that may not produce a valid LocationPoint. This is expected. Non-curtain hosted doors and windows typically process correctly.