047 Convert Areas or Rooms To Mass
Chris McKeown / July 1, 2025
Power
Overview
Convert Areas or Rooms To Mass traces the boundary curves of selected Areas or Rooms and creates extruded Generic Model or Mass families from them. You can produce all forms in a single family or create one family per area/room. Each family is saved as an .rfa file to an output directory you specify, then loaded back into the project. Options include automatic level creation within the family, material assignment from project materials, and naming families by parameter values. The tool is useful for early design massing, energy analysis geometry, and spatial volume documentation.

Table of Contents
Key Features
- Areas and Rooms as source — converts either area boundaries or room boundaries into extrusion profiles
- One family or one per area/room — produce all forms in a single combined family, or one .rfa per area/room
- Generic Model or Mass — choose the Revit category for the output family
- Form or Linework only — create a solid extrusion, or keep only the model curves (for custom mass shapes in the family editor)
- Create Levels — optionally generates reference levels inside the family from project levels (available for Mass category)
- Create Materials — automatically creates Revit materials matching a parameter value and applies them to the forms
- Parameter-based family naming — for individual families, name them from two element parameters with optional prefix and suffix
- Height control — set the extrusion height per area/room in the grid, or batch-set heights via right-click
- Selection grid — scrollable DataGridView with Select All, Select None, and Select Selected (toggle) buttons
- Search and filter — filter the grid by up to two parameters with search values
- Export to CSV/Excel — export the area/room list for reporting
- Room Phase and Area Scheme — filter the source list by room phase or area scheme
Requirements
- Project document (not available in the Family Editor)
- The project must have areas (with an area scheme) or rooms placed and bounded
- A Generic Model or Mass family template (.rfa) must exist on disk to use as the base
- An output directory must be specified for saving generated .rfa files
- A valid Kiwi Codes Bonus Tools licence must be active
Note: Areas or rooms with non-crossing boundary lines (open boundaries) may fail to convert. Ensure all spatial elements are fully bounded before running.
Running the Tool
Launch
Find Convert Areas or Rooms To Mass on the Bonus Tools Ribbon or use 115 Search Tools.
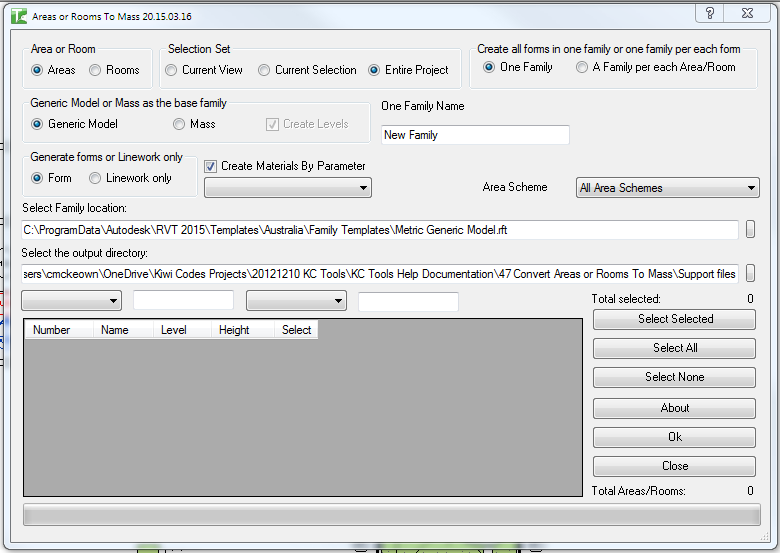
Step 1 — Choose Area or Room
In the Area or Room group, select:
| Option | Source data |
|---|---|
| Areas | Uses area boundaries from the selected Area Scheme |
| Rooms | Uses room boundaries from the selected Room Phase |
When Areas is selected, an Area Scheme dropdown appears. When Rooms is selected, a Room Phase dropdown appears.
Step 2 — Choose Selection Set
| Option | Elements included |
|---|---|
| Current View | Areas/rooms visible in the active view |
| Current Selection | Areas/rooms currently selected |
| Entire Project | All bounded areas/rooms in the project |
Step 3 — Filter the grid (optional)
Use the two Search by Parameter fields and their text inputs to filter the list of areas/rooms in the grid. This is useful in large projects to focus on a subset (e.g., all rooms on a specific level or within a given area scheme).
Step 4 — Select areas/rooms
The DataGridView lists all matching areas/rooms with columns: Select (checkbox), Id, Name, Number, and Height.
Use:
- Select All — ticks all rows
- Select None — unticks all rows
- Select Selected — toggles the ticked/unticked state of highlighted rows
Set the Height value for each row to control the extrusion height. Right-click to batch-set height values across multiple selected rows via Rename Selected.
Step 5 — Choose family output mode
In the Create all forms in one family or one family per each form group:
| Option | Behaviour |
|---|---|
| One Family | All selected areas/rooms are combined into a single .rfa file; enter a name in the text field |
| A Family per each Area/Room | One .rfa file is created per selected area/room; named by GUID, or by parameters if enabled |
For A Family per each Area/Room, optionally tick Use Parameters as Family Name and select two parameters plus optional prefix/suffix to control the output file name.
Step 6 — Choose family category and form type
| Setting | Options |
|---|---|
| Category | Generic Model / Mass |
| Form type | Form (solid extrusion) / Linework only (model curves only) |
| Create Levels | Tick to generate levels inside the family from project levels (Mass category only) |
| Create Materials | Tick to create and apply materials based on parameter values; optionally set Material Prefix and Suffix |
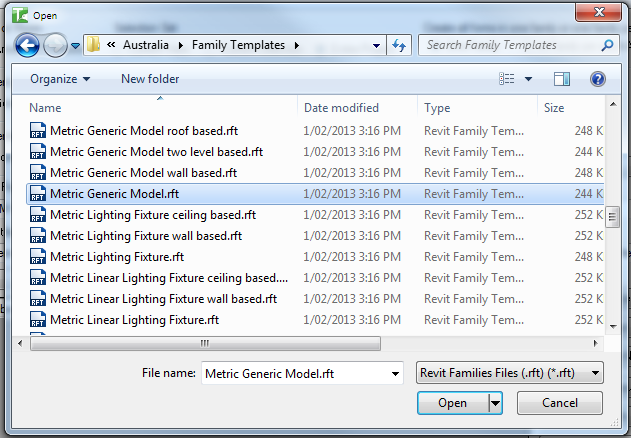
Step 7 — Set family template and output directory
- Click the browse button next to Select Family location and choose the .rfa family template file
- Click the browse button next to Select the output directory and choose a folder to save the generated families
The family template must match the chosen Category — a Generic Model template for Generic Model output, or a Mass template for Mass output. If the category does not match, the tool will report an error.
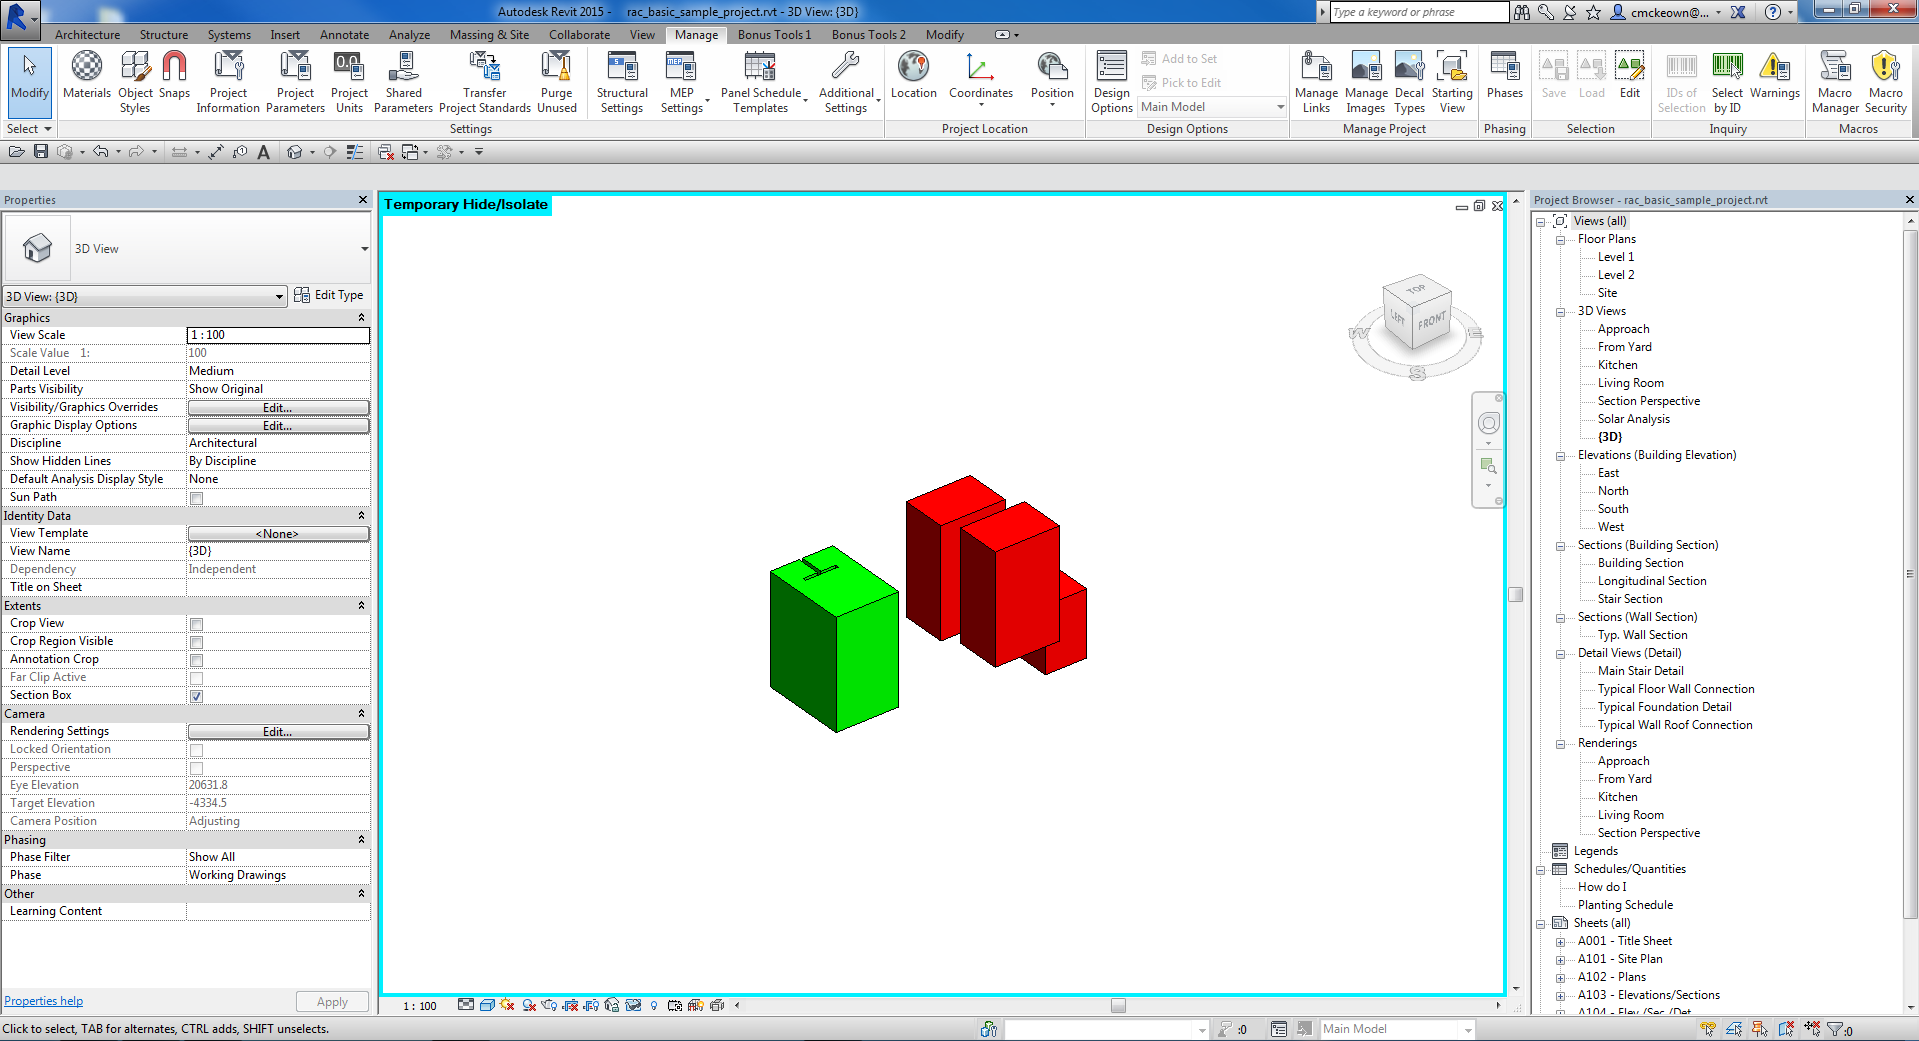
Step 8 — Click OK
Click OK. A progress bar tracks conversion. The tool:
- Opens each family document from the template
- Traces boundary curves and creates model curves
- Creates an extrusion (if Form is selected)
- Saves the .rfa file to the output directory
- Loads the family back into the project
The converted masses appear in the project as loaded families, visible in a 3D view:
Tips and Best Practices
- Ensure all rooms/areas are fully bounded. Open boundaries result in conversion failures. Use Revit's Room Separation Lines to close any gaps.
- Use a dedicated output folder. Set the output directory to a project-specific folder rather than a shared library location to avoid overwriting production files.
- Test with One Family first. Before running on all rooms, test on two or three rooms in One Family mode to verify the boundary tracing and extrusion height produce the expected result.
- Use Generic Model for most use cases. The Mass category requires Show Mass to be enabled in the view to see the result. Generic Model is visible without any extra settings.
- Create Materials for energy analysis. When the output is used in energy analysis tools, enabling Create Materials and mapping them to program types makes the model easier to work with downstream.
- Export to Excel before running. Use the Export to Excel button to save the full area/room list with heights before processing, so you have a record of the input data.
Common Use Cases
Early-stage massing from room data — Convert all rooms to Mass families at the start of a project to build a massing model from the spatial programme data, rather than modelling masses from scratch.
Gross floor area visualisation — Convert area scheme boundaries to extrusions to produce a 3D GFA model for client presentations or area-weighted colour coding.
Energy analysis geometry — Create one Generic Model family per room, using room parameters as family names, then export the families for use in energy analysis software.
Level-by-level space modelling — Convert rooms per phase and floor to produce a phased massing model that reflects the design programme at each stage.
Troubleshooting
"Please select a Mass Family." The family template path field is empty or the file does not exist. Click the browse button and select a valid .rfa template file.
"Please select an output directory." The output directory path field is empty or the path does not exist. Click the browse button and select a valid folder.
"Please select a family name." One Family mode is selected but no name has been entered in the name field. Enter a name before clicking OK.
"Please select at least one Area/Room." No rows in the grid have the Select checkbox ticked. Use Select All or tick individual rows.
"Unable to load 'Generic Models'. Category of family is: X" The family template selected is not a Generic Model family. Open the template in the Revit Family Editor and verify its category, or select a different template.
"Unable to load 'Mass'. Category of family is: X" The family template selected is not a Mass family. Select a template whose category is Conceptual Mass / Mass.
Conversion fails with 0 processed The selected areas/rooms may have open boundaries (non-crossing lines). In Revit, check each room/area boundary in a plan view and add Room Separation Lines to close any gaps.