036 Sheet Revisions
Chris McKeown / July 1, 2025
Sheet & View Manipulation
Overview
Sheet Revisions shows all sheets and revisions in the project as a matrix — sheets as rows, revisions as columns, with a checkbox at each intersection. Tick or untick cells to assign or remove revisions from sheets, then click Apply Revisions to Sheets to commit all changes at once. Cells with a red background indicate the revision is controlled by a Revision Cloud on that sheet; these cannot be unchecked by clicking — the revision cloud must be deleted first by double-clicking the red cell.
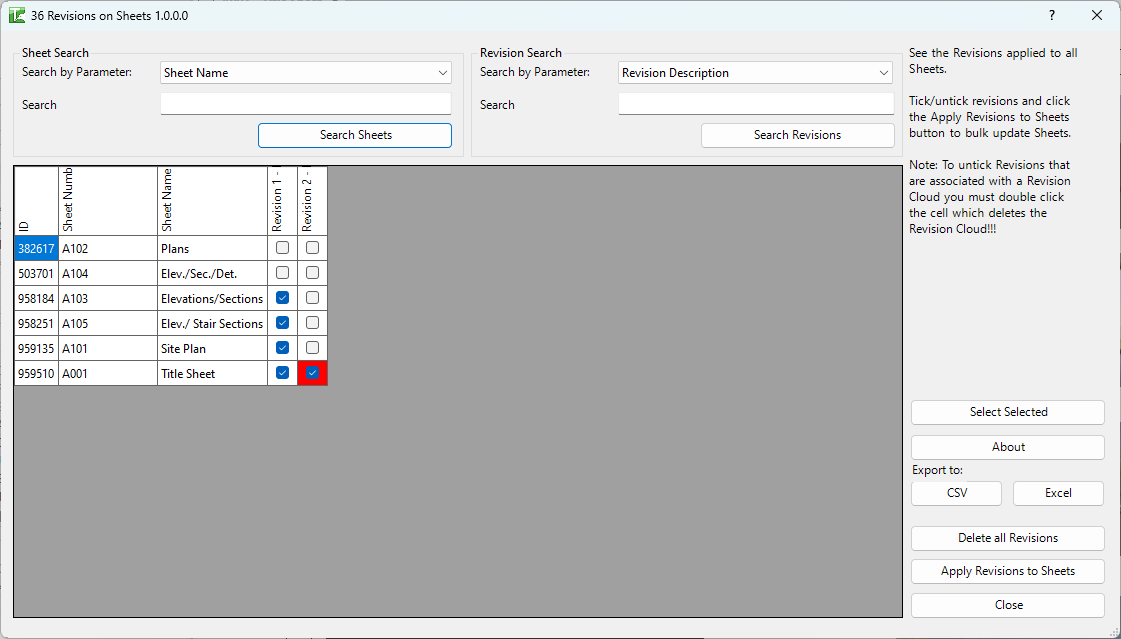
Table of Contents
Key Features
- Matrix view — all project sheets (rows) × all project revisions (columns) in a single scrollable grid
- Red cells indicate the revision is controlled by a Revision Cloud on that sheet
- Bulk selection — highlight multiple cells using mouse drag and Ctrl/Shift, then use Select Selected to toggle their state
- Sheet Search — filter visible sheets by any sheet parameter (Sheet Name, Sheet Number, etc.)
- Revision Search — filter visible revision columns by any revision parameter (Revision Description, etc.)
- Apply Revisions to Sheets — commits all checkbox changes to the Revit model in one transaction
- Delete all Revisions — removes all revision associations from all sheets
- Double-click red cell — prompts to delete the associated Revision Cloud so the revision can be removed
- Export to CSV / Excel — saves the current matrix for reporting or audit
Requirements
- The project must have at least one revision defined (Manage → Sheet Issues/Revisions)
- The project must have at least one sheet
- A valid Kiwi Codes Bonus Tools licence must be active
Running the Tool
Launch
Find Sheet Revisions on the Bonus Tools Ribbon or use 115 Search Tools.
The dialog opens with the full matrix of all sheets and revisions. Existing revision assignments are shown with checked checkboxes; red-background cells indicate revision clouds are present.
Note: Columns are added dynamically based on the revisions in the project. If a project has many revisions, scroll horizontally to see all columns.
Step 1 — Search and filter (optional)
Use Sheet Search to narrow visible rows:
- Select a parameter from the Search by Parameter dropdown (e.g. Sheet Name, Sheet Number)
- Type in the Search field
- Click Search Sheets
Use Revision Search to narrow visible columns:
- Select a parameter from the revision Search by Parameter dropdown
- Type in the Search field
- Click Search Revisions
This is useful in large projects where the matrix has many rows and columns.
Step 2 — Assign or remove revisions
To assign a revision to a sheet: click the checkbox cell at the intersection of the sheet row and revision column to tick it.
To remove a revision from a sheet: click a ticked checkbox to untick it.
Bulk selection: drag across multiple cells, or use Ctrl+click to select a range, then click Select Selected to toggle all highlighted cells simultaneously.
Red cells cannot be unchecked by clicking. A red background means a Revision Cloud on that sheet controls this revision. The Revision Cloud must be deleted first — see Step 4.
Step 3 — Apply changes
Click Apply Revisions to Sheets to commit all checkbox changes to the model.
A confirmation dialog appears when the operation is complete.
Step 4 — Delete a Revision Cloud to unlock a red cell
If a cell has a red background, the revision is tied to a Revision Cloud placed on that sheet. To remove the revision:
- Double-click the red cell
- Confirm the prompt to delete the Revision Cloud:

- The cloud is deleted and the revision is removed from the sheet automatically:

There is no need to click Apply Revisions to Sheets after deleting a cloud — the change is applied immediately. To undo, close the dialog and use Ctrl+Z in Revit.
Export
Click Export to CSV or Export to Excel to save the current matrix state for audit or coordination records.
Tips and Best Practices
- Use Sheet Search before bulk operations. In projects with many sheets, filter down to the relevant sheets (e.g., by Sheet Name containing "Structure") before selecting and applying.
- Red cells require double-click, not single-click. A single click on a red cell does nothing — this is by design to prevent accidental cloud deletion. Always double-click to initiate the deletion workflow.
- Undo cloud deletion with Ctrl+Z. Cloud deletion is immediate — close the dialog and undo in Revit if you deleted the wrong cloud.
- Use Export before Delete all Revisions. If you need to clear all revision assignments, export the matrix first to keep a record of the prior state.
- Check the sheet in Revit after changes. After clicking Apply Revisions to Sheets, open a modified sheet to confirm the revision block in the title block reflects the expected revisions.
- Revision columns reflect the Manage → Sheet Issues/Revisions order. Revisions are shown left-to-right in the order they appear in Revit's revision list.
Common Use Cases
Issuing a revision to multiple sheets at once — Tick the revision column for all relevant sheets, click Apply Revisions to Sheets, and the revision is applied to all selected sheets without opening each sheet individually.
Removing a superseded revision from all sheets — Use Sheet Search to find affected sheets, untick the relevant revision cells, and apply in one pass.
Pre-handover revision audit — Export the full matrix to Excel to verify which revisions are applied to which sheets and confirm the issue record is complete.
Clearing Revision Clouds after issue — After a formal issue, double-click each red cell to remove the revision clouds, leaving the revision assigned to the sheets but clearing the cloud annotations.
Troubleshooting
Red cell does not respond to single click This is expected behaviour. Red cells (revision cloud controlled) require a double-click to initiate cloud deletion. A single click has no effect.
"Complete" dialog appears but sheets look unchanged Check that the revision appears in the Revit title block's revision table. The revision must be set to Issued in Manage → Sheet Issues/Revisions for it to appear in the title block stamp.
Matrix is empty after opening The project has no revisions defined. Go to Manage → Sheet Issues/Revisions and add at least one revision, then reopen the tool.
Double-clicking a red cell does nothing The Revision Cloud may be in a group or owned by another user in a workshared model. Gain ownership of the cloud and check it is not part of a group before retrying.
"Delete all Revisions" removes more than expected This button removes all revision assignments from all sheets in the project. Use Sheet Search to filter first, or use individual cell unchecking if only a subset needs to be cleared.