034 Shared Parameters
Chris McKeown / July 1, 2025
Parameters
Overview
The Shared Parameters tool streamlines the process of loading shared parameters into Revit family files. Instead of manually adding parameters one at a time through the Family Properties dialog, you can select any number of parameters from a shared parameter file, configure their group, type/instance setting, default value, and formula in a single grid, then apply them to the current family or to every .rfa file in a folder in one operation.
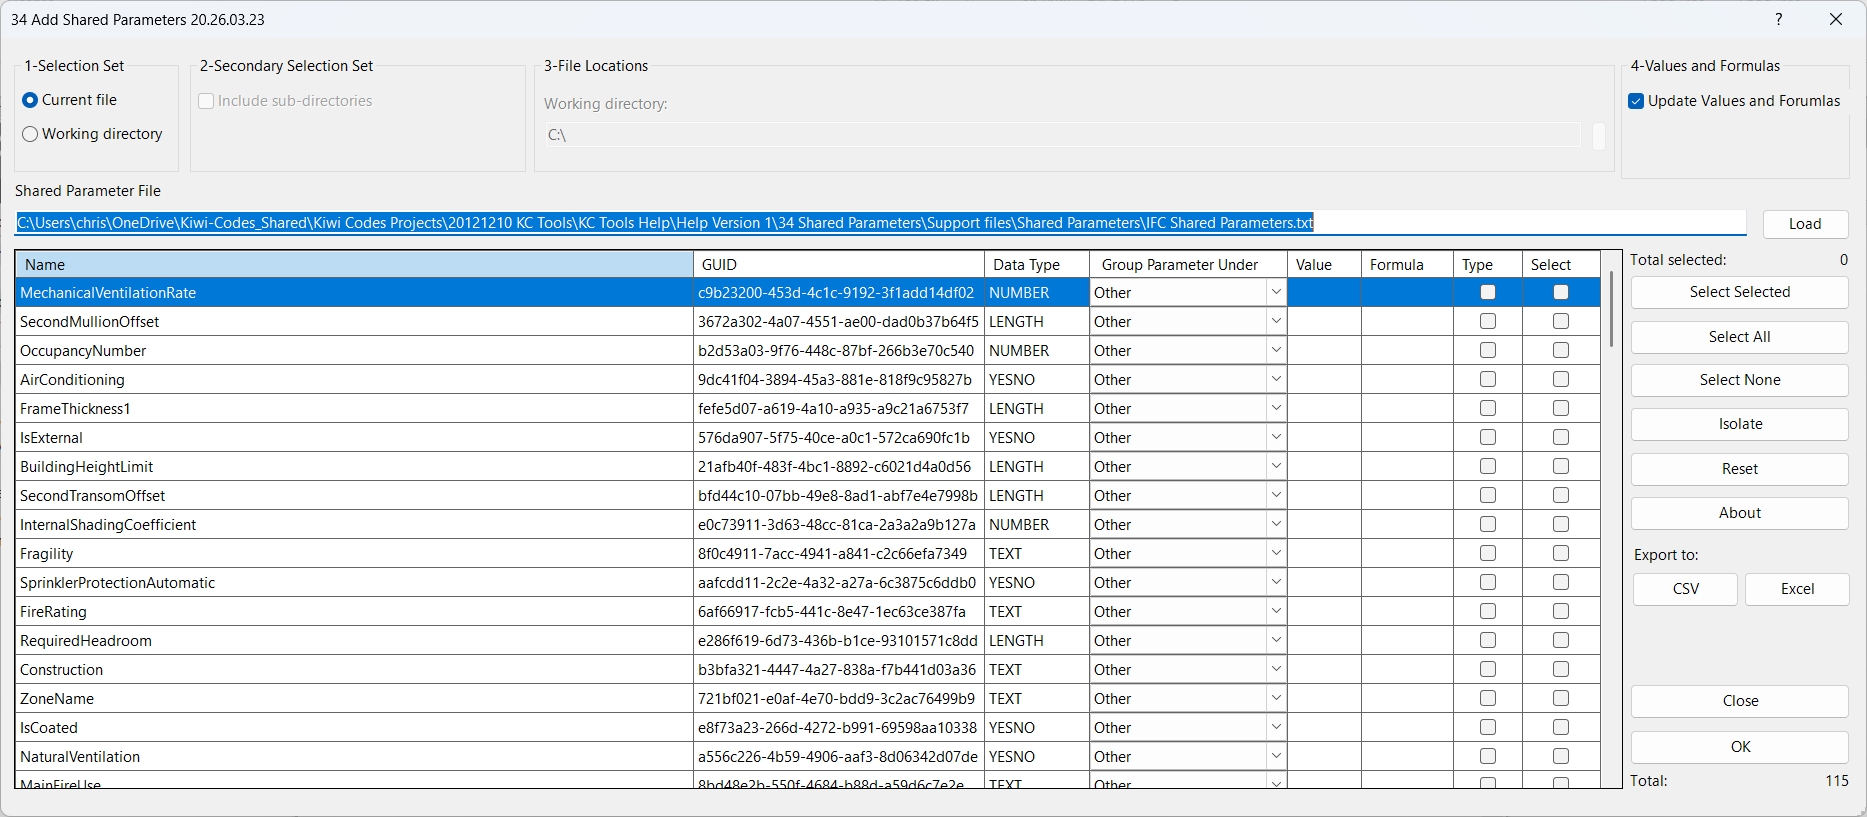
Table of Contents
Key Features
- Load any shared parameter file and display all parameters in a sortable grid
- Batch-apply parameters to the current family or to all
.rfafiles in a directory - Optionally recurse into sub-directories when processing a working directory
- Set the Group Parameter Under category per parameter directly in the grid (full list of Revit built-in groups)
- Toggle each parameter between Type and Instance before adding
- Assign a default Value and/or Formula to each parameter in the same step
- Automatically update existing parameters (group, type/instance, value, formula) without recreating them
- Bulk-select rows with Select All, Select None, and Select Selected (toggle highlighted rows)
- Isolate view to show only selected parameters; Reset to restore the full list
- Export the parameter grid to Excel or CSV for documentation or review
- Persistent settings — the last-used shared parameter file path and working directory are remembered between sessions
Requirements
- Must be run from within a Family document (
.rfa). The tool is not available in a Project environment. - A valid Revit Shared Parameter File (
.txt) is required. - The shared parameter file must not be open/locked by another application when loading.
- At least one parameter must be checked in the Select column before clicking OK.
Running the Tool
Launch
Find Shared Parameters on the Bonus Tools Ribbon or use 115 Search Tools.
The tool can only be launched from inside an open Revit Family file. If you run it from a Project, a message will appear: "Action not available in the Project environment."
Step 1 — Choose a Selection Set
In the 1-Selection Set group (top-left), choose where the parameters will be added:
| Option | Behaviour |
|---|---|
| Current File | Adds parameters to the family that is currently open |
| Working Directory | Adds parameters to every .rfa file found in the specified folder |
When Working Directory is selected, the 2-Secondary Selection Set and 3-File Locations panels become active.
Step 2 — Configure the Working Directory (if applicable)
If you selected Working Directory:
- In the 3-File Locations group, enter or browse to the folder containing the target family files.
- In the 2-Secondary Selection Set group, check Include sub-directories to also process families in nested folders.
Only
.rfafiles are processed. Backup files (e.g.Family.0001.rfa) are automatically skipped.
Step 3 — Load the Shared Parameter File
In the Shared Parameter File field, enter the path to your shared parameter file or click Load to browse for it.
Once a valid file is selected, the grid populates automatically with all parameters defined in the file.
| Column | Description |
|---|---|
| Name | Parameter name as defined in the shared parameter file (read-only) |
| GUID | Unique identifier for the parameter (read-only) |
| Data Type | Parameter data type, e.g. Text, Integer, Length (read-only) |
| Group Parameter Under | The Revit parameter group this parameter will appear under in the family (editable dropdown) |
| Value | Default value to assign when the parameter is added or updated (editable) |
| Formula | Formula string to set on the parameter (editable) |
| Type | Checked = Type parameter; unchecked = Instance parameter |
| Select | Checked = this parameter will be processed when OK is clicked |
The Group Parameter Under dropdown is pre-populated from the shared parameter file where available. It defaults to Other if no group is specified.
Step 4 — Values and Formulas
In the 4-Values and Formulas group (top-right), the Update Values and Formulas checkbox controls what happens when a parameter already exists in the target family:
| Setting | Behaviour |
|---|---|
| Checked (default) | If the parameter already exists, its Value and Formula are updated to match what is in the grid |
| Unchecked | Existing parameters are skipped entirely — only new parameters are added |
Leave this checked when you want to keep default values and formulas synchronised across a family library. Uncheck it if you only want to add missing parameters without touching anything already present.
Step 5 — Select Parameters
Use the selection buttons on the right to control which parameters are queued for addition:
- Select All — ticks every parameter in the list
- Select None — clears all selections
- Select Selected — toggles the Select checkbox for whichever rows are highlighted in the grid
The Total selected counter updates as you check or uncheck rows.
To focus on specific parameters:
- Click Isolate to temporarily hide all un-selected rows, making it easier to review your choices
- Click Reset to restore the full list from the shared parameter file
Step 6 — Configure Each Parameter (Optional)
Before clicking OK, review and adjust settings for each selected parameter directly in the grid:
- Change Group Parameter Under by clicking the cell and selecting from the dropdown
- Set a Value by typing into the Value cell (applies to all family types)
- Set a Formula by typing into the Formula cell
- Toggle Type to control whether the parameter is Type-level or Instance-level
Step 7 — Apply
Click OK to run the operation.
The tool opens the Output panel and logs progress for each parameter and each file processed:
- "Working with Shared Parameter: [Name]" — parameter is being processed
- "Shared Parameter with GUID: [guid] already existing." — parameter exists; update logic will run
- "Updated Shared Parameter: Name, Parameter Group, and Instance/Type Value." — existing parameter was updated
- "Parameter: [Name] added." — new parameter added successfully
- A summary line at the end: "X already added, X added and X failed."
Click Close when done.
Tips and Best Practices
- Review the Group Parameter Under column before clicking OK. Parameters imported from older shared parameter files may default to Other — assigning the correct group (e.g. Identity Data, General, Dimensions) improves usability inside the family editor.
- Use the Export to Excel feature to document your parameter set. Before making changes, export the current grid to an Excel file as a reference record of which parameters are defined in the file.
- Leave Update Value/Formula checked. This ensures that if a family already has the parameter, its value and formula are kept in sync with the grid — useful for standardising default values across a family library.
- Process a test family first. When using the Working Directory option, run the tool on a copy of one family to verify settings before processing the full folder.
- Use Isolate to verify your selection. After choosing parameters with Select All or Select Selected, click Isolate to confirm only the intended parameters are visible before proceeding.
- Working directory and file paths are remembered. The tool saves your last shared parameter file path and working directory, so repeat runs on the same library require no re-configuration.
- Formulas are validated by Revit on commit. If a formula is invalid for the parameter's data type, Revit will roll back that parameter's transaction and log a failure — check the Output panel for details.
Common Use Cases
Standardising a family library — Select a working directory containing all families in a product range. Choose the same shared parameter file used across your project template, select the parameters, and click OK. Every family in the folder receives the same parameters in one pass.
Onboarding a shared parameter file to a single family — Open a family, load the tool, browse to the shared parameter file, select only the parameters relevant to that family (using Isolate to verify), configure type/instance, and click OK.
Updating parameter grouping — If a shared parameter file has been reorganised, run the tool with Update Value/Formula checked. The existing parameters in all family files will have their group and type/instance updated to match the grid without being recreated.
Applying default values across family types — Enter a default value in the Value column for a parameter, ensure Update Value/Formula is checked, then run the tool. All family types in the file receive the specified default.
Auditing available parameters — Load a shared parameter file and use Export to Excel (without clicking OK) to produce a spreadsheet listing all parameter names, GUIDs, and data types for documentation or review.
Troubleshooting
"Action not available in the Project environment." The tool was launched while a Project file was active. Open a Family file first, then re-run the tool.
"File is in use. Please check." The shared parameter file is currently locked by another application (e.g. Revit's own shared parameter file manager, or a text editor). Close any application that has the file open and try loading again.
"Please select at least one Shared Parameter." No rows have their Select checkbox ticked. Use Select All or manually check the rows you want to add, then click OK.
"Please select a valid Shared Parameter File."
The path in the Shared Parameter File field does not point to an existing file. Click Load to browse to the correct .txt shared parameter file.
"Please select a valid Working Directory." The Working Directory path is empty or does not exist. Browse to the folder containing your family files using the button next to the Working Directory field.
Parameters appear but the Group Parameter Under dropdown shows "Other" for everything The shared parameter file does not include group information, or the group names in the file do not match any of the built-in Revit groups. Set the group manually in the grid before applying.
A parameter was not added and is logged as "failed" Revit rolled back the transaction for that parameter — usually because the formula is invalid, the data type conflicts with an existing parameter of the same name, or the family is read-only. Review the Output panel log for the specific error and correct the formula or value.
Existing parameters are not being updated Ensure Update Value/Formula is checked. If it is unchecked, the tool skips updates to existing parameters and only adds new ones.
Sub-directory families are not being processed The Include sub-directories checkbox in the 2-Secondary Selection Set group must be checked, and Working Directory must be selected as the target (not Current File).