033b Excel Tools Export Schedule to Excel
Chris McKeown / July 1, 2025
Excel Tools
Overview
Export Schedule to Excel converts any Revit schedule into a structured Excel workbook, using the schedule's visible fields as column headers and each schedule row as a data row. The exported file preserves the parameter metadata needed for round-trip import via 033c Import from Excel. An optional header protection setting locks the top five metadata rows so colleagues editing the file cannot accidentally delete column definitions.
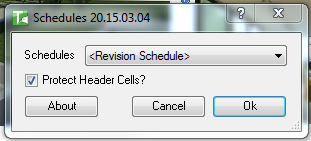
Table of Contents
Key Features
- Exports any Revit
ViewScheduleusing its currently visible (non-hidden) fields - Schedule selector dialog shows all schedules in the project
- Protect Header Cells option locks rows 1–5 in Excel so metadata cannot be accidentally deleted
- Colour-coded Excel output:
| Colour | Meaning |
|---|---|
| Dark Grey | Header rows (rows 1–5) |
| Indian Red | Element ID column (locked, do not edit) |
| Beige | Read-only parameter values |
- Five-row header structure preserves parameter IDs required for round-trip import
- Progress bar with Cancel button
Known limitations:
- Calculated values (formula fields) are not exported
- Formula-based parameter values are not exported
- Values from linked files are not exported
- Values derived from other elements (e.g. hosted element parameters) may not export
Requirements
- The project must contain at least one ViewSchedule
- Must be run in a project document (not a Family document)
- A valid Kiwi Codes Bonus Tools licence must be active
Running the Tool
Launch
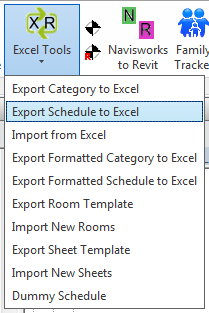
Find Export Schedule to Excel on the Bonus Tools Ribbon under the Excel Tools dropdown, or use 115 Search Tools.
If the project contains no schedules, a message appears: "File contains no Schedules" and the tool exits.
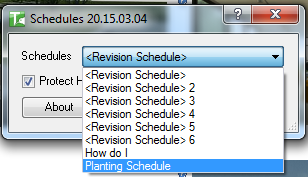
Step 1 — Select a schedule
A dialog lists all ViewSchedules in the project. Select the schedule you want to export from the Schedules dropdown.
Step 2 — Set export options
Protect Header Cells — When checked, the top five header rows in the exported Excel file are locked. This prevents users from accidentally deleting or modifying the metadata rows that are required for a successful reimport.
To delete or modify columns in a protected file, go to File → Info → Unprotect (or via the Review tab in Excel) before editing.
Include Elements in Links — When checked, elements from loaded Revit link files are also exported. Linked elements are indicated in the ID column with a Linked: prefix.
Step 3 — Export
Click OK. A Save File dialog opens — choose a location and filename. A progress bar tracks the export.
The generated Excel file structure:
| Row | Content |
|---|---|
| 1 | Schedule name |
| 2 | Parameter names (column headers) |
| 3 | Parameter value types |
| 4 | Instance or Type designation |
| 5 | Parameter IDs (GUIDs for shared parameters) |
| 6+ | One row per element, Element ID in column A |
Do not modify or delete the header rows or the Element ID column — these are required by Import from Excel.
Tips and Best Practices
- Always enable Protect Header Cells when sharing with non-Revit users. This prevents collaborators editing the file from accidentally breaking the import structure.
- Keep hidden fields hidden. Only visible (non-hidden) schedule fields are exported. If a parameter is not needed for editing, hide it in the schedule before exporting to keep the Excel file lean.
- Sort the schedule before exporting. The export order matches the schedule's current sort order. Sort by Mark or Sheet Number in Revit before exporting if you want the Excel rows to follow a logical sequence.
- Calculated values are not exported. Parameters that use Revit calculated value fields or formulas will export as blank. Use the actual source parameter instead.
- Use for bulk parameter updates on a single category. Since the schedule defines the columns, this tool is ideal when you already have a schedule set up for a specific category — you get a pre-configured parameter selection without having to rebuild it in Export Category.
Common Use Cases
Door hardware schedule bulk update — Export a Door Hardware schedule, fill in hardware sets in Excel for all doors, and reimport to update all Door elements in one transaction.
Sheet list management — Export a Sheet List schedule, edit Sheet Names, Drawn By, and Checked By fields in Excel, and reimport to update all sheets.
Equipment parameter handoff — Export a Mechanical Equipment schedule and send to a subcontractor to fill in model numbers and manufacturer data. Reimport the completed file to update the model.
QA parameter review — Export any schedule to Excel and use Excel's filter and sort tools to audit missing or inconsistent parameter values before issuing for construction.
Troubleshooting
"File contains no Schedules" The project has no ViewSchedule elements. Create at least one schedule in Revit before running the tool.
"No elements found to export" The selected schedule contains no elements. Check that the schedule is not empty and that its filter settings are not excluding all rows.
"Action not available in the Family environment." The tool was launched while a Family document was active. Close the Family Editor and run from within a project document.
Calculated or formula values are blank in the export This is expected behaviour — Revit calculated values and formula results cannot be extracted via the API and are not exported. Edit the source parameter values instead.
Header cells are locked and I cannot delete columns If Protect Header Cells was enabled during export, the sheet is protected. In Excel go to File → Info → Protect Workbook → Unprotect (no password is set) to remove the protection.