033f Excel Tools Export Room Template
Chris McKeown / July 1, 2025
Excel Tools
Overview
Export Room Template generates an Excel workbook with column headers matching all editable Room parameters found in your project. The first two rows define the parameter names and their data types — you add new room data from row 3 onwards and then use 033g Import New Rooms to create those rooms as unplaced placeholders in Revit. The workflow is ideal for bulk room creation from a client room data sheet or planning schedule.
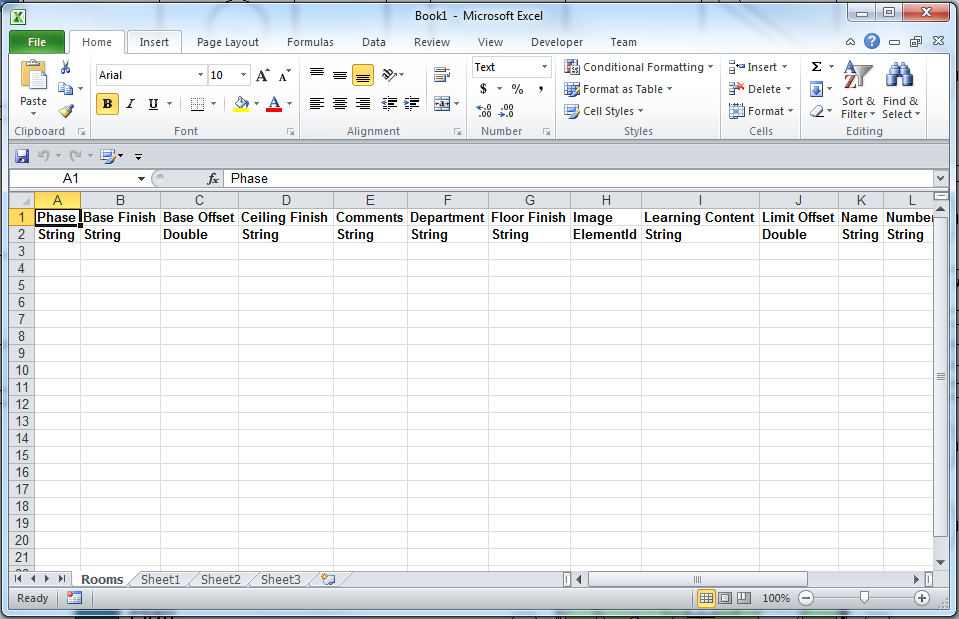
Table of Contents
Key Features
- Scans all Room elements in the project and collects every non-read-only parameter
- Generates one Excel worksheet per Room category (typically one sheet named "Rooms")
- Row 1: Parameter names (column headers) — including a mandatory Phase column
- Row 2: Parameter data types (String, Integer, etc.)
- Data starts from row 3 — ready for new room entries
- Parameters sorted alphabetically for easy navigation
- No dialog — runs immediately and prompts for a save location
Requirements
- The project must contain at least one Room element (so parameters can be discovered)
- Must be run in a project document (not a Family document)
- A valid Kiwi Codes Bonus Tools licence must be active
Running the Tool
Launch
Find Export Room Template on the Bonus Tools Ribbon under the Excel Tools dropdown, or use 115 Search Tools.

The tool runs immediately — a Save File dialog appears. Choose a location and filename for the Excel template.
Understanding the template structure
| Row | Content |
|---|---|
| 1 | Parameter names — do not delete or modify |
| 2 | Parameter data types — do not delete or modify |
| 3+ | Your new room data (one row per room) |
The first column is always Phase (a text field). This is used by Import New Rooms to assign each room to the correct project phase. If Phase is left blank, rooms are created in the first project phase.
Remaining columns correspond to Room parameters in alphabetical order: Comments, Department, Name, Number, and any custom parameters present in the project.
Populating the template
- Open the generated Excel file
- Delete any columns you do not need (keep row 1 and 2 headers intact for the columns you keep)
- Add one row per new room from row 3 onwards, filling in the parameter values
- Save the file
- Run 033g Import New Rooms to create the rooms in Revit
Tips and Best Practices
- Treat the template as a starting point. Delete columns you do not need to populate — fewer columns means a simpler file for data entry. Always keep at least the Name, Number, and Phase columns.
- Do not delete or modify rows 1 and 2. The Import New Rooms tool reads header row 1 to identify which parameter each column corresponds to. Changing or removing these headers will cause that column to be ignored or fail during import.
- Use the Phase column to place rooms in the correct phase. If your project has multiple phases (e.g. Phase 1, Phase 2), set the Phase cell for each room row to the exact phase name as it appears in Revit.
- The saved file is temporary. Treat the exported template as a working document for a specific import operation — it does not represent a persistent record. Re-export a fresh template if project Room parameters change.
- Match parameter names exactly. Import New Rooms matches column headers to Room parameters by exact name. If a parameter is renamed in Revit after the template is generated, re-export a fresh template.
Common Use Cases
Bulk room creation from a client brief — Export the template, share with the client or space planner to fill in room numbers, names, and departments in Excel, then import the completed file to create all placeholder rooms in one step.
Room data handoff from another system — Receive room data in a spreadsheet, reformat it to match the template structure (rows 1–2 as headers, data from row 3), and import to populate Revit.
Adding rooms for a new phase — Export the template, fill in rooms for the new phase with the correct Phase value, and import to create them as unplaced placeholders ready to be placed on levels.
Troubleshooting
No file is generated / dialog does not open The project may contain no Room elements, so no parameters were discovered. Add at least one room to the project before running the tool.
"Action not available in the Family environment." Close the Family Editor and run from within a project document.
Template has no columns / only Phase column The project's Room elements have no editable non-read-only parameters beyond the built-in ones. Check that shared or project parameters have been added to the Room category.
Columns are missing after regenerating the template If Room parameters were added to the project since the last export, re-export a fresh template to include the new parameters.