033e Excel Tools Export Formatted Schedule to Excel
Chris McKeown / July 1, 2025
Excel Tools
Overview
Export Formatted Schedule to Excel writes data from a Revit schedule into a pre-existing, pre-formatted Excel workbook at a position you specify. Unlike 033b Export Schedule to Excel, this tool writes into an existing template without creating a new file, preserving company branding, formulas, and charts. The export is one-way: the output cannot be reimported into Revit.
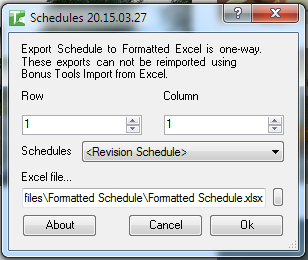
Table of Contents
Key Features
- Writes schedule data into a pre-existing Excel file — preserves all formatting, charts, and formulas
- Configurable starting row and starting column for precise data placement
- Schedule selector dialog shows all schedules in the project
- Progress bar with Cancel button
- One-way export — output cannot be reimported using Import from Excel
One-way only. The structured header metadata required by Import from Excel is not written. This tool is for reporting output only.
Requirements
- A pre-formatted Excel file must exist on disk before running the tool
- The project must contain at least one ViewSchedule
- Must be run in a project document (not a Family document)
- A valid Kiwi Codes Bonus Tools licence must be active
Running the Tool
Launch
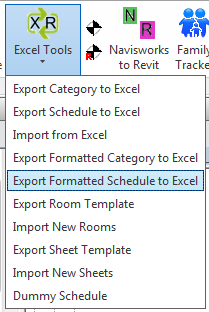
Find Export Formatted Schedule to Excel on the Bonus Tools Ribbon under the Excel Tools dropdown, or use 115 Search Tools.
Step 1 — Select a schedule
A dialog lists all ViewSchedules in the project. Select the schedule to export.
Step 2 — Set the starting position
Enter the Starting Row and Starting Column where schedule data should begin writing in the template (1-based). Set these to match your template's first data row — below header rows and above any footer.
Step 3 — Select the Excel template
Browse to and select the pre-formatted Excel file to write into.
The tool writes to the first worksheet only. Existing values at the write position will be overwritten.
Step 4 — Export
Click OK. The tool writes schedule field values (visible non-hidden fields only) into the template, starting at the specified row and column. A progress bar tracks progress; Cancel rolls back all writes.
When complete, the file is saved and opened in the default Excel application.
Tips and Best Practices
- Design your template with matching column headers. Arrange columns in the template to match the schedule field order so written data aligns with your headers automatically.
- Use for client-facing reports. This tool produces formatted deliverables with company branding — ideal for door schedules, room data sheets, or equipment lists sent to clients.
- Ensure enough blank rows. The tool overwrites cells starting at the specified position. Make sure there are enough empty rows to hold all schedule rows.
- Calculated values are not exported. Formula and calculated value fields in the schedule will write as blank. Use source parameter fields instead.
Common Use Cases
Branded door schedule — Export a Revit door schedule into a company letterhead Excel template for issue to the contractor, with all formatting and trade marks preserved.
Pre-formatted room data sheet — Write room parameters into a template that has conditional formatting highlighting incomplete data — QA ready on export.
Equipment list with pricing formulas — Export equipment parameters into a cost-estimating template where cost formulas reference the exported quantity and type columns.
Troubleshooting
"Excel file does not exist" The template file path is not valid. Select an existing Excel file before running the export.
"No elements found to export" The selected schedule is empty or has no visible fields. Check that the schedule contains rows and that at least one field is visible (not hidden).
"Action not available in the Family environment." Close the Family Editor and run from within a project document.
Data written to wrong cells in the template The starting row or column offset is incorrect. Adjust the starting position to align with the first data row of your template.