033d Excel Tools Export Formatted Category to Excel
Chris McKeown / July 1, 2025
Excel Tools
Overview
Export Formatted Category to Excel writes Revit element parameter data into a pre-existing, pre-formatted Excel workbook at a position you specify. Unlike 033a Export Category to Excel, this tool does not create a new file — it writes into an existing template that already has company branding, formulas, charts, or other formatting applied. The export is one-way: the output cannot be reimported into Revit using Import from Excel.
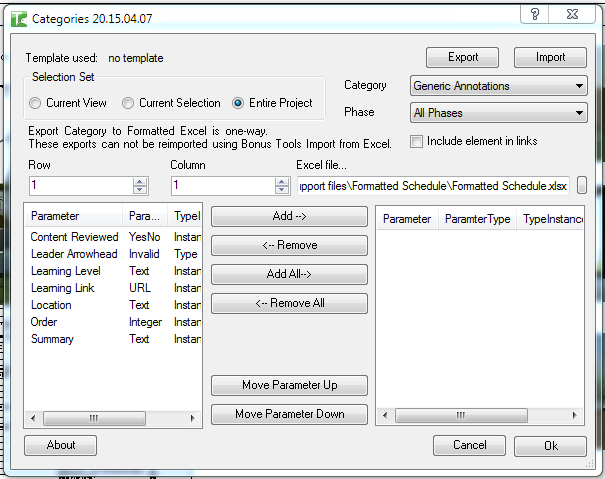
Table of Contents
Key Features
- Populates a pre-existing Excel file rather than creating a new one — preserves all formatting, charts, and formulas
- Configurable starting row and starting column for precise placement within the template
- Same category, phase, scope, and parameter selection workflow as 033a Export Category to Excel
- Optional Include Elements in Links (enabled for Entire Project scope only)
- One-way export — output cannot be reimported using Import from Excel
- Progress bar with Cancel button
One-way only. Because the output is written into an existing template (not a round-trip structured file), the five-row header metadata is not written. Import from Excel will not recognise this output.
Requirements
- A pre-formatted Excel file must exist on disk before running the tool
- Must be run in a project document (not a Family document)
- At least one parameter must be selected for export
- A valid Kiwi Codes Bonus Tools licence must be active
Running the Tool
Launch
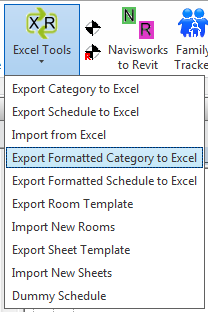
Find Export Formatted Category to Excel on the Bonus Tools Ribbon under the Excel Tools dropdown, or use 115 Search Tools.
Step 1 — Choose scope, category, phase, and parameters
The parameter selection dialog is the same as 033a Export Category to Excel. Select your scope, category, phase, and the parameters to export.
Step 2 — Set the starting position
In the dialog, enter the Starting Row and Starting Column where data should be written in the template. Row and column numbers are 1-based (row 1, column 1 = cell A1).
Set these to match the first data row in your template — below any headers, title rows, or frozen pane labels.
Step 3 — Select the Excel template
Use the Excel File field or browse button to select the pre-formatted Excel file to write into.
The tool writes to the first worksheet of the selected workbook. Existing cell values at the write position will be overwritten.
Step 4 — Export
Click OK. A progress bar tracks the export. Parameter values are written to the template starting at the specified row and column, one column per parameter, one row per element.
When complete, a message confirms the number of elements exported.
Tips and Best Practices
- Prepare your template first. Design the Excel file with all required formatting, header rows, and formulas before running the export. The tool only writes parameter values — it does not apply any formatting to the cells it writes.
- Leave enough empty rows. Ensure there are enough blank rows below the starting position to accommodate all elements. Existing data below will be overwritten.
- Use for reporting, not editing. Because this is a one-way export, it is best suited for generating reports or populating dashboards that are then distributed without returning to Revit.
- Export to a copy of the template. If you need to retain the original blank template, save a copy before running the export.
- Match column order to your template headers. Reorder parameters in the Selected Parameters list (using Move Up/Move Down) to match the column order in your Excel template headers.
Common Use Cases
Company-branded schedule output — Populate a company letterhead Excel template with Revit door, room, or equipment data for client handoff without losing branding.
Dashboard data feed — Write Revit category data into an Excel dashboard that has existing charts and conditional formatting — the charts update automatically with the new data.
Pre-formatted QA checklist — Export element parameters into a QA spreadsheet that has pass/fail formulas already set up in adjacent columns.
Troubleshooting
"Excel file does not exist" The specified Excel file path no longer exists or was not selected. Browse to an existing Excel file before running the export.
"No elements found in document: [path]" The selected scope, category, and phase returned no elements. Check the selection and category settings.
"No elements found to export" The dialog was closed with OK but no elements matched the criteria. Verify the scope and category.
"Action not available in the Family environment." Close the Family Editor and run from within a project document.
Data overwrites existing content in the template The starting row or column is set incorrectly. Adjust the starting position to write below your template's headers and above any existing footer content.