033a Excel Tools Export Category to Excel
Chris McKeown / July 1, 2025
Excel Tools
Overview
Export Category to Excel lets you extract parameter data from any Revit element category into a structured Excel workbook. You choose the category, phase filter, parameters to include, and which elements to scope — then a colour-coded spreadsheet is generated that can be edited and pushed back into Revit using 033c Import from Excel. A template system saves your parameter selection so you can repeat the same export on any project without reconfiguring.
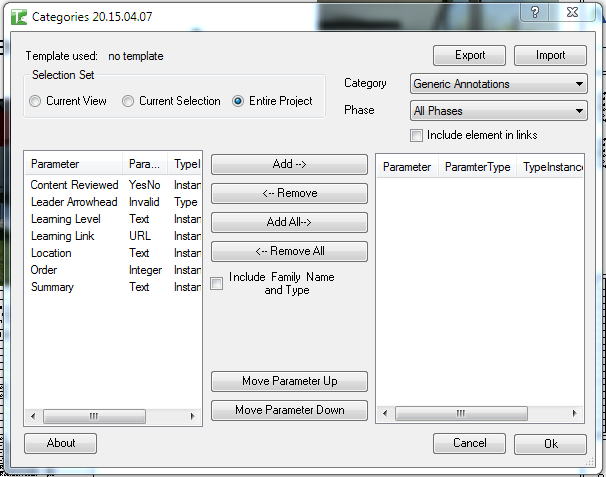
Table of Contents
Key Features
- Export any Revit category — doors, walls, rooms, families, and more
- Three scope options: Current View, Current Selection, or Entire Project
- Phase filter — export elements created in a specific phase or across All Phases
- Dual parameter list with add/remove, add-all/remove-all, and move-up/move-down controls
- Optional Family and Type column with dropdown validation for easy type-swapping during import
- Optional Include Elements in Links to include elements from loaded linked files
- Colour-coded Excel output for clarity:
| Colour | Meaning |
|---|---|
| Dark Grey | Header rows (rows 1–5) |
| Indian Red | Element ID column (locked, do not edit) |
| Light Blue | Elements from linked files |
| Beige | Read-only parameter values |
| Light Grey | Editable parameter values |
- Five-row header structure preserves parameter metadata for round-trip import
- Export Template / Import Template buttons save and restore your parameter configuration as a
.txtfile - Settings remembered between sessions via Revit Extensible Storage
Requirements
- Must be run in a project document (not a Family document)
- At least one element of the chosen category must exist in the selected scope
- At least one parameter must be moved to the Selected Parameters list before exporting
- A valid Kiwi Codes Bonus Tools licence must be active
Running the Tool
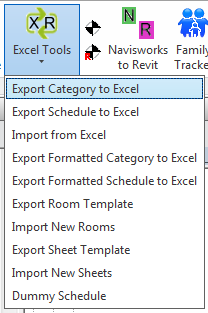
Launch
Find Export Category to Excel on the Bonus Tools Ribbon under the Excel Tools dropdown, or use 115 Search Tools.
Step 1 — Choose the scope
In the Selection Set group at the top of the dialog, choose which elements to include:
| Option | Elements included |
|---|---|
| Current View (default) | Elements visible in the active view |
| Current Selection | Elements selected before launching the tool |
| Entire Project | All elements in the project |
Include Elements in Links is only enabled when Entire Project is selected. Check it to include elements from loaded Revit link files in the export.
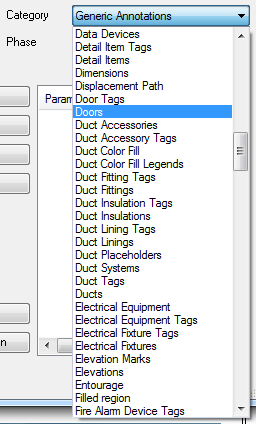
Step 2 — Choose the category
Select a category from the Category dropdown. The list is populated from the elements in the chosen scope — only categories with at least one element are shown.
Step 3 — Choose a phase (optional)
Select a construction phase from the Phase dropdown to export only elements created in that phase. Choose All Phases to include elements from all phases.
Step 4 — Select parameters to export
The left list (Available Parameters) shows all parameters for the chosen category. Move parameters to the right list (Selected Parameters) using:
- Double-click a parameter to add it
- Add button — adds the selected parameter
- Add All button — moves all available parameters to Selected
- Remove / Remove All — move parameters back to Available
- Move Up / Move Down — reorder parameters in the Selected list (this controls column order in Excel)
You must select at least one parameter before clicking OK.
Step 5 — Optional settings
- Include Family Name & Type — adds a "Family and Type" column with a dropdown validation list. This column can be edited in Excel and used by Import from Excel to change an element's type.
Step 6 — Save or load a template (optional)
Click Export Template to save the current category, phase, scope, and parameter selection as a .txt file. Click Import Template on a future session to restore the same configuration instantly.
Step 7 — Export
Click OK. A Save File dialog opens — choose a location and filename for the Excel file. A progress bar tracks the export. Click Cancel to stop and discard the partial output.
The generated Excel file has:
- Row 1 — Category name
- Row 2 — Parameter names
- Row 3 — Parameter value type
- Row 4 — Instance or Type designation
- Row 5 — Parameter ID (GUID for shared parameters)
- Row 6 onwards — One row per element, starting with the Element ID in column A
Do not modify or delete the header rows (1–5) or the Element ID column (A). These are required by Import from Excel.
Tips and Best Practices
- Save a template for each project standard. Export your parameter selection once and save it as a template. Load it on other projects to get a consistent export configuration every time.
- Use Current Selection for targeted exports. Pre-select a specific set of elements before opening the tool to limit the export to just those elements — faster than filtering after the fact in Excel.
- Keep read-only columns for reference, not editing. Beige cells (read-only parameters) will not be imported even if you change them. Use them as contextual data but do not edit them expecting the change to stick.
- Use Family and Type for type reassignment. If you need to swap multiple elements to a different type, enable the Family and Type column, update the cells in Excel, and reimport — much faster than changing types one by one in Revit.
- Do not add or remove rows in Excel. Import from Excel matches each row by the Element ID in column A. Adding or removing rows (other than empty trailing ones) will cause incorrect elements to be updated or the import to fail.
- Phase filter reduces noise. If a category has elements across many phases, filter to the relevant phase to keep the Excel file manageable.
Common Use Cases
Door parameter bulk edit — Export the Doors category for the Entire Project, edit Mark, Comments, or custom parameters in Excel, and reimport to update all doors in one operation.
Room data management — Export Rooms with parameters like Name, Number, Department, and Area for review or handoff to a project manager who fills in missing data in Excel.
Curtain panel type swap — Enable Family and Type, export Curtain Panels, update the type column in Excel, and reimport to change types across an entire facade in seconds.
Type parameter audit — Export any structural category with type parameters to create a schedule of all unique type values for a QA review, without needing a formal Revit schedule.
Linked file inventory — Enable Include Elements in Links, export the Furniture category across the entire project and all linked files, and produce a complete furniture inventory including linked models.
Troubleshooting
"Must select at least one Parameter." No parameters were moved to the Selected Parameters list. Move at least one parameter from the Available list to the Selected list before clicking OK.
"Action not available in the Family environment." The tool was launched while a Family document was active. Close the Family Editor and run from within a project document.
"No elements found in document: [path]" The chosen scope, category, and phase combination returned no elements. Check that the category contains elements in the selected scope and phase.
"No elements found to export" The export encountered an error or the element list was empty. Verify the scope and category selection, then try again.
Category dropdown is empty No elements were found in the selected scope. Switch to a broader scope (e.g. Entire Project) or check that the active view or selection contains elements.
Export template fails to load If the template was saved on a different project or with different categories, the tool may not find the saved category or parameters in the current project. Load the template and manually adjust the category and parameters as needed.