029a View Template Map
Chris McKeown / July 1, 2025
Lists
Overview
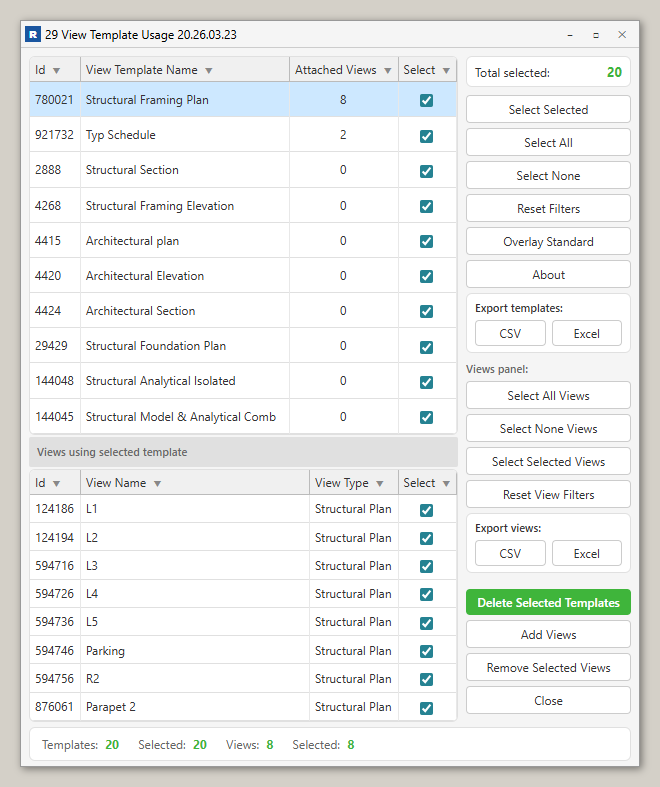
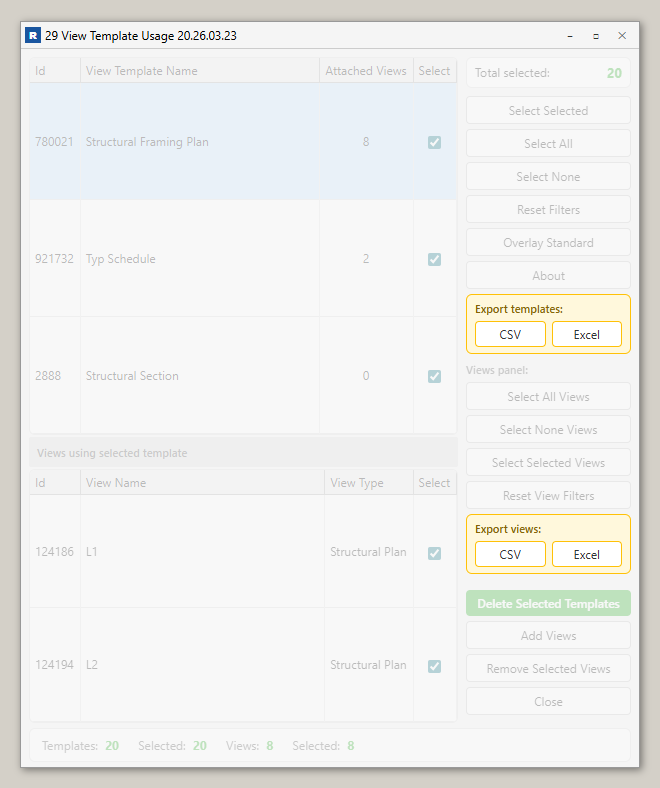
View Template Map gives you a complete picture of how View Templates are used across your Revit project. The dual-panel interface lists every template in the top grid and shows all views attached to the selected template in the bottom grid, making it easy to spot unused templates, reassign views, and delete obsolete templates in bulk. Teams managing large projects or enforcing BIM standards will find it especially useful for auditing template compliance against an Excel naming standard.
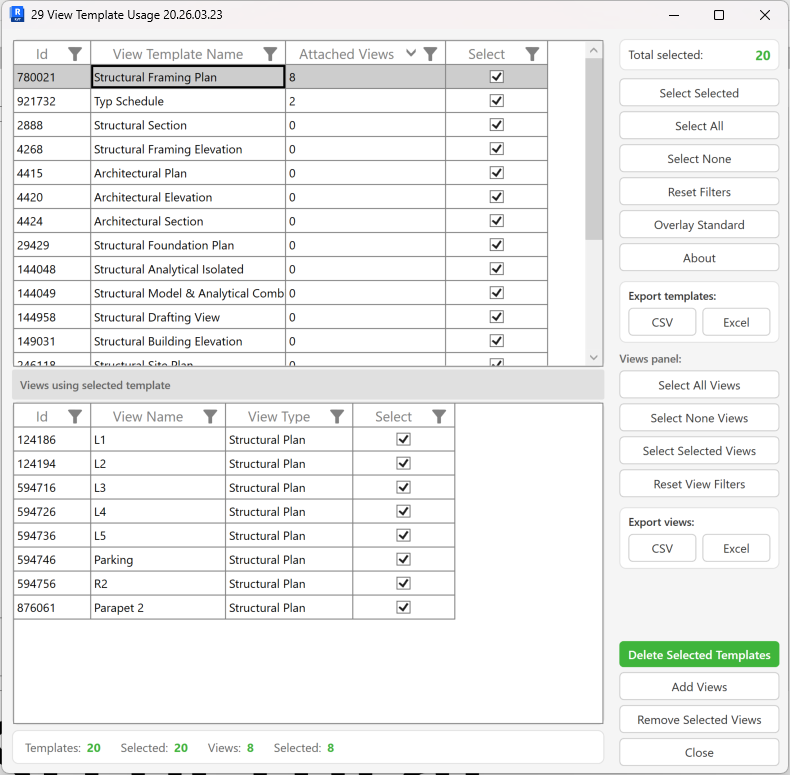
Table of Contents
Key Features
- Dual-panel layout: all View Templates listed in the top grid, views assigned to the selected template in the bottom grid
- Live count display — Templates total, selected count, Views total, and views selected shown in the status bar
- Select Selected, Select All, Select None, and Reset Filters controls for both grids
- Export either grid to CSV or Excel with a single click
- Add Views to a template — opens a full view picker supporting all Revit view types
- Remove selected views from a template (detaches without deleting the view)
- Delete selected templates permanently from the project
- Overlay Standard — compare all templates against a named Excel list, automatically selecting any non-standard templates
- Settings are persisted per document so the Excel file and tab selections are remembered
Requirements
- Must be run in a project environment — not available in the Family Editor
- The project must contain at least one View Template; the tool closes with a message if none exist
- Optional — an Excel file with a single column of approved template names for the Overlay Standard feature
Running the Tool
Launch
Find View Template Map on the Bonus Tools ribbon or use 115 Search Tools.
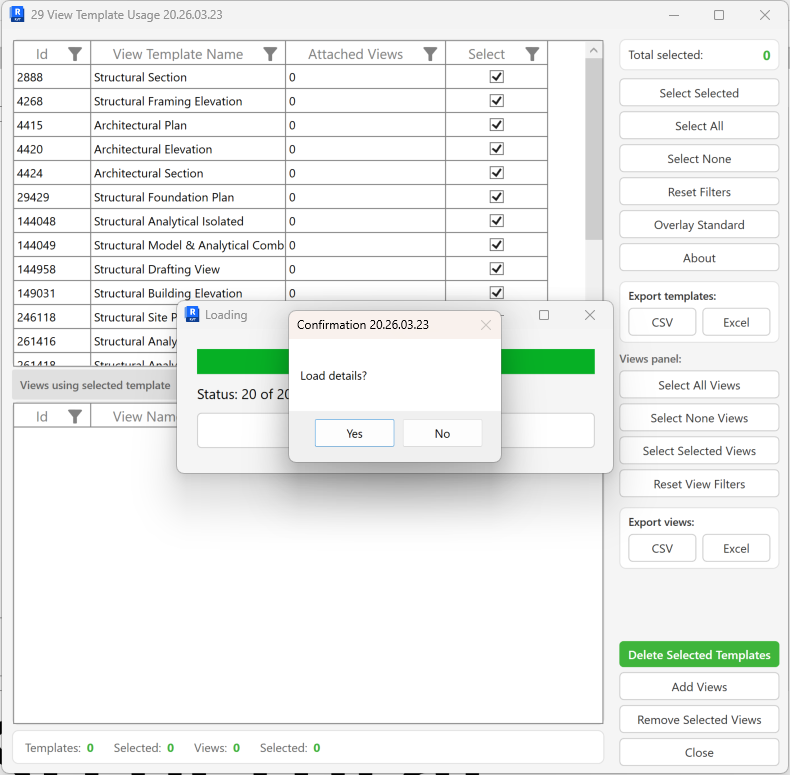
On launch, the tool loads all View Templates into the top grid. A confirmation dialog asks "Load details?" — click Yes to also load which views are attached to each template (recommended for full auditing). Click No to skip this step if you only need to review template names.
Step 1 — Review the Templates Grid
The top grid lists every View Template in the project with four columns:
| Column | Description |
|---|---|
| Id | Revit Element Id of the View Template |
| View Template Name | Name as it appears in Revit |
| Attached Views | Number of views currently using this template |
| Select | Checkbox — tick to include in bulk actions |
Click any row to load that template's views into the bottom panel.
Use the column headers to filter and sort — for example, filter Attached Views to 0 to find all unused templates.
Step 2 — Review the Views Panel
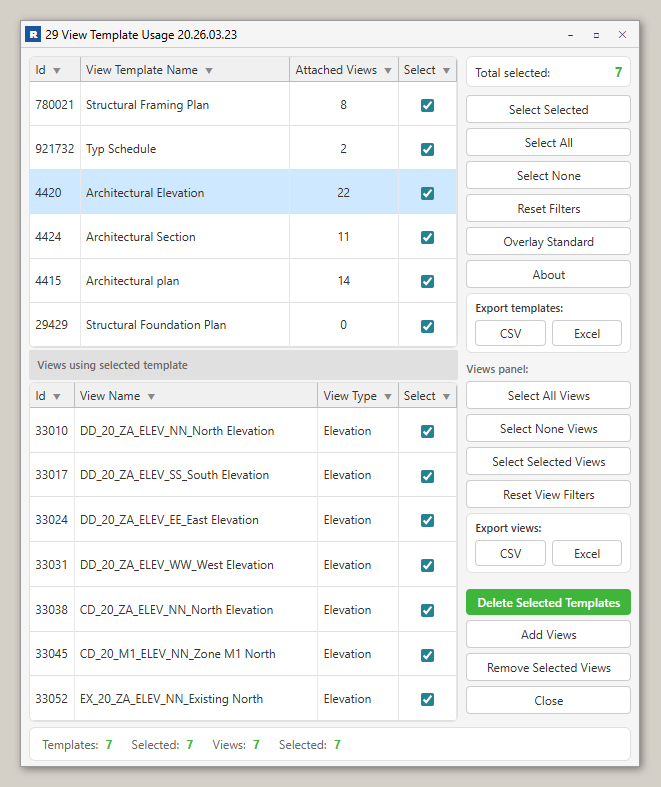
When a template row is selected, the bottom grid shows all views currently assigned to that template:
| Column | Description |
|---|---|
| Id | Revit Element Id of the view |
| View Name | Name of the view |
| View Type | Revit view type (e.g. Floor Plan, Section, Elevation) |
| Select | Checkbox — tick to include in bulk actions |
The status bar below both grids shows live counts: Templates, Selected (templates), Views, Selected (views).
Step 3 — Select Templates or Views
Use the action buttons in the right panel to manage selections:
Templates panel:
- Select Selected — toggles the Select checkbox for highlighted rows
- Select All — ticks all templates
- Select None — unticks all templates
- Reset Filters — clears any active column filters on the templates grid
Views panel:
- Select All Views — ticks all views in the bottom panel
- Select None Views — unticks all views
- Select Selected Views — toggles the Select checkbox for highlighted view rows
- Reset View Filters — clears any active column filters on the views grid
Step 4 — Export Data (Optional)
Export either grid to a spreadsheet for reporting or record-keeping.
Under Export templates, click CSV or Excel to export the full templates list.
Under Export views, click CSV or Excel to export the views currently shown in the bottom panel.
Step 5 — Overlay Standard (Optional)
The Overlay Standard feature compares your project's View Templates against an approved list stored in an Excel file. Any template not on the list is automatically flagged and selected.
- Click Overlay Standard
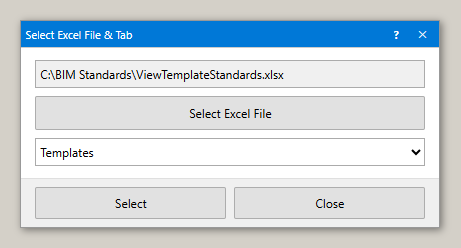
- In the file picker, select the Excel file and the sheet tab containing the approved template names (one name per row in column A)
- Click OK — the tool reads the list and marks any template not found in it as selected and non-standard
- Review the selected templates in the grid, then use Delete Selected Templates if they should be removed
The Excel file path and tab name are saved to the project so you do not need to reselect them each session. The overlay re-applies automatically on next load if a file has been configured.
Step 6 — Add Views to a Template
To assign additional views to the currently selected template:
- Select the template row in the top grid
- Click Add Views
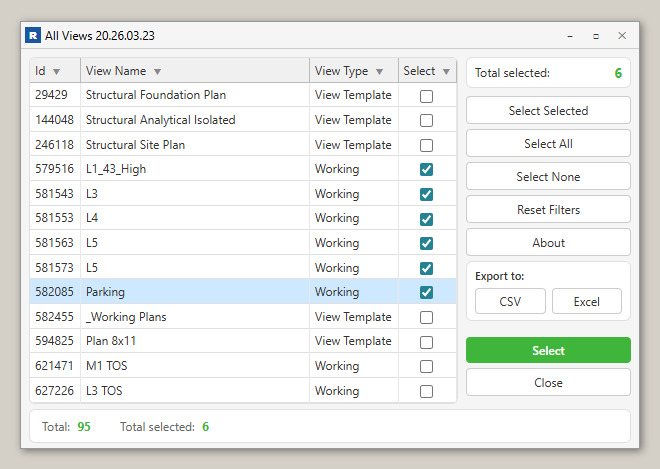
- In the view picker, select one or more views to assign
- Click OK — the selected views are updated with the template's Id in a single transaction
Supported view types: Area Plan, Ceiling Plan, Column Schedule, Detail, Drafting View, Elevation, Engineering Plan, Floor Plan, Legend, Section, 3D View, Walkthrough, Cost Report, Loads Report, Panel Schedule, Pressure Loss Report, Rendering, Report, Schedule.
Step 7 — Remove Views from a Template
To detach views from a template (without deleting them):
- In the bottom views panel, tick the Select checkbox on the views to remove
- Click Remove Selected Views
- Confirm the prompt — each selected view's template assignment is cleared
The views remain in the project; they simply no longer have a View Template applied.
Step 8 — Delete Selected Templates
To permanently delete View Templates from the project:
- In the top templates grid, tick the Select checkbox on the templates to delete
- Click Delete Selected Templates
- Confirm the prompt — the tool deletes each selected template in a subtransaction, logging success or failure for each
This action cannot be undone. Ensure the templates are not needed before deleting. Views that were assigned to a deleted template will revert to no template.
The status bar and grid update automatically after deletion to reflect the new totals.
Tips and Best Practices
- Always load details on open. Clicking Yes to "Load details?" is essential for seeing which templates are in use vs. unused. Templates showing
0in Attached Views are safe candidates for deletion. - Use column filters to isolate unused templates. Click the Attached Views column header and filter to
0to instantly surface all templates with no assigned views — a quick way to audit for cleanup. - Export before deleting. Click Export Excel on the templates grid before running a bulk delete. This gives you a record of what was removed and can be used to recreate templates if needed.
- Use Overlay Standard to enforce BIM standards. Maintain a central Excel list of approved template names and run the overlay at project milestones to catch any non-standard templates added by team members.
- The Excel standard file is per-document. The file path is stored in Revit's Extensible Storage (Schema:
ViewTemplateStandards), so each project can reference a different standards file. - Selective subtransactions mean partial success is possible. During bulk delete or remove, each item is processed in its own subtransaction. If one fails (e.g. due to a workset lock), others still proceed — check the Output panel for green/red status per item.
- Press F1 or F2 at any time inside the dialog to open the help page for this tool.
- Press Escape to close the dialog without making changes.
Common Use Cases
Auditing unused templates before project handover — Run the tool, load details, then filter Attached Views to 0. Export the list to Excel for review with the BIM Manager, then delete confirmed orphans to clean up the project file.
Enforcing a BIM standard — Maintain an Excel file of approved template names in a shared location. Before each milestone, open the tool and click Overlay Standard. The tool highlights any non-conforming templates in red and selects them — review and delete as appropriate.
Bulk reassigning views — If a template is being retired and replaced, select all views in the bottom panel, click Remove Selected Views to detach them, then use Add Views on the new template to reassign them in one operation.
Identifying over-templated or under-templated view groups — Sort the Attached Views column to find templates with unusually high counts (possible over-reliance on one template) or zero counts (candidates for deletion).
Onboarding a new project file — Run the tool at the start of a project to document what templates were inherited from a template file, confirm they match the project's BIM Execution Plan, and delete any that are not required.
Troubleshooting
"Action not available in the Family Environment"
View Template Map works on project files only. Open a project (.rvt) rather than a family (.rfa) file and try again.
"Project contains no View Templates" The project has no View Templates defined. The tool will close automatically. Create at least one View Template in Revit (Manage → View Templates) before using this tool.
"Load details?" — should I click Yes? Clicking Yes loads which views are assigned to each template — this is the full audit mode and is recommended. For very large projects with hundreds of views, it may take a moment. Clicking No loads template names only, which is faster if you only need to delete or export templates.
Attached Views column shows 0 for all templates You clicked No on the "Load details?" prompt at startup. Close and reopen the tool, then click Yes to load view assignments.
"Deletion failed. Gain ownership of elements and try again." In a workshared project, you do not own the View Template elements. Use Revit's Editing Requests or synchronise and acquire the relevant worksets, then retry.
"Operation Failed." during Add Views or Remove Views A general error occurred during the transaction. Check the Output panel for specific details. Common causes: the view is locked by another user, or the view type is not compatible with the selected template.
"Worksheet: [tab] not found." The Excel tab name stored for Overlay Standard no longer matches a sheet in the file (e.g. the tab was renamed). Click Overlay Standard again, reselect the correct file and tab, and re-apply.
"No Views selected." when clicking Add Views You did not select any views in the view picker dialog that opens. Click Add Views again and check at least one view before clicking OK.
"Could not find a valid View Template." The selected template row in the top grid could not be retrieved from the Revit document (it may have been deleted externally). Close and reopen the tool to refresh the list.