029 View Template Map
Chris McKeown / July 1, 2025
Lists
Overview
View Template Map gives you a complete inventory of all view templates in the project alongside a count of how many views use each one. Click any template in the top grid to see the exact views attached to it in the lower panel. Use it to identify templates with no attached views (candidates for deletion), reassign views to different templates in bulk, or validate your template set against a company standard list loaded from Excel.
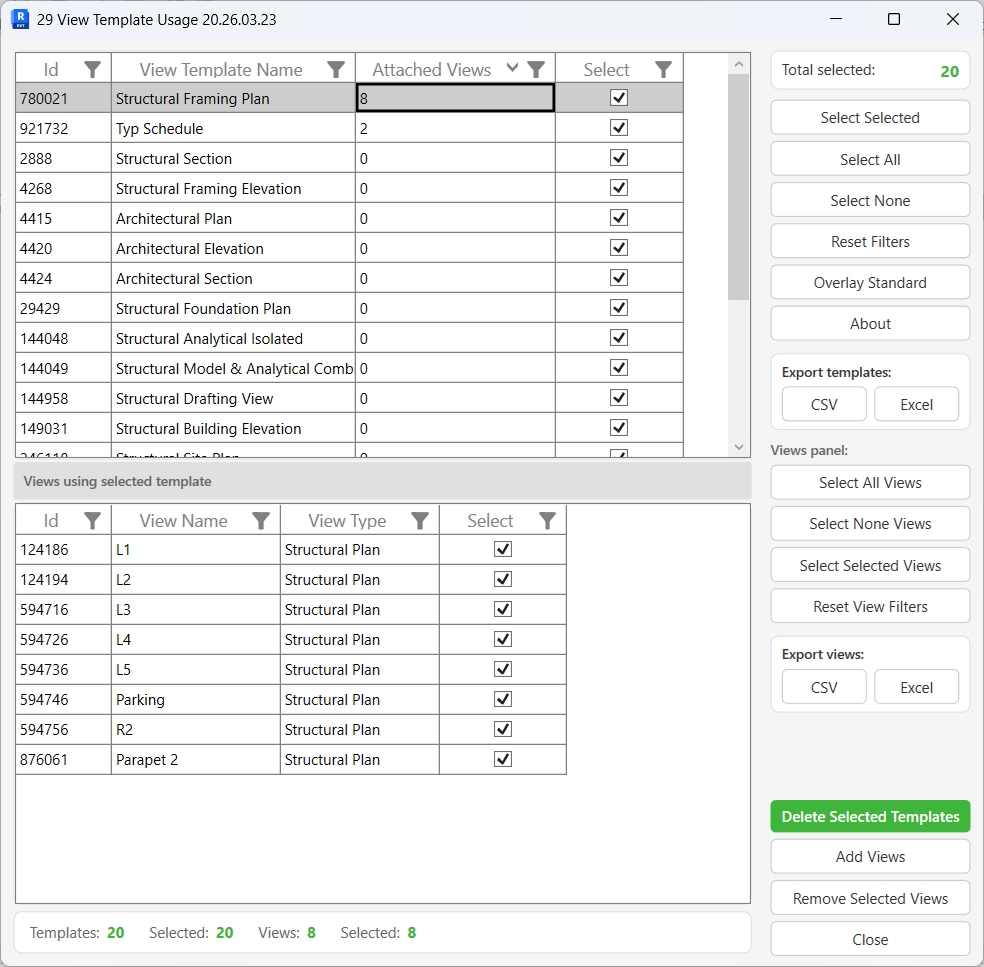
Table of Contents
Key Features
- Templates grid (top panel): Id, View Template Name, Count (attached views), Select
- Views grid (bottom panel): Id, View Name, View Type, Select — updates when a template is selected above
- Load details prompt on open — choosing Yes maps all views to their templates (may be slow on large projects); choosing No loads templates only and maps on demand
- Delete Templates — bulk-deletes selected view template elements; transaction: "Delete Elements"
- Add Views — opens a view picker (WPF_AllViews) to assign additional views to the selected template; transaction: "Add Views"
- Remove Selected Views — detaches selected views from their template without deleting the views; transaction: "Remove Views"
- Overlay Standard — loads an Excel file column of approved template names; non-standard templates are highlighted and pre-selected for review
- Column filtering on both grids — filter by name, type, or any column value
- Reset Filters on both grids to clear applied column filters
- Multi-select: Select Selected / Select All / Select None for both grids
- Export to CSV / Export to Excel for both grids
- Confirmation: "X items deleted. Y items failed." / "X Views removed. Y Views failed." / "X Views updated. Y Views failed."
Requirements
- Any Revit project document (not available in the Family environment)
- At least one view template must exist in the project — the tool closes automatically if none are found
- Overlay Standard requires a pre-prepared Excel file with template names in the first column of a named tab
- A valid Kiwi Codes Bonus Tools licence must be active
Running the Tool
Launch
Find View Template Map on the Bonus Tools Ribbon or use 115 Search Tools.
On opening, all view templates are loaded into the top grid. A prompt asks whether to load the full template-to-view mapping:
- Yes — maps all views to their templates immediately (recommended for audit work)
- No — loads templates only; the view count updates when you click each template row
Step 1 — Review templates and view counts
The top grid shows every view template in the project with its current attached view count:
| Column | Description |
|---|---|
| Id | Revit Element Id of the view template |
| View Template Name | The view template name |
| Count | Number of views currently using this template |
| Select | Checkbox — tick to include in the next action |
Templates with Count = 0 have no views attached and are candidates for deletion.
Click any template row to load its attached views in the lower panel.
Step 2 — Review attached views
The bottom panel shows all views using the selected template:
| Column | Description |
|---|---|
| Id | Revit Element Id of the view |
| View Name | The view name |
| View Type | The view family type (Floor Plan, Section, Elevation…) |
| Select | Checkbox — tick to include in the next action |
Use Select All Views, Select None Views, or Select Selected Views to manage the selection in the lower panel independently of the upper grid.
Step 3 — Delete unused templates
To remove view templates that are no longer needed:
- In the top grid, select the templates to delete (use Select All then uncheck templates you want to keep, or sort by Count and select zero-count templates)
- Click Delete Templates
- Confirm the deletion prompt
A summary reports how many templates were deleted and how many failed. Deleted rows are removed from the grid.
Step 4 — Add views to a template
To assign additional views to a template:
- Click the target template row in the top grid to select it
- Click Add Views
- Select one or more views from the view picker that opens
- Click OK in the picker
The selected views are assigned to the template and the Count updates.
Step 5 — Remove views from a template
To detach views from a template (the views are not deleted — only the template assignment is cleared):
- In the bottom grid, select the views to detach
- Click Remove Selected Views
- Confirm the prompt
The selected views have their template assignment removed (ViewTemplateId is cleared). The Count in the top grid updates.
Step 6 — Validate against a company standard (Overlay Standard)
To compare the project's view templates against an approved list:
- Click Overlay Standard
- Browse to the Excel file containing the approved template names
- Select the worksheet tab containing the list
The tool reads the first column of the selected tab. Templates whose names do not appear in the list are marked as non-standard and pre-selected in the top grid. Templates that match the standard are deselected.
Review the selection, then use Delete Templates to remove all non-standard templates, or adjust the selection manually first.
Export
Click Export to CSV or Export to Excel under either grid to save that grid's current data.
Tips and Best Practices
- Sort by Count ascending to find unused templates. Templates with Count = 0 have no attached views. Check that they are truly obsolete before deleting — they may be future-use templates kept intentionally.
- Load details at startup on smaller projects. On very large projects with hundreds of views, loading details can take a moment. Click No at the prompt and then click individual template rows to map on demand.
- Use Overlay Standard before a project handover. Load your company's approved template list and immediately see which project templates are non-standard. Delete them in one pass.
- Prepare the Excel standard file carefully. The file must have template names in the first column of the selected tab, one per row, with no header row (or the header will be treated as a template name). Names are case-sensitive and must match exactly.
- Remove views from a template before deleting it. If a template is deleted while views still reference it, Revit may clear those views' template assignments automatically, but it is safer to reassign or remove them first.
- Export before bulk deletion. Save the CSV from the top grid before deleting templates so you have a record for audit purposes.
Common Use Cases
Identifying and removing unused view templates — Sort the top grid by Count ascending, select all rows with Count = 0, and delete them. This removes templates created during early design that are no longer referenced by any view.
Auditing template assignments before issue — Load all details at startup, then scroll through the top grid reviewing each template's count. Export to Excel for a formal BIM audit record.
Validating a project against BIM standards — Use Overlay Standard to load the company's approved template list. Non-standard templates are pre-selected — review and delete them in a single operation.
Reassigning views after a template rename — When a template is renamed or replaced, use Add Views to assign all affected views to the new template, then Remove Selected Views on the old one to clean up the mapping.
Finding which views use a specific template — Click the template row in the top grid. The bottom panel immediately shows every view attached to it, along with view type — useful for understanding the blast radius before deleting or modifying a template.
Troubleshooting
"Project contains no View Templates." No view templates exist in the project. The dialog closes automatically. Create at least one view template in Revit before running the tool.
"Could not find a valid View Template." The template selected in the top grid could not be retrieved from the model. Refresh by clicking Reset Filters and selecting the template again.
"No Views selected." No views were selected in the view picker when using Add Views. Select at least one view and click OK.
"Deletion failed. Gain ownership of elements and try again." The delete or remove transaction failed due to a worksharing conflict. Gain ownership of the affected templates or views and retry.
"Operation Failed." An unexpected error occurred. Check the Revit journal for details.
"X items deleted. Y items failed." with failures Some templates could not be deleted. In a workshared model, the template element may be owned by another user. Borrow the element and retry.
Overlay Standard shows "Worksheet: [tab] not found." The Excel tab name selected in the dialog does not exist in the file. Re-run Overlay Standard and choose the correct tab name from the dropdown.
Count shows 0 but views appear to use this template The view mapping may not have been loaded (you clicked No at the startup prompt). Click a template row to load its detail panel — the count updates after mapping.