028 Reference Plane List
Chris McKeown / July 1, 2025
Time Saving
Overview
Reference Plane List loads all reference planes in the project into a grid, showing their name, sub-category, how many other elements depend on them, which view they belong to (for view-specific planes), and whether they are hidden. Use it to quickly identify and remove unused or orphaned reference planes that accumulate during design and slow down model performance — with the dependency count column giving you confidence about which planes are safe to delete.
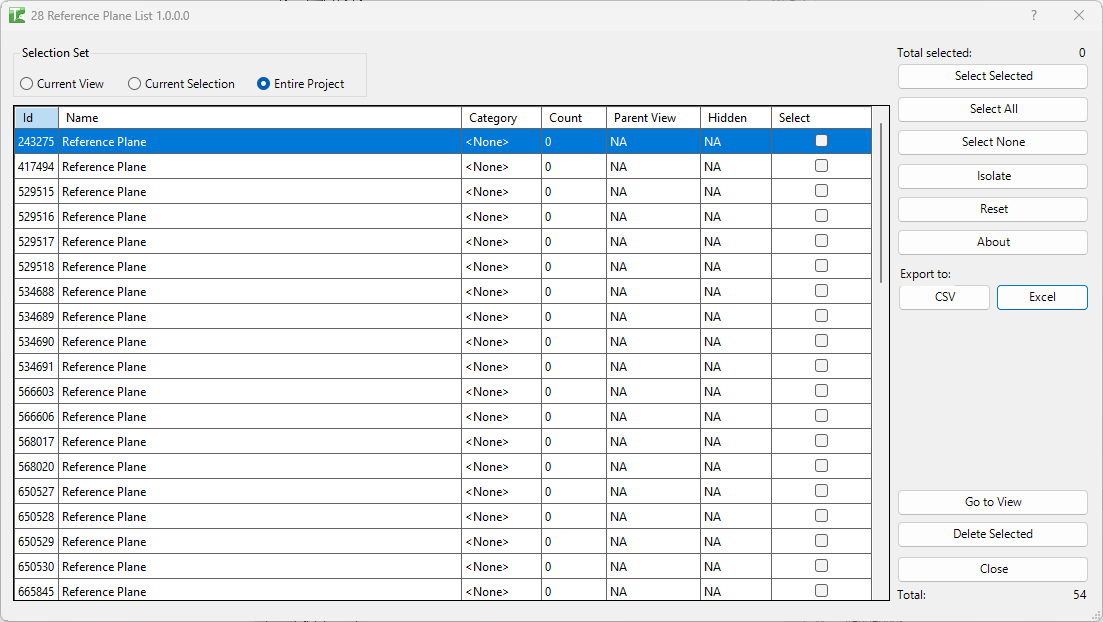
Table of Contents
Key Features
- Three scope modes: Current View, Current Selection, Entire Project (radio buttons)
- Grid columns: Id, Name, Category (sub-category), Count (dependency count), Parent View, Hidden, Select
- Count column — computed by temporarily attempting to delete the plane and counting the cascade, then rolling back. A count of 0 means the reference plane is safe to delete without side effects
- Parent View — for view-specific reference planes, shows the host view name; shows
NAfor project-wide planes - Hidden — for view-specific planes, shows whether the plane is hidden in its host view; shows
NAfor project-wide planes - Go to View — opens the host view and highlights selected reference planes in Revit
- Delete Selected — bulk-deletes checked reference planes; transaction: "Delete Reference Planes"
- Isolate — filters the grid to show only selected rows for focused review
- Reset — reloads the full reference plane list from the model
- Export to Excel / Export to CSV — saves the current grid for reporting or audit
- Multi-select: Select All / Select None / Select Selected
- Confirmation: "X passed. Y failed."
Requirements
- Any Revit project document
- A valid Kiwi Codes Bonus Tools licence must be active
Running the Tool
Launch
Find Reference Plane List on the Bonus Tools Ribbon or use 115 Search Tools.
The dialog opens with Current View selected by default and the grid populated immediately with all reference planes visible in the active view.
| Column | Description |
|---|---|
| Id | Revit Element Id of the reference plane |
| Name | The reference plane name (blank if unnamed) |
| Category | The sub-category assigned to the plane (e.g. Reference Plane, Lines) |
| Count | Number of dependent elements that would also be deleted if this plane were deleted (0 = safe) |
| Parent View | Host view name for view-specific planes; NA for project-wide planes |
| Hidden | Whether the plane is hidden in its host view; NA for project-wide planes |
| Select | Checkbox — tick to include in the next action |
The Total counter shows the number of reference planes loaded. Click any column header to sort.
Step 1 — Choose scope
Use the radio buttons at the top to control which reference planes are loaded:
| Scope | Loads |
|---|---|
| Current View | Reference planes visible in the active view (default) |
| Current Selection | Only reference planes in the current Revit selection set |
| Entire Project | All reference planes across the entire model |
Switching scope reloads the grid automatically.
Step 2 — Review the dependency count
The Count column is the key safety indicator. The tool temporarily attempts to delete each reference plane, counts how many additional elements would be removed in the cascade, then rolls back. A count of 0 means the plane has no dependents — it is safe to delete. A count greater than 0 means other elements (dimensions, constraints, hosted objects) depend on it.
Sort by Count ascending to surface all zero-dependency reference planes at the top — these are the primary candidates for cleanup.
Step 3 — Select reference planes
Tick checkboxes in the Select column, or use the selection buttons:
| Button | Action |
|---|---|
| Select Selected | Toggle the checkbox for the currently highlighted row(s) |
| Select All | Check all reference planes in the grid |
| Select None | Uncheck all reference planes |
The Total selected counter updates as selections change.
Step 4 — Navigate to a reference plane (optional)
To confirm which reference plane a row represents:
- Select the row(s)
- Click Go to View
Revit opens the host view and highlights the selected reference planes. If no open view shows the selected planes, Revit prompts whether to search closed views:
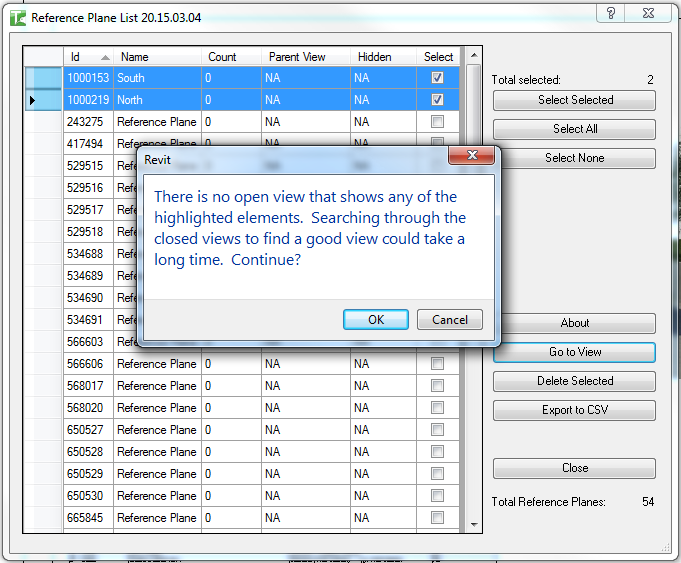
View-specific reference planes navigate to their parent view. Project-wide planes navigate to the current active view.
Step 5 — Delete selected reference planes
- Select the reference planes to delete
- Click Delete Selected
- Confirm the deletion prompt
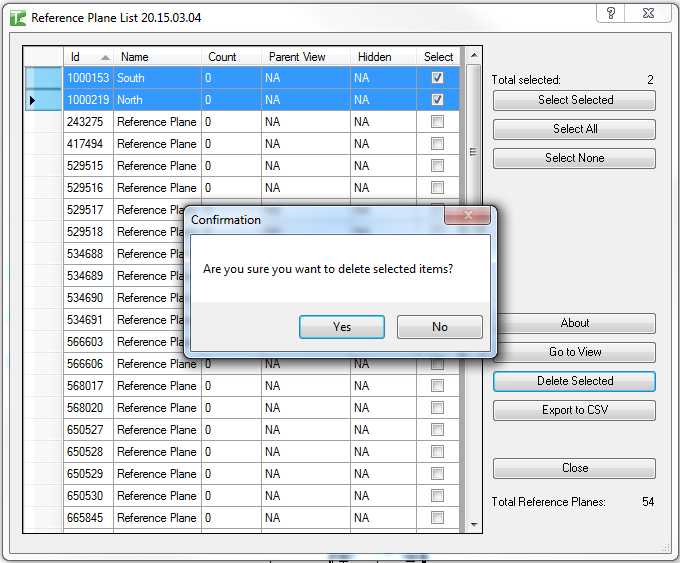
A pass/fail summary reports the result. Successfully deleted rows are removed from the grid; failed rows remain.
Isolate and Reset
Click Isolate to filter the grid to only the currently selected rows — useful for reviewing a subset before deleting. Click Reset to reload the full list from the model.
Export
Click Export to CSV or Export to Excel to save the current grid for audit or reporting.
Tips and Best Practices
- Sort by Count = 0 to find unused planes. Zero-dependency planes have no hosted elements or constraints. They are safe to delete and are the primary target for cleanup.
- Use Entire Project scope for a full audit. Current View only shows planes in the active view. Switch to Entire Project before running a pre-handover cleanup.
- Check Parent View before deleting view-specific planes. A hidden view-specific plane may be invisible in the current view but still valid in its host view. Navigate to it before deleting.
- Use Isolate to review before deleting. Select all zero-dependency planes, click Isolate, and review the narrowed list before running Delete Selected.
- Export before bulk deletion. Save the CSV first to have a record of the deleted planes for audit trail purposes.
- Reference planes with dependencies can still be deleted. The Count column warns you, but deletion is not blocked. Deleting a plane with dependents will delete those dependents too — check the count carefully for high-count planes.
Common Use Cases
Pre-handover reference plane cleanup — Run with Entire Project scope, sort by Count ascending, select all planes with Count = 0, and delete them in a single pass. This removes reference planes that were created as temporary construction aids.
Audit before model issue — Export to CSV with Entire Project scope and review the full list of reference planes. Identify unnamed planes (blank Name column) or planes with unexpected sub-categories.
Finding view-specific reference planes — Sort by Parent View to group all view-specific planes together. Check whether their host views still exist and whether the planes are still needed.
Diagnosing slow model performance — A large number of reference planes (especially with dependencies) can increase regeneration time. Use this tool to identify and remove planes that are no longer serving their original purpose.
Troubleshooting
"Reference Plane Deletion failed. Gain ownership of elements and try again." The delete transaction failed due to a worksharing conflict. Gain ownership of the affected reference planes via Worksets or Editing Requests and retry.
"X passed. Y failed." with failures Some planes could not be deleted — they may be owned by another user in a workshared model, pinned, or protected by Revit. Check ownership and retry.
"Operation Failed." An unexpected error occurred. Check the Revit journal for details or contact support.
Grid is empty after switching scope No reference planes exist in the selected scope. Switch to Entire Project to verify whether any reference planes exist in the model at all.
Count is higher than expected The Count column counts all elements that would be deleted in a cascade, not just direct dependents. Dimensions, constraints, and sketch-hosted objects all count. Review the host view before deleting high-count planes.
Go to View opens an unexpected view For project-wide (non-view-specific) planes, the tool navigates to the current active view. Switch to the view you want to inspect before clicking Go to View.