019 Remove Unused Views
Chris McKeown / July 1, 2025
Review Views
Overview
Remove Unused Views scans your Revit project for views that are not placed on any sheet and presents them in a reviewable list before any deletion occurs. Up to three parameter-based retention filters let you protect specific views from deletion even if they are off-sheet. The tool also optionally targets unused schedules, helping to keep file size under control without accidental data loss.

Table of Contents
Key Features
- Automatically identifies all views not placed on a sheet
- Protects the currently active view from appearing in the deletion list
- Handles dependent views — if any dependent view is placed on a sheet, the parent view is retained
- Three independent parameter retention filters to protect views by custom parameter value
- Optional schedule cleanup — remove schedules not placed on any sheet
- Titleblock revision schedules are always excluded from deletion
- Review and cherry-pick views before deleting with a sortable, filterable data grid
- Select All / Select None / Select from grid highlight for precise control
- Export the unused view list to CSV or Excel for documentation
- Progress bar with cancel support during deletion
- Per-view sub-transactions — one failed deletion does not roll back the others
Requirements
- Must be run in a project environment — not available in the Family Editor
- Close any views you want to keep before running (the active view is always protected)
- For parameter retention filters to work, the parameter must exist on the views in the project
- Views must be owned by the current user for deletion in a workshared environment
Running the Tool
Launch
Find Remove Unused Views on the Bonus Tools Ribbon or use 115 Search Tools.
The tool opens the 19 Remove Unused Views configuration dialog.
Step 1 — Configure Retention Filters (Optional)
The dialog offers up to three independent parameter retention filters. Each filter group consists of:
| Control | Purpose |
|---|---|
| Checkbox ("Select parameter 1/2/3") | Enable or disable this filter group |
| Parameter dropdown | Select the view parameter to check |
| Value text box | Enter the value that flags a view to be retained |
When a filter group is enabled, any view where the chosen parameter equals the entered value will be excluded from the deletion list — it is retained regardless of whether it is on a sheet.
For yes/no parameters, enter
1to retain views where the parameter is set to yes, or0for no. For text parameters, enter the exact text value to match.
If you enable a filter group but leave the value field blank, the tool will prompt you to enter a value before proceeding.
All three filters are independent and checked in sequence — a view is retained if it matches any of the active filters.
Step 2 — Include Schedules (Optional)
Check Include Schedules to add schedules not placed on any sheet to the deletion candidate list.
Note: Retention filters do not apply to schedules. Any schedule not on a sheet will be included for deletion when this option is checked. Titleblock revision schedules are always excluded regardless of this setting.
Leave the checkbox unchecked to leave all schedules untouched.
Step 3 — Review the Unused Views List
Click OK to scan the project and open the 19 Unused Views List dialog.
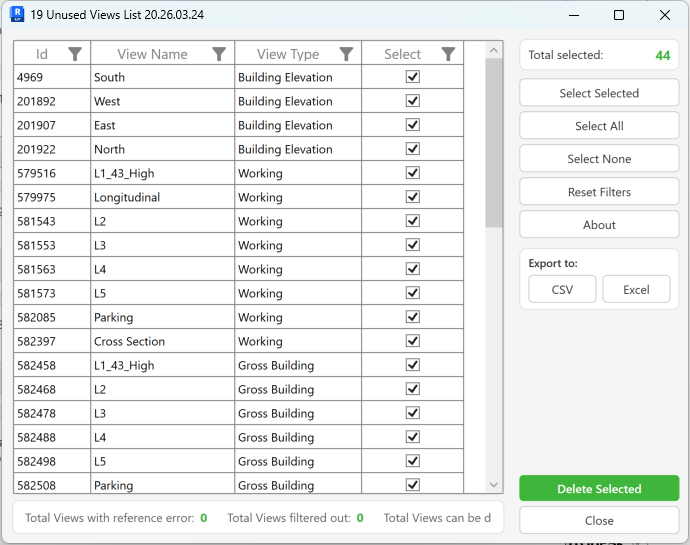
The data grid displays all views eligible for deletion:
| Column | Description |
|---|---|
| Id | Revit element ID of the view |
| View Name | Name of the view |
| View Type | View type (Floor Plan, Section, Elevation, etc.) |
| Select | Checkbox — tick to include in deletion |
The status bar at the bottom shows three counts:
| Counter | Description |
|---|---|
| Total Views with reference error | Views that could not be processed |
| Total Views filtered out | Views excluded by your retention filters |
| Total Views can be deleted | Views currently shown in the grid |
All views are pre-selected by default. Use the right-hand panel to adjust your selection before deleting.
Step 4 — Refine Your Selection
The right-hand action panel provides selection controls:
| Button | Action |
|---|---|
| Select Selected | Toggles the Select checkbox for all rows highlighted in the grid |
| Select All | Marks every view in the grid for deletion |
| Select None | Clears all selections |
| Reset Filters | Clears any column filters applied to the grid |
The Total selected counter updates live as you change selections.
You can also sort and filter columns in the grid to find specific views — use Reset Filters to return to the full list.
Step 5 — Export (Optional)
Before deleting, you can export the list for documentation or sign-off:
- CSV — exports the grid data to a comma-separated file
- Excel — exports to an Excel workbook
Use this to record which views were removed from the project.
Step 6 — Delete Selected Views
Click Delete Selected to begin deletion. A confirmation dialog appears — click Yes to proceed.
A progress bar tracks deletion. You can click Cancel at any time to stop — views already deleted at that point are not restored.
After completion, a summary message reports:
[n] items deleted. [n] items failed.
Successfully deleted views are removed from the grid. Any views that could not be deleted remain in the list for review. Click Close to exit when done.
Tips and Best Practices
- Close views before running. The active view is protected and never added to the deletion list. If you have views open in tabs, close the ones you don't want to keep before launching the tool.
- Use a retention parameter in your template. Add a shared parameter (e.g.
BT_KeepView) to your project template and set it to1on any view that should never be deleted. Configure it as Filter 1 in the tool to make it permanent protection. - Review before deleting. The list dialog is a preview — nothing is deleted until you click Delete Selected. Take the time to sort by View Type and scan for anything unexpected.
- Export before deleting. Use the CSV or Excel export to create an audit trail of what was removed. This is useful for large cleanup operations or when working in a team.
- Dependent views are handled automatically. If a detail view is referenced on a sheet but its parent plan is not, the parent is still protected. You do not need to manually identify these relationships.
- Schedules need special attention. Retention filters do not apply to schedules — if you check Include Schedules, all off-sheet schedules will be listed for deletion. Review the schedule rows carefully before deleting.
- Workshared models require ownership. You can only delete views you own. Run Synchronize with Central first and ensure you have ownership of the views you intend to delete.
- Run regularly. Incorporate this tool into your project close-out process or periodic model audits to prevent unused view accumulation over the project lifecycle.
Common Use Cases
End-of-stage model cleanup — At the end of a design stage, run the tool to remove working views that were never documented on a sheet. Use the Export function first to record what was removed for project records.
Reducing file size before issuing — Large models with hundreds of unused views contribute significantly to file size. Run Remove Unused Views before issuing to reduce file weight and improve load times for consultants.
Protecting work-in-progress views — If your team uses a custom parameter (e.g. BT_KeepView = 1) to flag views under active development, configure it as a retention filter. Views under construction are automatically excluded without needing to remember their names.
Schedule tidying — Over a long project, many one-off schedules accumulate that were never placed on sheets. Check Include Schedules and review the list to remove these alongside unused views.
Delegated cleanup — Export the unused views list to Excel and share it with the project architect for review before deletion. Use the select checkboxes to implement their decisions precisely.
Troubleshooting
"Action not available in the Family environment" The tool only works in project files. Close the family and open the project document before running.
"Please enter filter 1/2/3 text" You have enabled a parameter filter group but left the value field blank. Either enter a value to match or uncheck the filter group before clicking OK.
A view I expected to see is missing from the list The view may be placed on a sheet (or a dependent view is on a sheet), may be a view template, may be the currently active view, or may have been excluded by one of your retention filters. Check the Total Views filtered out counter in the status bar for the number excluded by your filters.
"Deletion failed. Gain ownership of elements and try again" In a workshared model, you can only delete views you own. Use Synchronize with Central, request ownership of the relevant views, then run the tool again.
Some views failed to delete Individual view deletions use sub-transactions — a failure on one view does not block the others. The failed count is shown in the summary message. Views that failed remain in the grid. Common causes: the view is referenced by a callout, scope box, or another element still active in the model. Investigate the view before attempting manual deletion.
Schedules are not appearing in the list Ensure the Include Schedules checkbox is checked before clicking OK. If schedules are still missing, they may already be placed on a sheet, or they may be titleblock revision schedules which are always excluded.
The grid is empty after scanning All views in the project are either placed on a sheet, are view templates, are the active view, or were excluded by retention filters. This is a healthy result — the project has no unused off-sheet views eligible for deletion.