149 Process Standards
Chris McKeown / July 1, 2025
Standards
Overview
The Process Standards tool is a comprehensive standards automation system that analyzes, renames, and standardizes Revit elements according to predefined naming conventions. It can process current files or batch process entire directories of families and projects, automatically applying consistent naming standards to fill patterns, line styles, text styles, dimensions, parameters, system families, and more. This powerful tool ensures project-wide consistency and can dramatically reduce manual standardization work.
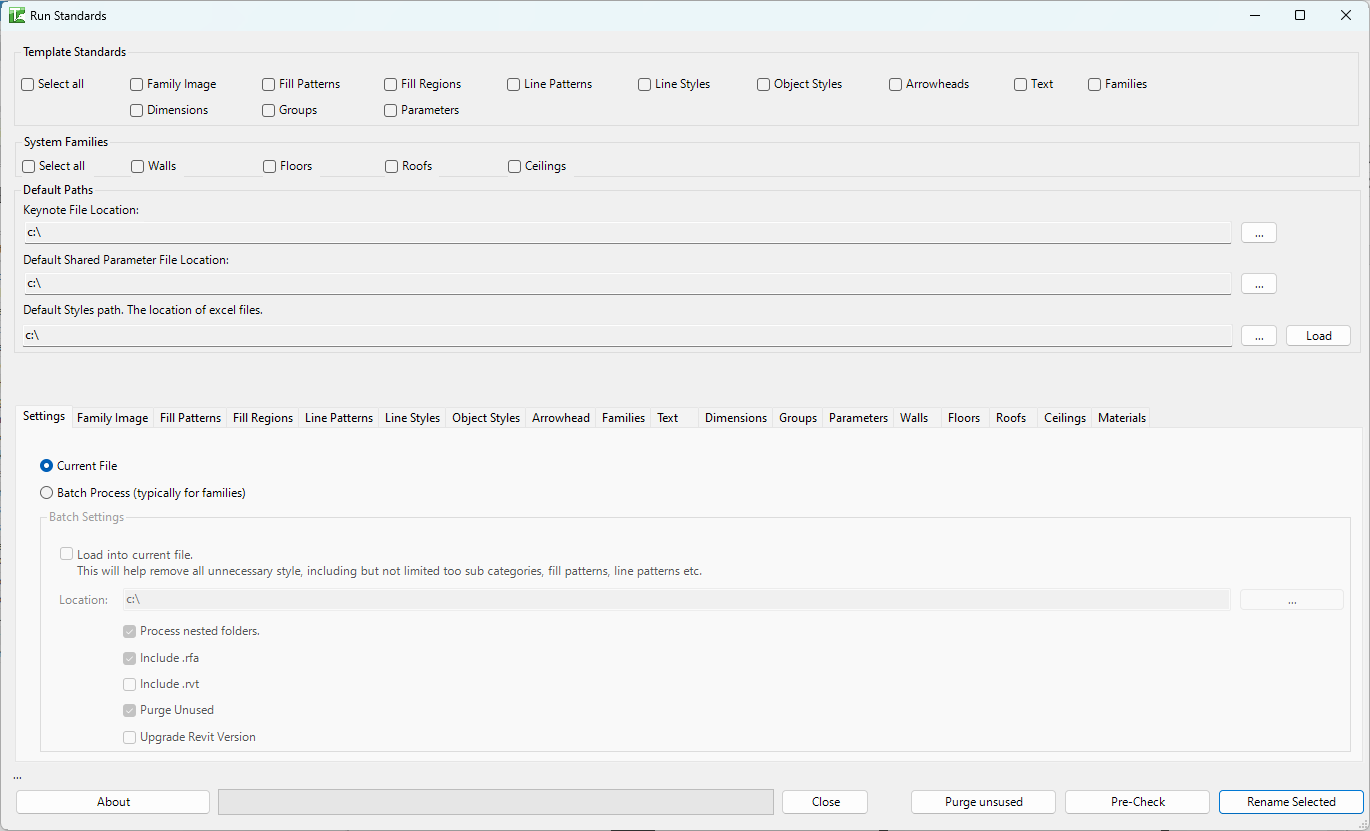
Table of Contents
- Key Features
- Requirements
- Interface Guide
- Step-by-Step Guide
- Understanding Naming Standards
- Example Workflows
- Tips and Best Practices
- Common Use Cases
- Troubleshooting
Key Features
- Comprehensive Standards Coverage: Processes 15+ element categories
- Fill Patterns and Fill Regions
- Line Patterns and Line Styles
- Object Styles (subcategories)
- Text and Label styles
- Dimension styles
- Arrowhead styles
- Groups
- Parameters (family parameters)
- System Families (Walls, Floors, Roofs, Ceilings)
- Loadable Families
- Family Images
- Two Processing Modes: Current file or batch processing
- Intelligent Naming: Generates standardized names based on element properties
- Pre-Check Mode: Preview proposed changes before applying
- Batch Processing: Process entire directories of families/projects
- Purge Capabilities: Remove unused elements during processing
- Standards Mapping: Load external standards definitions
- Selective Processing: Choose which categories to process
- Update Capabilities: Can update element properties (fonts, patterns, styles)
- Progress Tracking: Real-time progress bars for batch operations
- Detailed Logging: Comprehensive output log of all operations
- Keynote Integration: Load keynote files during processing
- Shared Parameter Support: Handle shared parameter renaming
Requirements
Pre-requisites
-
For Current File Mode
- Open Revit file (project or family)
- File must be editable (not read-only)
- Save before running for safety
-
For Batch Mode
- Directory containing RVT/RFA files
- Write permissions to directory
- Sufficient disk space for processing
- Backup of files recommended
-
Standards Files (Optional but Recommended)
- Excel files defining line patterns
- Excel files defining line styles
- Excel files defining object styles
- Shared parameter file
- Keynote file
-
Memory and Performance
- Adequate RAM for batch processing
- Batch mode can be memory-intensive
- Close other applications during large batches
Recommended Setup
Before Using Tool:
- Back up your files - This tool makes extensive changes
- Prepare standards source directory with Excel definitions
- Test on sample files first
- Document your naming conventions
- Review pre-check results before processing
Interface Guide
The interface is organized into multiple sections and tabs for different element types.
Template Standards Section
Select all checkbox: Enables all template standards at once
Individual Checkboxes:
- ☐ Family Image: Set 3D preview image in families
- ☐ Fill Patterns: Rename fill pattern elements
- ☐ Fill Regions: Rename filled region types
- ☐ Line Patterns: Rename and optionally update line patterns
- ☐ Line Styles: Rename and optionally add default line styles
- ☐ Object Styles: Rename object style subcategories
- ☐ Arrowheads: Rename arrowhead types
- ☐ Text: Rename text and label styles
- ☐ Dimensions: Rename dimension styles
- ☐ Groups: Rename detail and model groups
- ☐ Parameters: Rename family parameters
- ☐ Families: Rename loadable families
System Families Section
Select all checkbox: Enables all system families at once
Individual Checkboxes:
- ☐ Walls: Rename wall types
- ☐ Floors: Rename floor types
- ☐ Roofs: Rename roof types
- ☐ Ceilings: Rename ceiling types
Default Paths
Keynote File Location:
- Path to keynote text file
- Used during processing
- Browse button to select file
- Example:
C:\Standards\Keynotes.txt
Default Shared Parameter File Location:
- Path to shared parameter file
- Required for shared parameter renaming
- Browse button to select file
- Example:
C:\Standards\SharedParameters.txt
Default Styles path:
- Location of Excel files with standards
- Contains line pattern, line style, object style definitions
- Browse button to select folder
- Load button: Loads standards from Excel files
Processing Mode
○ Current File (Default)
- Processes only the currently open file
- Immediate results
- Safer for testing
○ Batch Process (typically for families)
- Processes multiple files in directory
- Shows batch settings panel when selected
Batch Settings Panel
☐ Load into current file
- Loads each family into current project
- Processes within project context
- Useful for project-based standards
Location:
- Directory path containing files to process
- Browse button to select folder
- Processes all RVT/RFA files in folder
☑ Process nested folders
- Includes subdirectories in processing
- Recursive directory traversal
☑ Include .rfa
- Process Revit family files
☑ Include .rvt
- Process Revit project files
☑ Purge Unused
- Runs purge unused on each file
- Removes unused elements before processing
☐ Upgrade Revit Version
- Only processes files from older Revit versions
- Useful for version migration projects
Settings Tabs
The interface contains multiple tabs for each element type. Each tab has:
Data Grid: Shows proposed changes
- ID: Element ID
- Old Name: Current name
- New Name: Proposed standard name
- Select: Checkbox to include in processing
- Update (some tabs): Apply property updates
Right-Click on Rows: Toggle select/deselect
Type-Specific Settings: Varies by tab (fonts, widths, patterns, etc.)
Action Buttons
About: Display tool version and information
Close: Close dialog without processing
Purge unused: Run purge operations only
- Separate buttons for specific purge operations
- Purge Line Styles Only
- Purge Line Patterns Only
- Purge Categories ALL
- Purge Fill Patterns
- Purge Materials
Pre-Check: Analyze and populate grids without applying changes
- Shows what would be renamed
- No modifications made
- Review before running
Process file(s): Execute the standardization
- Applies all checked changes
- Shows progress during processing
- Generates output log
- Prompts to view log when complete
Step-by-Step Guide
Basic Current File Processing
-
Open Your File
- Open the Revit file (project or family) to standardize
- Save the file first as backup
- Ensure file is not read-only
-
Open Process Standards Tool
- Navigate to Bonus Tools tab
- Click 149 Process Standards
- Dialog opens with all options
-
Configure Standards Source (First Time)
- Click ... button for "Default Styles path"
- Browse to folder containing Excel standards definitions
- Click Load button
- Tool loads line patterns, line styles, object styles definitions
- Success message appears
-
Set File Paths
- Keynote File Location: Browse to keynote TXT file
- Shared Parameter File: Browse to shared parameter file
- These are optional but recommended
-
Select Elements to Process
- Check boxes for element types you want to standardize
- Or use "Select all" checkboxes for quick selection
- Common selections:
- Template standards only
- System families only
- All standards
-
Run Pre-Check
- Click Pre-Check button
- Tool analyzes file and populates all checked tabs
- Switch through tabs to review proposed changes
- Each grid shows Old Name → New Name mappings
-
Review Proposed Changes
- Click through each enabled tab
- Review proposed new names
- Uncheck any items you don't want to change
- Edit new names in grid if needed
- Right-click rows to toggle selection
-
Process File
- Click Process file(s) button
- Tool applies all checked changes
- Progress indicated in status
- Completion dialog appears
- Click Yes to view detailed log
-
Review Results
- Log opens in default text editor
- Shows success/failure for each rename
- Document shows:
- File name
- Category
- Result (Passed/Failed)
- Old name
- New name
Batch Processing Families
-
Prepare Directory
- Organize families in folder structure
- Ensure all files are backed up
- Close all family files in Revit
-
Open Process Standards
- Open any Revit file (can be template)
- Launch 149 Process Standards tool
-
Select Batch Mode
- Choose Batch Process radio button
- Batch Settings panel enables
-
Configure Batch Settings
- Location: Browse to folder containing families
- ☑ Process nested folders: Check to include subfolders
- ☑ Include .rfa: Check for family files
- ☐ Include .rvt: Usually unchecked for family batch
- ☑ Purge Unused: Recommended for cleanup
- ☐ Upgrade Revit Version: Only if needed
-
Load Standards
- Set Default Styles path
- Click Load button
- Set keynote and shared parameter paths
-
Select Processing Options
- Check element types to process
- Typically for families:
- Family Image
- Fill Patterns
- Line Patterns
- Line Styles
- Object Styles
- Text
- Parameters
- Usually skip system families for family batch
-
Configure Type-Specific Settings
- Switch through relevant tabs
- Set fonts, width factors, view settings, etc.
- These apply to all processed files
-
Start Batch Processing
- Click Process file(s) button
- Progress bar shows:
- Current file being processed
- Overall progress (X of Y files)
- Processing continues automatically
- May take considerable time for many files
-
Review Batch Results
- Click Yes to view log
- Log shows results for each file
- Look for failed operations
- Document any issues for follow-up
Setting Up Standards Files
To use external standards, create Excel files:
-
Line Patterns Excel
- Columns: linePatternName, code, knownNames
- Example:
- Dash Dot, Dash12.0_Dot_Space3.0, "dash dot;dash-dot"
- Codes define pattern segments
-
Line Styles Excel
- Columns: lineStyleName, code, lineWeight, R, G, B, linePattern, knownNames
- Example:
- 02_Black, 02, 2, 0, 0, 0, Solid, "medium line"
-
Object Styles Excel
- Columns: category, objectStyleName, projectionWeight, cutWeight, R, G, B, linePattern, material, knownNames
- Example:
- Walls, Demolition, 4, 4, 255, 0, 0, Hidden, , "demo;demolished"
-
Shared Parameters Excel (Optional)
- Columns: name, knownNames
- Maps old parameter names to standard names
-
Place in Standards Folder
- Save all Excel files to single folder
- Point "Default Styles path" to this folder
- Click Load to import definitions
Understanding Naming Standards
The tool generates names based on specific patterns for each element type.
Fill Pattern Naming
Format: [Use][Type]_[Angle]_[LineSpacing]_[Description]
Example: MPL_000_3.5mm
- M: Model pattern (D = Drafting)
- PL: Parallel Lines (CH = Crosshatch, CU = Custom)
- 000: Angle in degrees
- 3.5mm: Line spacing
Fill Region Naming
Format: [FillPatternCode]_[Background]_[Colour]
Example: MPL_000_3.5mm_T_Black
- Fill pattern name
- T: Transparent (O = Opaque)
- Black: Color name
Line Pattern Naming
Format: Describes dash/space/dot sequence
Example: Dash12.0_Space3.0_Dot
- Segments defined by type and length
- Mapped to known pattern names via Excel
Line Style Naming
Format: [Weight][NamedWeight]_[Colour]_[Pattern]
Example: 02_Black_Dashed
- 02: Line weight
- Black: Color
- Dashed: Pattern name
Text/Label Style Naming
Format: [Category]_[Size]_[Background]_[Extras]_[Colour]
Example: TXT_2.5_T_Arial_Black
- TXT: Text (LBL = Label)
- 2.5: Text size in mm
- T: Transparent background
- Arial: Font (if not default)
- Black: Color
Extras can include:
- _Bold, _Ital, _Undl: Text styles
- _Box#: Leader box with line weight
- _Tab#: Tab size
- _WF#: Width factor
- _(ArrowheadName): Leader arrowhead
Dimension Style Naming
Format: [Category]_[Size]_[Background]_[Extras]_[Colour]
Example: LIN_2.5_T_Arial_2DPI_Black
- LIN: Linear (ANG=Angular, RAD=Radial, DIA=Diameter, S-SPE=Spot Elevation)
- 2.5: Text size
- T: Transparent
- 2DPI: Decimal places (rounding)
- Black: Color
Parameter Naming
Format: [Name]_[Type]
Example: Overall_Width_L
- Name in Title Case with underscores
- _L: Length (_T=Text, _I=Integer, _Y=YesNo, _N=Number, etc.)
- Shared parameters map to known names via Excel
Wall/Floor/Roof/Ceiling Naming
Format: [Type]_[Keynote/Mark]_[Layers]_[Width]_[FireRating]
Example: WAL_07.22.13_100STR/13INS/13FN1_126_FR60
- WAL: Wall (FLR=Floor, CLG=Ceiling)
- 07.22.13: Keynote or Type Mark
- 100STR/13INS/13FN1: Layer thicknesses and materials
- 126: Total width
- FR60: Fire rating
Family Naming
Format: [CategoryCode]_[Name]_[RevitVersion]
Example: FU_Office_Chair_R25
- FU: Furniture category code
- Office_Chair: Descriptive name
- R25: Revit 2025 version
Options control whether to add category prefix and/or version suffix.
Arrowhead Naming
Format: [Style]_[Size]_[Properties]
Examples:
ARW_3.0_030_FIL_CLD: Arrow, 3.0mm, 30°, Filled, ClosedDGL_2.5: Diagonal, 2.5mmDOT_1.5: Dot, 1.5mmHET_4.0_PEN4: Heavy End Tick, 4.0mm, Pen weight 4
Group Naming
Format: [Type]_[Category]_[Description]
Example: D_LIN_Handrail_Detail
- D: Detail Group (M = Model Group)
- LIN: Category code if single category
- MUC: Multi-category if mixed
- Description from existing name
Example Workflows
Workflow 1: Standardizing Project Template
Scenario: Clean up and standardize office template file
-
Prepare Template
- Open master template file
- Save As with new name (backup)
- Close unnecessary views
-
Load Standards
- Set Default Styles path to office standards folder
- Click Load button
- Set keynote file path
- Set shared parameter path
-
Select All Standards
- Check Select all for Template Standards
- Check Select all for System Families
- Leave families unchecked (no families in template)
-
Run Pre-Check
- Click Pre-Check button
- Switch through all tabs
- Review proposed names
- Make adjustments as needed
-
Process Template
- Click Process file(s)
- Wait for completion
- Review log for any failures
- Address failures manually if needed
-
Verify Results
- Check each category in Revit
- Verify names follow standards
- Test creating elements with new styles
-
Save and Distribute
- Save template
- Update template location on server
- Notify team of updated template
Result: Fully standardized template ready for project use
Workflow 2: Family Library Standardization
Scenario: Standardize entire family library (hundreds of families)
-
Organize Families
- Collect all families in single directory structure
- Example structure:
- Furniture/
- Equipment/
- Plumbing/
- Etc.
- Backup entire directory
-
Prepare Standards
- Create/verify Excel standards files
- Place in standards folder
- Load in Process Standards tool
-
Configure Batch Settings
- Mode: Batch Process
- Location: Root family directory
- ☑ Process nested folders
- ☑ Include .rfa
- ☐ Include .rvt
- ☑ Purge Unused
- ☐ Load into current file
-
Select Family Standards
- Check Template Standards:
- ☑ Family Image (set preview)
- ☑ Fill Patterns
- ☑ Line Patterns
- ☑ Line Styles
- ☑ Object Styles
- ☑ Text
- ☑ Dimensions (if present)
- ☑ Parameters
- ☑ Families (rename families themselves)
- Uncheck System Families (not relevant)
- Check Template Standards:
-
Configure Family Settings
- Family Image Tab: Set view and display preferences
- Text Tab: Set default font
- Parameters Tab: Enable shared parameter mapping
- Families Tab:
- ☑ Prefix with Category
- ☑ Suffix with Revit Version
-
Start Batch Process
- Click Process file(s)
- Progress bar shows current file
- May take hours for large libraries
- Do not interrupt process
-
Review Batch Results
- View detailed log
- Note any failures
- Document patterns in failures
-
Handle Failures
- Manually process failed families
- Or exclude from library
- Update documentation
-
Quality Check
- Spot-check random families
- Verify naming standards applied
- Check family previews generated
- Test loading into projects
-
Deploy Updated Library
- Move to production server
- Update family library documentation
- Train staff on new naming
Result: Entire library standardized and production-ready
Workflow 3: Project Mid-Stream Standardization
Scenario: Apply standards to active project
-
Coordinate with Team
- Schedule during low-activity period
- Notify team of pending changes
- Have all users sync and close
-
Prepare Project
- Create new local file
- Open in Revit
- Sync to Latest
- Take ownership of all worksets
-
Backup Before Processing
- Make backup copy of central
- Document current state
-
Load Standards
- Set paths to office standards
- Load Excel definitions
-
Run Pre-Check
- Select all appropriate standards
- Click Pre-Check
- Review changes carefully
- Discuss major renames with team
-
Process in Stages
- First run: Line patterns, line styles, fill patterns
- Save and sync
- Second run: Text and dimensions
- Save and sync
- Third run: System families
- Save and sync
-
Verify After Each Stage
- Check that elements still display correctly
- Verify views not broken
- Test key drawings
-
Final Verification
- Open multiple view types
- Check sheets
- Verify schedules still work
- Test detail libraries
-
Communicate Completion
- Notify team processing complete
- Document any issues encountered
- Provide list of renamed items
Result: Project standardized with minimal disruption
Workflow 4: Version Migration with Standards
Scenario: Upgrade old project files to new Revit version with standards
-
Prepare Migration
- Collect all old version files
- Place in migration directory
- Create backup of originals
-
Setup Batch Process
- Mode: Batch Process
- Location: Migration directory
- ☑ Process nested folders
- ☑ Include .rfa
- ☑ Include .rvt
- ☑ Purge Unused
- ☑ Upgrade Revit Version (key setting)
-
Load Current Standards
- Use latest office standards
- Ensures upgraded files use current naming
-
Select Comprehensive Processing
- Check all relevant standard types
- Upgrade and standardize in one pass
-
Run Batch Process
- Start processing
- Monitor progress
- Log any files that fail to upgrade
-
Review Upgraded Files
- Spot-check upgraded files
- Verify they open in new version
- Check standards applied
-
Address Failed Upgrades
- Manually upgrade failed files
- Document issues encountered
- May indicate corrupted files
-
Deploy Upgraded Files
- Move to appropriate locations
- Update file paths/links
- Notify users of new locations
Result: Files upgraded and standardized in single operation
Workflow 5: Creating Project from Library Families
Scenario: Build new project template from standardized families
-
Start with Clean Project
- Open Revit with default template
- Or start from minimal template
-
Prepare Family List
- Document needed families
- Verify all are standardized
- Organize by discipline/category
-
Batch Load Families
- Mode: Batch Process
- ☑ Load into current file (key setting)
- Location: Standardized family directory
- ☑ Process nested folders
- ☑ Include .rfa
- ☐ Purge Unused
-
Process Into Project
- Select Family standards only
- Uncheck direct family renaming
- Run process
- Families loaded and processed in context
-
Verify Loaded Families
- Check Project Browser
- All families should be loaded
- Styles transferred from families
-
Apply Project Standards
- Mode: Current File
- Select System Families
- Select Template Standards not from families
- Run Pre-Check and Process
-
Configure Project
- Set up views
- Create schedules
- Configure phases, etc.
-
Save as Template
- Save As template file
- Place in template directory
Result: New template with standardized family library integrated
Tips and Best Practices
-
Always Backup Before Processing
- Especially critical for batch operations
- Keep original files until verification complete
- For projects, create detached copy to test on
- Can't easily undo standards processing
-
Use Pre-Check Extensively
- Never skip pre-check step
- Review every tab carefully
- Edit proposed names before processing
- Better to catch issues in preview
-
Process in Phases
- Don't try to do everything at once
- Process related categories together
- Save between phases
- Easier to troubleshoot issues
-
Start Small for Learning
- Test on sample files first
- Process single file before batch
- Verify results before scaling up
- Build confidence with tool
-
Maintain External Standards Files
- Keep Excel definitions in version control
- Document any changes to standards
- Review and update regularly
- Share with all users
-
Understand Naming Conventions
- Study the generated names
- Understand the logic
- Document office-specific variations
- Train team on reading names
-
Monitor Batch Processing
- Don't leave unattended initially
- Watch for error patterns
- Cancel if many failures occurring
- Address root cause before continuing
-
Review Logs Thoroughly
- Logs contain valuable information
- Note failure patterns
- Document for process improvement
- Archive logs for reference
-
Coordinate Team Changes
- Standards affect everyone
- Communicate before processing projects
- Provide transition support
- Document changes for users
-
Keep Standards Updated
- Review standards periodically
- Update Excel files with new patterns
- Add newly discovered variations to known names
- Continuous improvement process
Common Use Cases
Template Maintenance
Purpose: Keep office templates standardized
Approach:
- Quarterly review of templates
- Run Process Standards on each template
- Apply latest standards definitions
- Distribute updated templates
Benefits:
- Consistent starting point for projects
- Standards automatically applied
- Reduced manual cleanup
- Better quality control
Family Library Management
Purpose: Maintain consistent family library
Approach:
- Standardize new families on creation
- Periodic batch processing of library
- Version upgrade with standardization
- Quality gate before publication
Benefits:
- Professional family library
- Easy to find and identify families
- Predictable behavior
- Better performance
Project Cleanup
Purpose: Fix standards issues in active projects
Approach:
- Identify non-standard elements
- Run Process Standards selectively
- Coordinate with project team
- Verify before submission
Benefits:
- Client-ready deliverables
- Professional appearance
- Consistent documentation
- Reduced RFIs
Onboarding New Staff
Purpose: Teach naming conventions
Approach:
- Show Pre-Check results
- Explain naming logic
- Practice on sample files
- Reference standards documentation
Benefits:
- Faster learning curve
- Consistent work from day one
- Self-service standardization
- Reduced mentoring burden
Standards Development
Purpose: Establish new office standards
Approach:
- Process existing files
- Review generated names
- Refine Excel definitions
- Iterate until satisfied
- Document final standards
Benefits:
- Data-driven standards
- Based on actual content
- Achievable standards
- Buy-in from team
Troubleshooting
"Load complete" Message But Standards Don't Apply
Problem: Loaded standards but processing doesn't use them
Solutions:
- Verify Excel files are in correct format
- Check column headers match expected names
- Open Excel files to verify content
- Ensure linePatternName/lineStyleName columns present
- Try loading again, check for error messages
- May need to manually populate code mappings
Batch Processing Hangs on Specific File
Problem: Progress stops on one file indefinitely
Solutions:
- File may be corrupted
- Note the filename from progress display
- Cancel batch operation
- Move problematic file out of directory
- Continue batch on remaining files
- Investigate problematic file separately
Many "Failed" Results in Log
Problem: High percentage of renames failing
Solutions:
- Elements may be in use in views
- Some element types can't be renamed
- Read-only elements can't be changed
- Type vs Instance naming issues
- Review actual error messages in log
- Some failures are expected (built-in elements)
Generated Names Too Long
Problem: Names exceed Revit's character limits
Solutions:
- Simplify material names in assemblies
- Use shorter keynote codes
- Abbreviate layer functions
- Revit has 256 character limit for names
- Consider custom name generation rules
Pre-Check Shows No Changes
Problem: All "New Name" matches "Old Name"
Solutions:
- Standards may already be applied
- Excel mappings may not match current elements
- Check if code columns populated in Excel
- Verify knownNames columns include variations
- May need to expand known names list
Shared Parameter Renaming Fails
Problem: Shared parameters don't rename or cause errors
Solutions:
- Shared parameter file must be accessible
- Defined parameter must exist in file
- GUID must match between file and element
- Process uses complex swap method
- May require manual shared parameter editing
- Check shared parameter file path correct
Family Images Not Generating
Problem: Family Image processing doesn't create previews
Solutions:
- Family must have 3D geometry
- View settings may be incorrect
- "Default View Name" must be valid
- 2D families can't have 3D preview
- Check view detail level setting
- Visual style may not be supported
Batch Process Skips Files
Problem: Some files in directory not processed
Solutions:
- Check Include .rfa / .rvt settings
- Files may be different Revit version
- Upgrade Revit Version setting may exclude files
- Nested folder setting affects subdirectories
- Files may be locked/in use
- Check file extensions are exactly .rvt/.rfa
Parameter Renaming Breaks Formulas
Problem: Parameter renames cause formula errors
Solutions:
- Formulas reference parameters by name
- Renaming breaks formula references
- Tool doesn't update formula dependencies
- May need to manually fix formulas after
- Consider not renaming parameters used in formulas
- Document formula dependencies before processing
Object Styles Don't Update
Problem: Object style properties don't change
Solutions:
- Check "Update" checkbox is checked
- Excel must have matching objectStyleName
- Parent category must match
- Line patterns/materials must exist
- May need to add missing dependencies first
- Process line patterns before object styles
Processing Causes File Corruption
Problem: File won't open after processing
Solutions:
- This is rare but serious
- Restore from backup immediately
- Report issue to support with details
- May be existing corruption made worse
- Try processing with fewer options enabled
- Use Audit when opening file
- Consider file may have been corrupted before
Purge Deletes Needed Elements
Problem: Purge removes elements that should stay
Solutions:
- Purge uses temporary deletion method
- Elements with no usage are removed
- May remove unused but needed standards
- Consider not using Purge option
- Or add elements to project before purging
- Purge selectively using individual buttons
Progress Bar Not Updating
Problem: Progress bar frozen during batch process
Solutions:
- Check if Revit is responding in Task Manager
- Large files take time per file
- Progress between files may have gaps
- Working directory label should change
- If truly frozen (>30 min no change), may need to force close
- Review log to see where it stopped
Need Help? Contact support or refer to additional Bonus Tools documentation.
Thank you for using Bonus Tools - Process Standards!