142 KiwiCodes Audit
Chris McKeown / July 1, 2025
Power
Welcome to this demonstration on Bonus Tools – 142 KiwiCodes Audit. This powerful tool automatically analyzes your Revit model and reports comprehensive health metrics to a customizable "Splash-Screen" title block, helping you monitor model quality and performance over time.
Table of Contents
Key Features
- Automated Health Monitoring: Schedule automatic health checks at specified intervals
- Comprehensive Metrics: Tracks 50+ different model health indicators across 11 categories
- Customizable Reporting: Configure which checks run and where data is stored
- Visual Feedback: Display results on a customizable splash screen title block
- Centralized Management: Configure settings globally for your entire organization or locally per workstation
- Historical Tracking: Monitor model health trends over time with the next run date parameter
Requirements
Essential Components
- Valid Bonus Tools License: Active license key required
- Splash Screen Title Block: Sheet type named exactly as configured (default: "Splash-Screen")
- Configured Parameters: Title block family must contain all required text and integer parameters
- Global or Local Settings: Health check configuration via web dashboard or local Revit settings
Template Files
Located in: C:\Users\%userName%\AppData\Roaming\Autodesk\ApplicationPlugins\BonusTools.bundle\Contents\yyyy
- Sample Project:
rac_basic_sample_project.rvt- Contains pre-configured splash screen - Title Block Family:
Splash-Screen_A3.rfa- Starter template with all required parameters
Global Configuration
Step 1: Access the Web Dashboard
- Navigate to https://bonustools.kiwicodes.com/
- Sign in to your account
- New users: See 002 Signup and Register
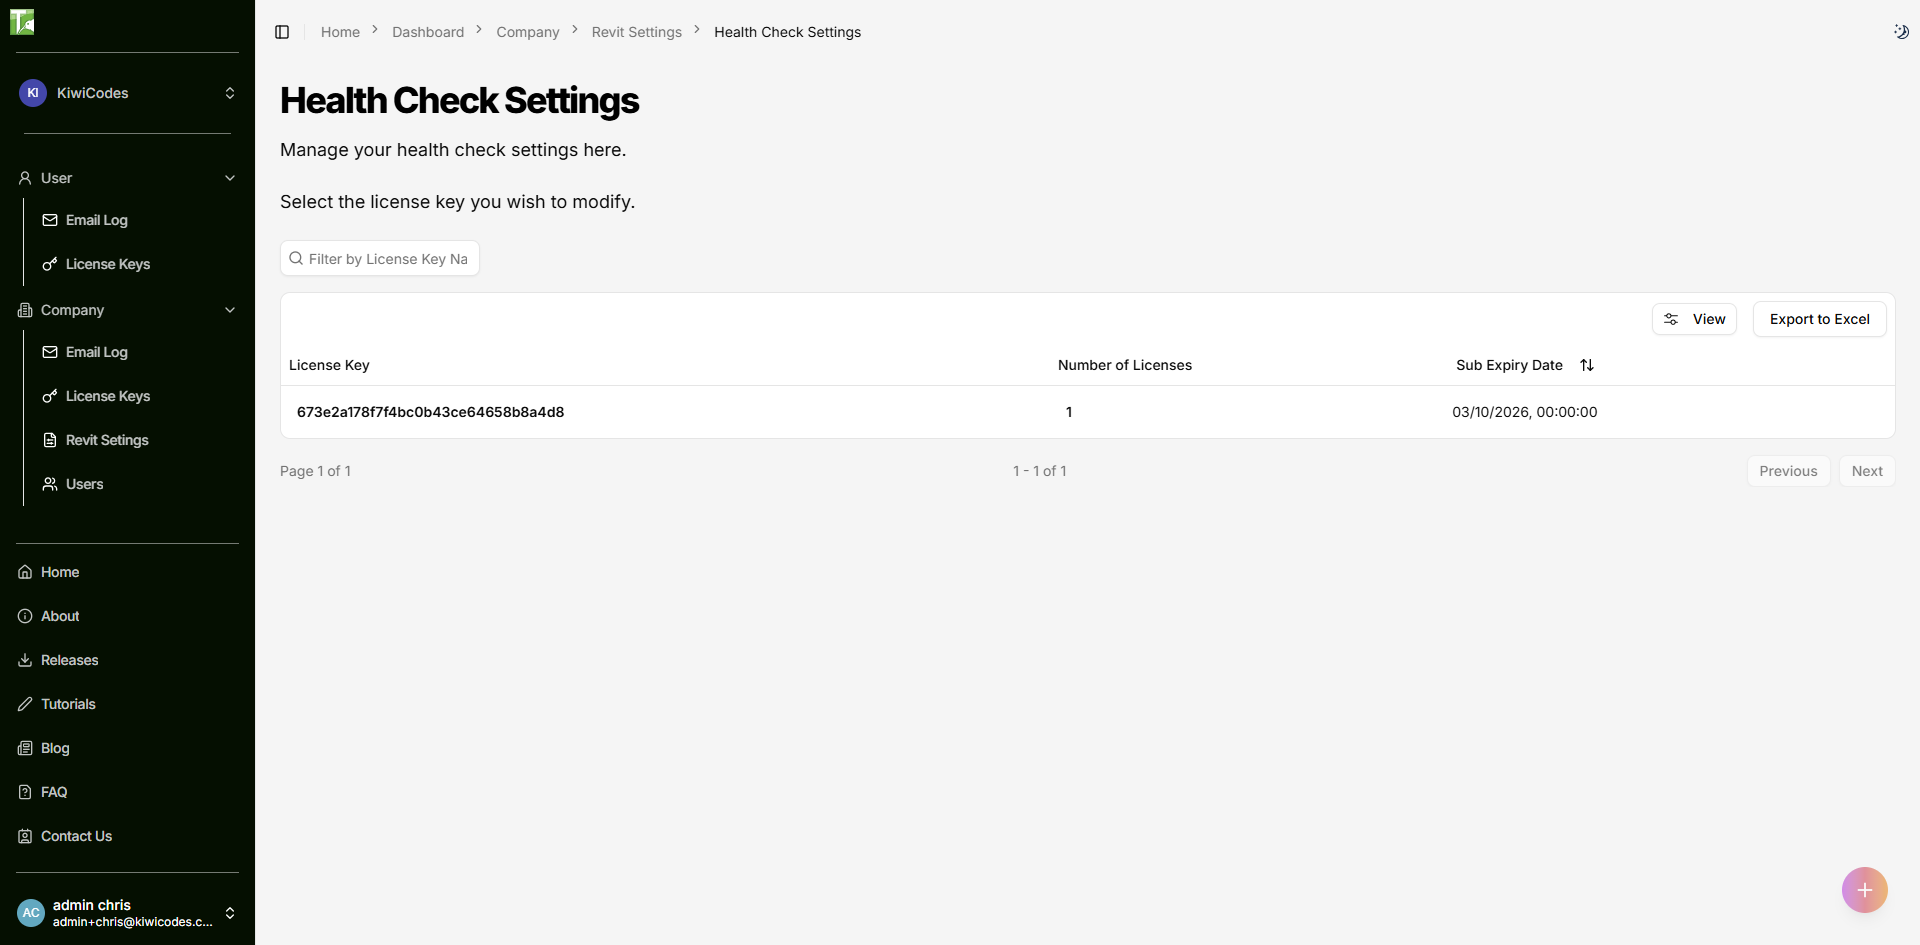
Step 2: Configure Health Check Settings
- Go to Health Check Settings
- Select the license key you wish to configure
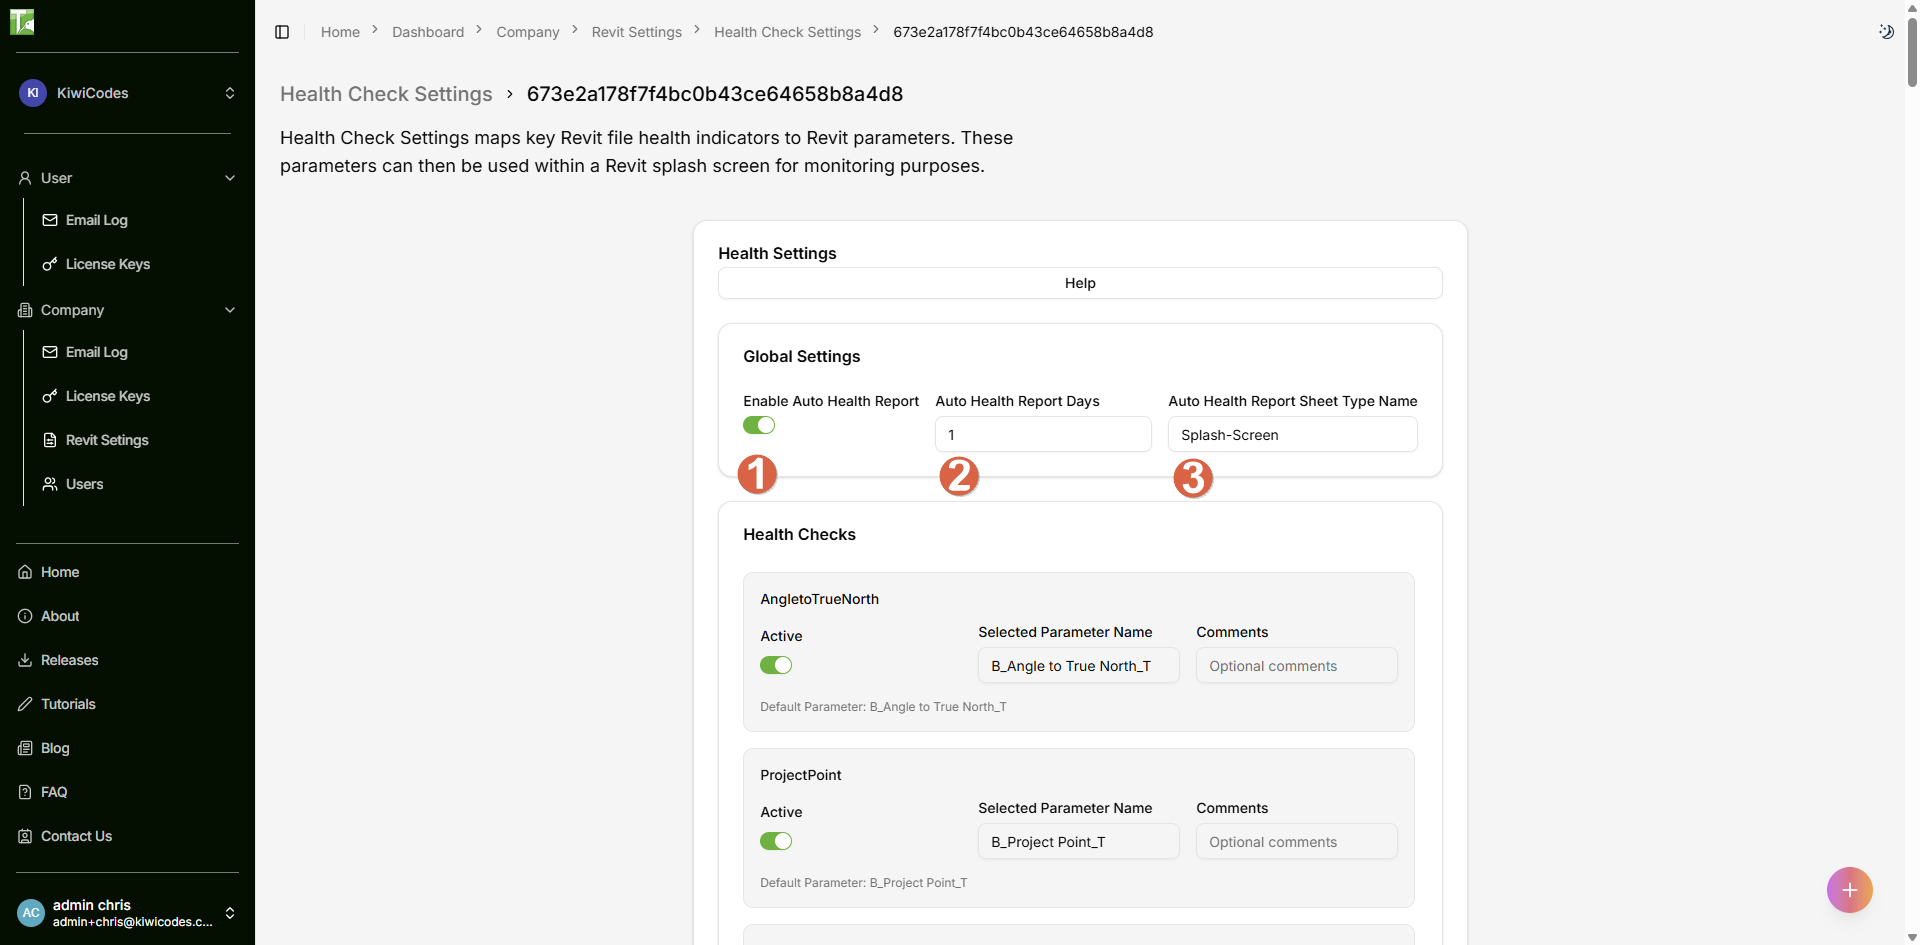
Step 3: Enable Auto Health Report
-
Check Enable Auto Health Report
-
Set Days Between Runs (e.g., 7 for weekly, 30 for monthly)
-
Enter the Sheet Type Name that matches your title block
- Default: "Splash-Screen"
- Must match exactly (case-sensitive)
💡 Tip: Click the help icon at any point for detailed explanations
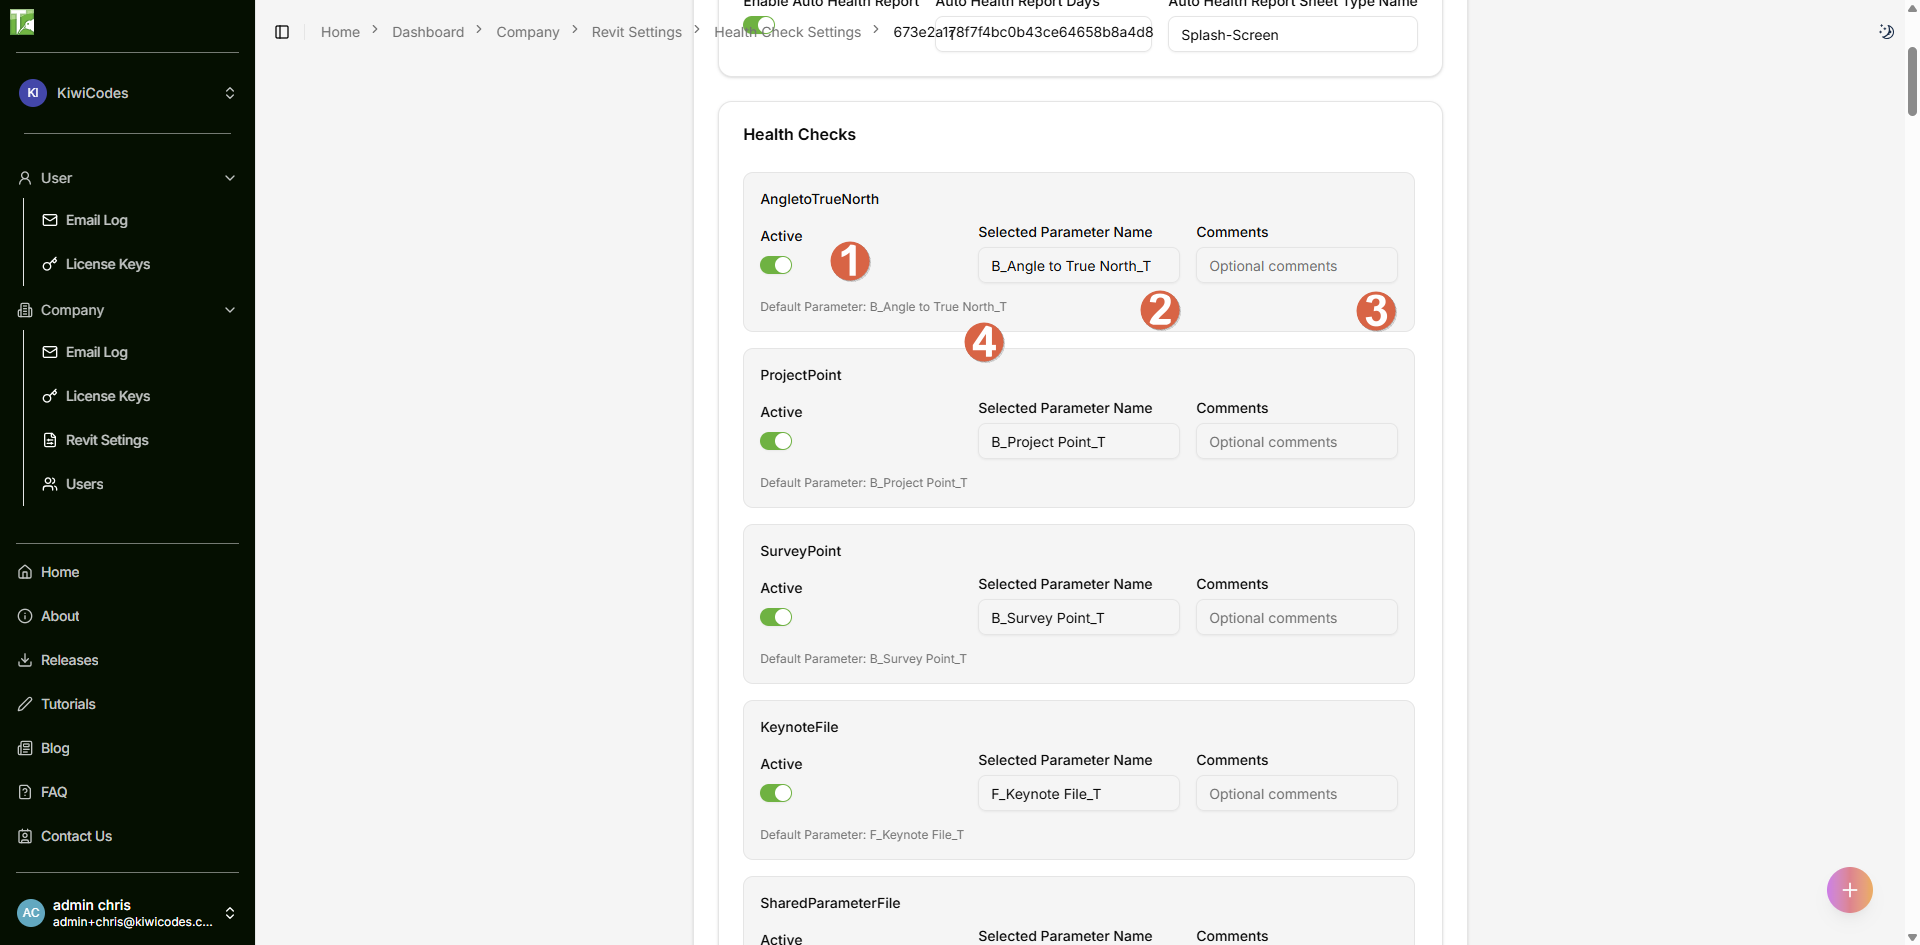
Step 4: Configure Individual Health Checks
For each health check item:
- Toggle Active: Enable/disable specific checks
- Parameter Name: Enter the parameter name in your title block
- Default values work with provided template
- Customize to match your title block family
- Comments: Add notes for your team (optional)
- Default Value: Reference for reverting changes
Title Block Setup
Critical Parameter
NextRunDay_T (Text Parameter)
- Required for automatic scheduling
- Stores the next scheduled run date in format:
yyyy/MM/dd - Updated automatically after each run
Customizing the Title Block
- Open
Splash-Screen_A3.rfain the Family Editor - Modify graphics, layout, and appearance as needed
- Do not rename or delete the health check parameters
- Add additional custom parameters if desired
- Load into your project templates
Health Check Categories
The tool monitors 11 categories with 50+ individual metrics:
B - Base/Location (3 checks)
- B_Angle to True North_T: Project rotation angle
- B_Project Point_T: Internal project base point coordinates (N/S, E/W, Elevation)
- B_Survey Point_T: Shared coordinates survey point location
F - Files (2 checks)
- F_Keynote File_T: Path to keynote text file
- F_Shared Parameter File_T: Path to shared parameter file
H - Health (3 checks)
- H_File Size_I: Model file size in MB
- H_Warnings_I: Total warning count
- H_2D-3D-Ratio_I: Ratio of detailing elements to model elements
S - Styles (3 checks)
- S_Fill Patterns_I: Number of fill patterns
- S_Line Patterns_I: Number of line patterns
- S_Line Styles_I: Number of line styles
L - Linked Files (8 checks)
- L_Duplicate CADs_I: Duplicate CAD file instances
- L_Imported CADs_I: Imported CAD files
- L_Linked DGN_I: Linked MicroStation files
- L_Linked DWG_I: Linked AutoCAD files
- L_Linked Images_I: Linked raster images
- L_Linked PDF Instances_I: Linked PDF instances
- L_Linked PDFs_I: Linked PDF files
- L_Linked Revit_I: Linked Revit models
A - Areas/Rooms (6 checks)
- A_Not Enclosed Areas_I: Areas with boundary issues
- A_Not Enclosed Rooms_I: Rooms with boundary issues
- A_Not Place Areas_I: Unplaced area tags
- A_Not Place Rooms_I: Unplaced room tags
- A_Placed Areas_I: Total placed areas
- A_Placed Rooms_I: Total placed rooms
T - Tags/Marks (3 checks)
- T_Door Mark Duplicated_I: Duplicate door marks
- T_Room Number Duplicated_I: Duplicate room numbers
- T_Window Mark Duplicated_I: Duplicate window marks
M - Modelling (9 checks)
- M_Dimensions Overriden_I: Dimensions with overridden values
- M_Filters_I: Total view filters
- M_In Place Families_I: In-place family instances
- M_Materials_I: Total materials
- M_Model Groups_I: Model group instances
- M_Modelled Elements_I: Total 3D model elements
- M_Purgable Items_I: Elements that can be purged
- M_Reference Planes_I: Total reference planes
- M_Worksets_I: User-created worksets
D - Detailing (4 checks)
- D_Detail Groups_I: Detail group instances
- D_Detail Lines_I: Detail line elements
- D_Filled Regions_I: Filled region elements
- D_Masking Regions_I: Masking region elements
G - Groups (8 checks)
- G_Detail Group Array Types_I: Detail group array types
- G_Detail Group Types_I: Detail group type definitions
- G_Detail Groups Not Named_I: Default-named detail groups
- G_Detail Groups Not Placed_I: Unplaced detail group types
- G_Model Group Array Types_I: Model group array types
- G_Model Group Types_I: Model group type definitions
- G_Model Groups Not Named_I: Default-named model groups
- G_Model Groups Not Placed_I: Unplaced model group types
V - Views (6 checks)
- V_Schedules Total_I: Total schedules
- V_Sheets Total_I: Total sheets
- V_Views Copy_I: Views with "Copy" in name
- V_View Templates Unused_I: Unused view templates
- V_Views Total_I: Total views (excluding sheets, schedules, templates)
- V_Views Unused_I: Views not placed on sheets
O - Design Options (4 checks)
- O_Design Option Sets Not Named_I: Default-named option sets
- O_Design Option Sets_I: Total design option sets
- O_Design Options Not Named_I: Default-named design options
- O_Design Options_I: Total design options
P - Parameters (2 checks)
- P_Project Parameters_I: Total project parameters
- P_Shared Parameters_I: Total shared parameters in use
Step-by-Step Guide
Initial Setup
-
Configure Global Settings
- Follow Global Configuration steps
- Set up all desired health checks
- Configure run frequency
-
Prepare Your Project
- Load the splash screen title block into your template
- Create a sheet using the configured type name
- Verify all parameters exist in the title block
-
Run First Health Check
- Open your Revit project
- Go to Bonus Tools ribbon
- Click "142 KiwiCodes Audit"
- Monitor the progress dialog
-
Review Results
- Navigate to your splash screen sheet
- Verify all parameters populated correctly
- Check the next run date
Ongoing Use
The tool automatically runs based on your configured schedule. You can also:
- Manual Run: Execute the tool anytime via the Bonus Tools ribbon
- After Major Changes: Run after significant model modifications
- Before Deliverables: Check model health before issuing
Example Workflows
Weekly Model Health Report
Goal: Monitor model health weekly and track trends
- Set auto-run interval to 7 days
- Enable all health checks
- Create a dedicated "Model Health" sheet
- Review each Monday morning
- Address any concerning metrics
Key Metrics to Watch:
- Warnings count increasing
- File size growth
- Unused views accumulating
- Purgeable items increasing
Pre-Submission Quality Check
Goal: Ensure model quality before client delivery
- Run manual health check
- Focus on these critical areas:
- Warnings (should be minimal)
- Duplicate marks (should be zero)
- Not enclosed rooms/areas (should be zero)
- Unused views (minimize)
- Purgeable items (purge before submission)
Multi-Discipline Coordination
Goal: Standardize reporting across disciplines
- Create organization-wide title block with health parameters
- Configure identical health check settings for all licenses
- Set consistent run schedule (e.g., every Friday)
- Compare metrics across discipline models
- Identify coordination issues early
Tips and Best Practices
Configuration Tips
- Global vs. Local: Global settings override local configurations - use global settings for consistency
- Parameter Naming: Use descriptive suffixes (_I for Integer, _T for Text) for clarity
- Incremental Setup: Start with essential checks, add more as needed
- Documentation: Use the comments field to note why specific checks are enabled/disabled
Model Health Guidelines
File Size
- Under 300MB: Healthy
- 300-500MB: Monitor closely
- Over 500MB: Investigate and optimize
Warnings
- Under 50: Excellent
- 50-100: Good, review periodically
- Over 100: Address immediately
Unused Elements
- Purge regularly (weekly recommended)
- Remove unused views before major milestones
- Clean up groups and templates monthly
Detail to Model Ratio
- 1:3 to 1:5 is typical for construction documents
- Very high ratios may indicate over-detailing
- Very low ratios may indicate under-documentation
Performance Optimization
- Run During Off-Hours: Schedule for nights or weekends if model is large
- Selective Checks: Disable non-critical checks for faster execution
- Regular Purging: Keep purgeable items low to improve check speed
- Clean Templates: Start projects with optimized templates
Troubleshooting
Common Issues
Error: "No titleblocks found"
- Cause: Sheet with configured type name doesn't exist
- Solution:
- Create a sheet using the exact type name from settings
- Verify type name spelling (case-sensitive)
- Check that title block is actually on the sheet
Error: "Health check not configured"
- Cause: No settings found (global or local)
- Solution:
- Configure via web dashboard (recommended)
- Or use local Revit settings (Bonus Tools menu)
- Restart Revit after configuration
Parameters Not Updating
- Cause: Parameter names mismatch or wrong data type
- Solution:
- Verify parameter names match exactly
- Confirm data types (_I for Integer, _T for Text)
- Check parameter is not read-only
- Ensure parameter exists in title block family
Tool Runs But No Data Appears
- Cause: Transaction failure or parameter access issues
- Solution:
- Check Revit journal for specific errors
- Verify title block is not in a read-only state
- Ensure you have edit permissions on the sheet
- Look for error messages in output log
"Failed to save to parameter" Messages
- Cause: Individual parameter write failures
- Solution:
- Note which parameters failed (shown in output)
- Check those specific parameters in family
- Verify correct data type and parameter settings
- Reload title block family if needed
Getting Support
If issues persist:
- Check Output Log: Review messages in Bonus Tools output window
- Review Journal: Check Revit journal file for detailed errors
- Verify License: Ensure valid Bonus Tools license
- Contact Support:
- Email: support@kiwicodes.com
- Include: Error messages, screenshots, Revit version
- Help Documentation: Click help icons in web dashboard for context-specific guidance
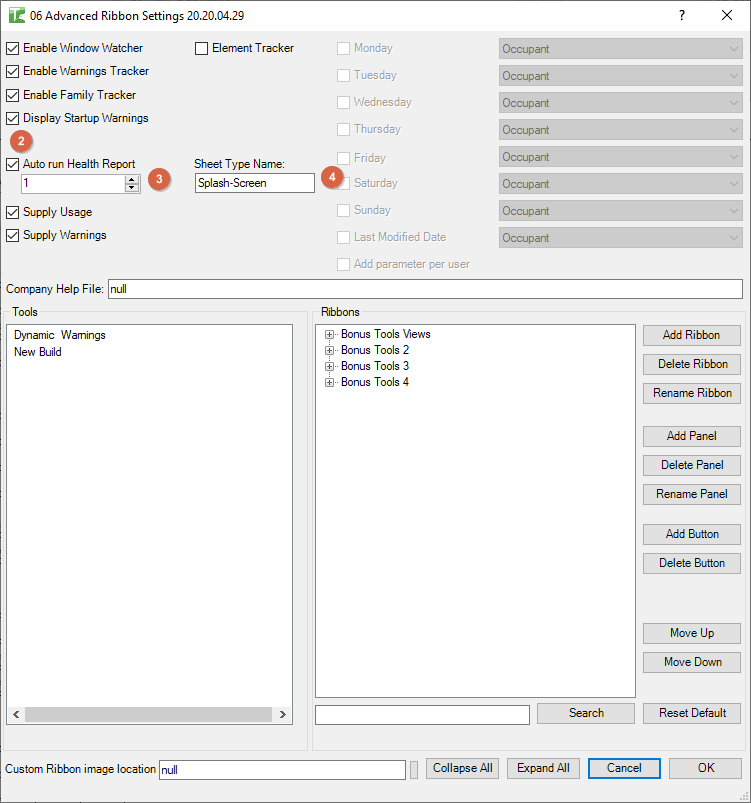
Local vs. Global Settings
Important: Global settings (web dashboard) take precedence over local settings (Revit menu)
-
Use Global When:
- Standardizing across organization
- Managing multiple licenses
- Centralized configuration control
-
Use Local When:
- Testing new configurations
- Individual workstation needs
- No internet access for web dashboard
Note: If global settings exist, they override any local configuration!
Need Help? Contact support or refer to additional Bonus Tools documentation.
Thank you for using Bonus Tools - 142 KiwiCodes Audit!