140 List Elements in Views
Chris McKeown / July 1, 2025
Highlight Elements
Overview
List Elements in Views scans every selected view and builds a category-by-category element count for each one. The results are written to a CSV file that opens automatically — one row per view, one column per category found across all selected views — with sheet number and sheet name included where the view is placed on a sheet. A JSON backup is saved alongside the CSV for programmatic or archival use. The tool is ideal for QA/QC checks, issue audits, and tracking model completeness across milestones.
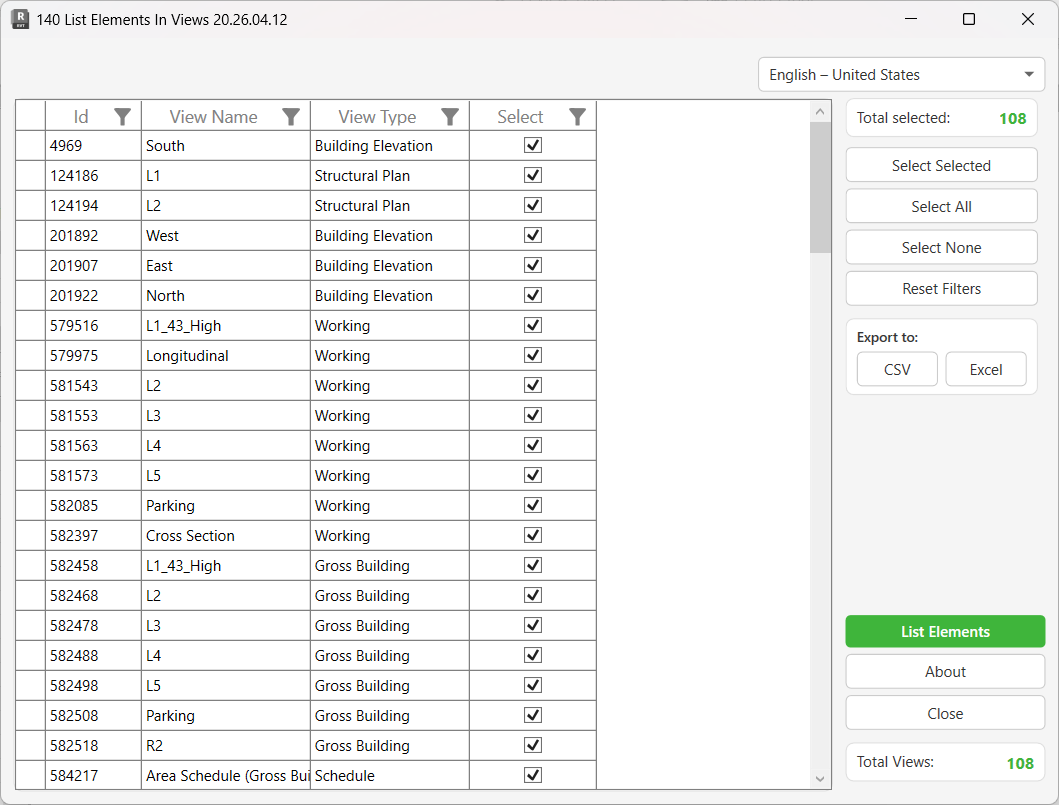
Table of Contents
- Key Features
- Requirements
- Running the Tool
- Understanding the Output
- Tips and Best Practices
- Common Use Cases
- Troubleshooting
Key Features
- Lists all non-hidden, non-element-type elements in each selected view, grouped by category name
- One row per view in the CSV output, with dynamic columns for every category found across all selected views
- Includes Sheet Number and Sheet Name for views placed on sheets; uses
NAwhen the view is not on a sheet - View templates are automatically skipped even if selected
- A JSON backup (
.txt) is saved alongside the CSV — same filename, same directory - The exported CSV opens automatically in the default application (e.g. Excel) after saving
- Grid supports column filtering and multi-select for precise view targeting
- Export the view list itself to CSV or Excel separately from the element analysis
- Built-in language selector for multi-language support
Requirements
- Works in both Project documents and is launched from a project context (no Family document restriction)
- The project must have at least one non-template view with elements
- Write access to a local or network folder for saving the output CSV
- The active view in Revit at the time of processing affects visibility checks — see Troubleshooting for details
Running the Tool
Launch
Find List Elements in Views on the Bonus Tools Ribbon or use 115 Search Tools.
The dialog loads all project views into the grid. All views are pre-selected by default.
Step 1 — Review and Filter the View List
The main grid lists all non-template views in the project.
| Column | Description |
|---|---|
| Id | Revit Element ID of the view |
| View Name | Name of the view as shown in the Project Browser |
| View Type | Revit view type (Floor Plan, Section, Elevation, 3D View, etc.) |
| Select | Checkbox — tick to include the view in the element analysis |
Use the column header filters to narrow the list — for example, filter View Type to FloorPlan to show only floor plans, then use Select All to check those views only.
Selection controls:
- Select Selected — toggles the Select checkbox for highlighted rows
- Select All — checks all visible rows (respects active column filters)
- Select None — unchecks all rows
- Reset Filters — clears all active column filters
The Total Selected counter in the right panel updates as you change selections. The Total Views counter shows the number of views in the grid.
The Export to CSV / Excel buttons in the right panel export the view list grid — not the element analysis results. Use these to document which views were analysed.
Step 2 — Run the Analysis
Click List Elements to begin processing.
A progress bar tracks processing. Each selected view is scanned in sequence — view templates are skipped automatically even if their checkbox was ticked. Processing time scales with the number of views and the element count in each view; use the Cancel button to abort at any time. No model changes are made.
Step 3 — Save the Output
When processing is complete, a Save As dialog appears. Choose a folder and filename for the CSV.
Two files are created in the chosen folder:
| File | Description |
|---|---|
[filename].csv | The element count results — one row per view, opens automatically |
[filename].csv.txt | JSON backup of the same data, for programmatic or archival use |
The CSV opens immediately in your default application (Excel, LibreOffice, etc.) after saving.
Understanding the Output
CSV Structure
The CSV contains one row per processed view. Columns are built dynamically from all categories found across the selected views:
| Column | Description |
|---|---|
| ID | Revit Element ID of the view |
| View Name | View name (with illegal characters ¬, ", and "Fin" stripped) |
| Sheet Number | Sheet number if the view is on a sheet, otherwise NA |
| Sheet Name | Sheet name if the view is on a sheet, otherwise NA |
| [Category Name] | Count of visible elements in that category for this view |
Category columns are created for every category that appears in at least one processed view. Views with no elements in a given category show an empty cell or 0 for that column.
Example:
ID,View Name,Sheet Number,Sheet Name,Walls,Doors,Windows,Dimensions,Text Notes
445123,Level 1 Floor Plan,A101,Floor Plans,145,23,18,89,67
556789,Section A,A201,Sections,78,12,8,45,34
667890,3D View - Overall,NA,NA,312,47,31,,
Element Visibility Rules
The tool uses FilteredElementCollector scoped to the view's element ID, then filters for:
- Non-element-type instances (types/families are excluded)
- Elements with a category (anonymous or categoryless elements are excluded)
- Elements not hidden in the currently active view in Revit at the time of processing
Important: The visibility check (
IsHidden) runs against the active view open in Revit, not the view being analysed. If the active view has categories or worksets hidden, elements that are visible in the processed view but hidden in the active view will not be counted. For the most accurate counts, set the active view to one with all categories visible (e.g. a 3D view with no visibility overrides) before clicking List Elements.
Tips and Best Practices
- Set the active view to an unrestricted 3D view before processing. Because the tool's visibility check runs against the active view, a 3D view with all categories turned on gives the most complete element counts.
- Use View Type filtering to process discipline-specific sets. Filter the grid to
FloorPlanfor architecture,EngineeringPlanfor structure, etc. Select all, run, and repeat per discipline for comparable output files. - Deselect 3D views if you need fast results. 3D views collect elements across the whole model and process more slowly than plan or section views. Exclude them unless you specifically need their counts.
- Export the view list to Excel before running. Use Export to Excel on the view grid to record which views were included in each analysis run. Archive this alongside the CSV output.
- Use date-stamped filenames. Save outputs as
ElementInventory_2026-04-12.csvto build a progression record across project milestones. - Open in Excel, not Notepad. The CSV may contain commas in sheet names; Excel handles the quoting correctly. If column alignment looks wrong, use Excel's Data > From Text/CSV import with comma as delimiter.
- The JSON backup is your safety net. If the CSV becomes corrupted or a column-alignment issue makes it hard to parse, the
.txtJSON file contains the same structured data and can be re-processed programmatically. - Views with zero elements are not included in the CSV. The tool skips views where the category dictionary is empty — meaning no visible, categorised elements were found. Check those views manually for visibility settings.
Common Use Cases
Pre-issue QA check — Before a drawing issue, export all sheet views and open the CSV in Excel. Filter the Sheet Number column to exclude NA, then scan for views with unusually low element counts. Zero dimensions on a plan view or zero walls in a section may indicate a visibility override problem or an empty viewport.
Milestone model progression tracking — Run the tool at each design phase (SD, DD, CD) on the same set of coordination views and save with a phase/date stamp. Pivot the results in Excel over time to track element count growth by category — a simple but effective model development metric.
View template compliance audit — Filter the view list to a specific view type (e.g. all floor plans at the same scale). Export the element counts and compare across views. Significant variation in annotation category counts (Text Notes, Dimensions, Tags) between views of the same type often indicates inconsistent view template application or manual visibility overrides.
Clash detection preparation — Before a coordination meeting, list elements in all coordination views. Identify views with unexpectedly high Generic Model or Mechanical Equipment counts — these are common sources of clashes — and prioritise them for review.
As-built documentation — At project completion, run the tool across all sheet views and include the CSV in the project closeout package. It provides a concise record of what element categories are documented in each drawing.
Troubleshooting
Element counts seem too low compared to what's visible in the view The tool checks visibility against the active view in Revit, not the view being processed. If the active view has categories hidden (e.g. via a view template that hides Mechanical Equipment), those elements will not be counted even if they are visible in the processed view. Before running, switch to a 3D view with all categories turned on, or a view with no visibility overrides, and keep it as the active view during processing.
View templates are selected in the grid but are not in the output View templates are skipped automatically during processing even if their Select checkbox is ticked. This is intentional — templates are not actual views and contain no placed elements. They appear in the grid only because they are view objects; untick them with Select None → filter → Select All to keep the selection clean.
Views show NA for Sheet Number even though they appear on sheets
The view's VIEWER_SHEET_NUMBER parameter returned empty or null. This can happen if the view is placed on a sheet but the viewport is outdated, or if the sheet number parameter was not populated. Open the sheet in Revit, verify the sheet number is filled in, and re-run.
Some categories are missing from the CSV columns Only categories with at least one visible, non-element-type element across the processed views create a column. Categories that are entirely hidden or have zero instances produce no column — this is expected behaviour, not an error.
"Error whilst running the tool. If the problem persists please contact chris@kiwicodes.com" An unhandled exception occurred during element processing for one or more views. This can happen when a view contains elements whose category lookup throws an exception, or when a view is in an inconsistent state. The tool continues processing other views; check the Output panel for more detail. If the issue persists, try processing the problem view in isolation to identify it.
The CSV opens but columns are misaligned
View names or sheet names containing commas will misalign CSV columns in Notepad. Open the file in Excel using Data > From Text/CSV and set the delimiter to comma — Excel handles quoted fields correctly. The tool strips the characters ¬, ", and "Fin" from view and sheet names automatically, but bare commas are not stripped.
Processing is very slow 3D views scan the entire model and take significantly longer than plan or section views. If speed is critical, deselect all 3D views using the View Type column filter and run without them. Also close unnecessary applications to free memory on large projects.
The dialog closes or Revit becomes unresponsive during large runs Processing hundreds of views with many elements is memory-intensive. Process in batches of 50–100 views, saving each batch to a separately named CSV, then consolidate in Excel.