014 Create Floors from Rooms
Chris McKeown / July 1, 2025
Time Saving
Overview
Create Floors from Rooms generates Revit Floor elements whose boundaries trace the finish edges of selected Rooms. Choose the scope (current selection, current view, or entire project), pick a Floor Type, and optionally offset the floor from the Room's level — all in a single click. The tool is particularly useful for floor-finish modelling workflows where each Room needs a matching Floor element of a specific type.
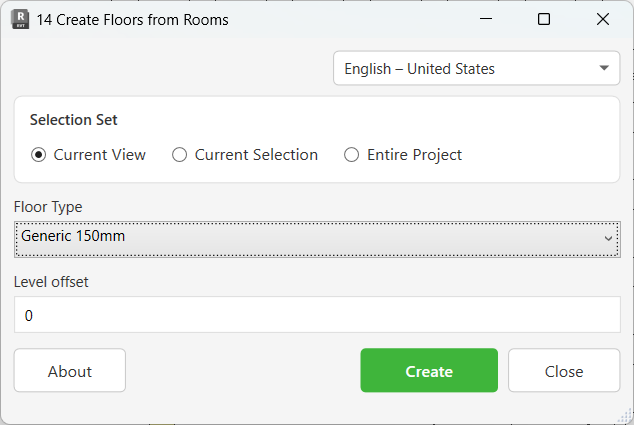
Table of Contents
Key Features
- Creates Floors that exactly trace Room finish boundaries
- Three scope options: Current Selection, Current View, or Entire Project
- Populated Floor Type list sourced directly from the project
- Numeric level offset field accepts project units (positive or negative)
- Handles complex Rooms with multiple boundary loops — uses the largest loop as the outer boundary
- Each Room is processed in an isolated sub-transaction, so one failure does not block the others
- Progress bar with cancel option for large batches
- Completion summary showing how many Floors passed and failed
Requirements
- Must be run in a project file — not available in the Family editor
- The active view must be a Plan View containing the Rooms you want to process
- Rooms must be fully enclosed with a valid boundary — unbounded rooms are skipped
- The Floor is placed on the Level associated with the Room, not the active view level
- Floor Types must already exist in the project before running the tool
Running the Tool
Launch
Find Create Floors from Rooms on the Bonus Tools Ribbon or use 115 Search Tools.
The dialog opens showing the last-used settings.

Step 1 — Choose the Selection Set
Select which Rooms the tool will process:
| Option | Behaviour |
|---|---|
| Current Selection | Processes only Rooms that are selected in Revit before launching (default) |
| Current View | Processes all Rooms visible in the active plan view |
| Entire Project | Processes every Room in the project across all levels |

Tip: Use Current Selection when you only need floors in specific rooms, or Entire Project when setting up a new model for the first time.
Step 2 — Choose the Floor Type
Select the Floor Type to apply from the Floor Type dropdown. The list is populated from all Floor Types loaded in the current project.

If the Floor Type you need is not listed, load it into the project via Insert → Load Family before running this tool.
Step 3 — Set the Level Offset
Enter a numeric value in the Level Offset field to shift the Floor vertically relative to the Room's level. Uses the project's current units (millimetres, feet, etc.).
0— Floor sits at the level elevation (default)- Positive values — Floor is raised above the level
- Negative values — Floor is lowered below the level

Step 4 — Create
Click Create. A progress bar appears while floors are generated. You can click Cancel at any time to stop processing — floors already created will be kept.
When complete, a confirmation message shows how many floors were created successfully and how many failed.

Tips and Best Practices
- Select Rooms before launching. Using Current Selection is the safest option when you only want floors in specific rooms — it avoids accidentally creating floors in unintended areas.
- Run per Floor Type. If different room types need different floor types (e.g. tiles vs. carpet), run the tool once for each floor type, selecting the relevant rooms each time.
- Use a negative offset for floor finishes. If the floor finish sits below the structural slab level, enter a negative offset equal to the finish thickness (e.g.
-10mm). - Check Room boundaries first. Rooms with invalid or open boundaries are skipped. Use Revit's Room Separation Lines to close any gaps before running the tool.
- Rooms with islands are handled automatically. For rooms with internal voids (multiple boundary loops), the tool uses the largest closed loop as the outer perimeter — inner loops are ignored.
- Review failures in the output panel. If the summary shows failures, check the Bonus Tools output log for details on which rooms could not be processed.
- Workshared models require element ownership. Ensure you have edited access to the relevant worksets before running, otherwise the transaction will fail.
Common Use Cases
Floor-finish modelling — Select all Rooms on a floor, choose a floor-finish type (e.g. Floor Finish - Tiles - 10mm), set a -10mm offset, and click Create. Every room gets a matching finish floor in one step.
Multi-level rollout — Use Entire Project to generate floors across all levels simultaneously. Useful at the start of documentation when every room needs a structural floor element.
Room-by-room material zoning — Group rooms by finish material, select each group in turn, and run the tool with the matching Floor Type. Each group is processed in a separate run without affecting other rooms.
Verifying room enclosure — Running the tool with Current View and checking the failure count is a quick way to identify Rooms with boundary problems — any room that fails likely has an open or invalid boundary.
Troubleshooting
Tool is greyed out or shows "Action not available in the Family environment" The tool cannot run inside a Family editor document. Open a project file and try again.
No Rooms processed / count shows 0 passed Check that:
- The active view is a Plan View (not a section, elevation, or 3D view)
- The selected scope actually contains Rooms (e.g. rooms are placed and bounded in the current view)
- For Current Selection, Rooms were selected before opening the dialog
Floor created in the wrong position vertically The Floor is placed on the Room's level, not the active view's level. If the room is associated with a different level than expected, adjust the Room's Level parameter in Revit before running the tool.
"[X] passed. [Y] failed." — some rooms failed Individual Room failures are isolated and do not cancel the batch. Failures typically occur when:
- The Room boundary cannot be computed (open or invalid boundary)
- The Room has no area (unbounded room)
- A geometry exception occurred for that specific room
Check the Bonus Tools output log for details. Fix the Room boundaries and re-run on the failed rooms using Current Selection.
"Location Point failed. Gain ownership of elements and try again." In a workshared (workset-enabled) model, you do not have edit ownership of the elements being modified. Use Synchronize with Central, borrow the relevant worksets or elements, then re-run the tool.
Floor Type not appearing in the dropdown The Floor Type is not loaded in the current project. Load it via Insert → Load Family or duplicate an existing floor type in the project's Floor Types family.
Offset value not accepted
The Level Offset field must contain a valid numeric value in the project's current units. Do not include unit symbols — enter 100 not 100mm. If the project uses imperial units, enter feet (e.g. 0.5 for 6 inches).