137 Keynote Browser
Chris McKeown / July 1, 2025
Power
137 Keynote Browser
Manage your Revit Keynote text file directly from a purpose-built dialog — browse, edit, assign, and merge keynotes without ever leaving Revit. Keynote Browser enforces unique key values, detects file changes, and keeps your keynote data stable and consistent across the project team.
Table of Contents
- Key Features
- Requirements
- Running the Tool
- The Interface
- Editing Keynotes
- Assigning Keynotes
- Merging Another File
- File Synchronisation
- Tips and Best Practices
- Common Use Cases
- Troubleshooting
Key Features
- Browse your Keynote text file in a hierarchical tree view
- Add, delete, and rename keynote entries with uniqueness validation
- Convert all keynote text to UPPER CASE, lower case, or Title Case in one click
- Find and Replace text across the entire keynote file
- Drag and drop to reorder keynotes within the tree
- Assign Keynotes panel — drag a family type onto a keynote to assign it directly in Revit
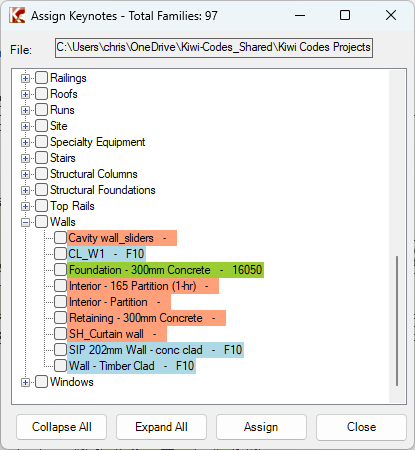
- Colour-coded assignment status: connected (green), unassigned (orange), broken link (blue)
- Merge selected keynotes from a second file into the current file
- Automatic file-change detection with a visual warning and one-click sync
- Create a new keynote file from scratch, from an existing file, or from the current project's families
Requirements
- Autodesk Revit (2019 or later)
- A Keynote text file (
.txt) linked to the Revit project, or the ability to create one - BonusTools installed and licensed
Running the Tool
Launch
Launch Keynote Browser from the BonusTools ribbon. The tool will automatically detect the keynote file path linked to the current Revit project and load it into the tree view.
If no keynote file is linked, you will be prompted to browse for one or create a new file.
Tip: The title bar always shows the total number of branches currently loaded, e.g. Keynote Browser — Total Branches: 17.
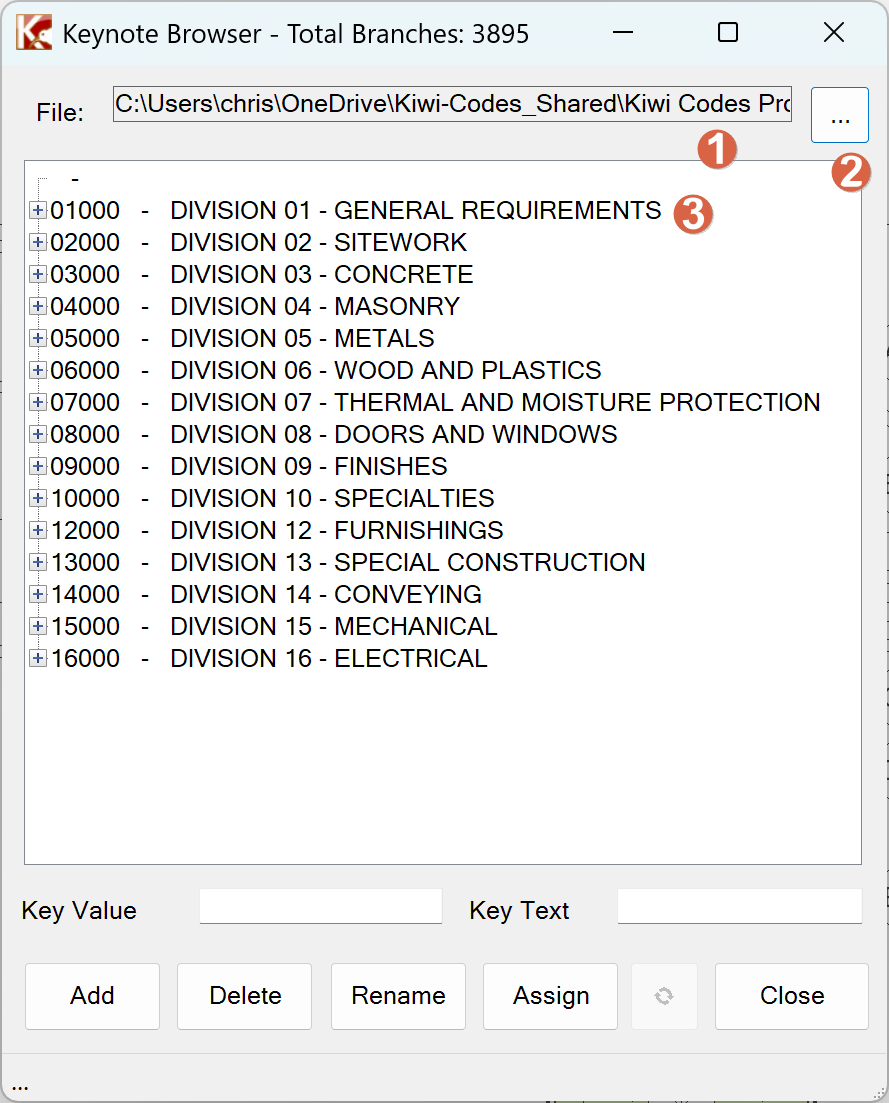
The Interface
The main window is divided into two areas:
Left panel — Keynote Browser
| Control | Purpose |
|---|---|
| File path box | Displays the path to the currently loaded keynote text file |
| ... button | Browse for and open a different keynote file |
| Tree view | Displays all keynotes in their parent/child hierarchy |
| Key Value | The keynote code (e.g. 1110) for the selected or new entry |
| Key Text | The descriptive text (e.g. Cast-in-Place Concrete) for the selected or new entry |
| Add | Adds a new keynote under the currently selected node, or at the root level |
| Delete | Deletes the selected keynote after confirmation |
| Rename | Renames/renumbers the selected keynote |
| Assign ► | Opens the Assign Keynotes panel on the right |
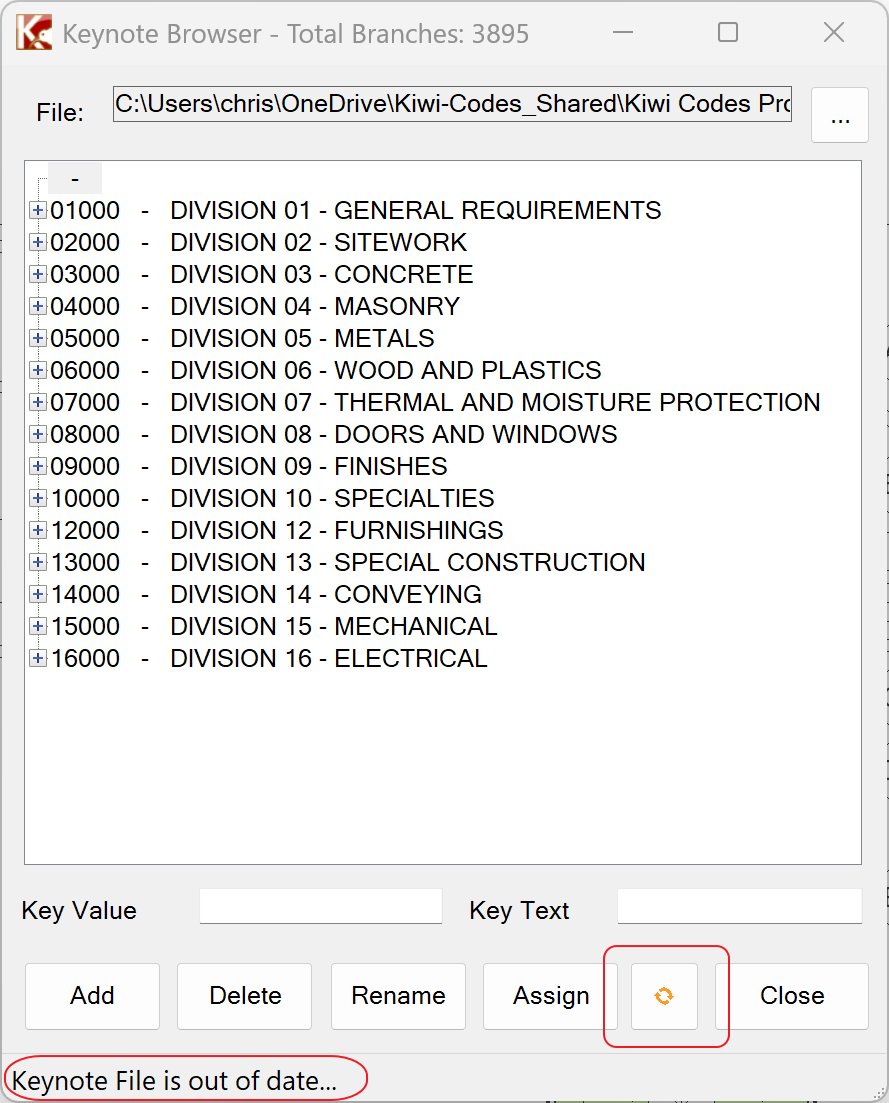
| ↻ | Synchronises the tree with the latest version of the file on disk |
| Close | Saves and closes the tool |
Right panel — Assign Keynotes (opens when you click Assign ►)
See Assigning Keynotes below.
Context Menu
Right-clicking the tree view opens a full context menu with additional operations:
The Create submenu lets you start a new keynote file:
| Option | Description |
|---|---|
| New | Creates a new, empty keynote file |
| From Existing | Opens an existing file and saves it as a new file |
| From Current Project | Scans all families in the project and builds a keynote file from their existing keynote values |
Editing Keynotes
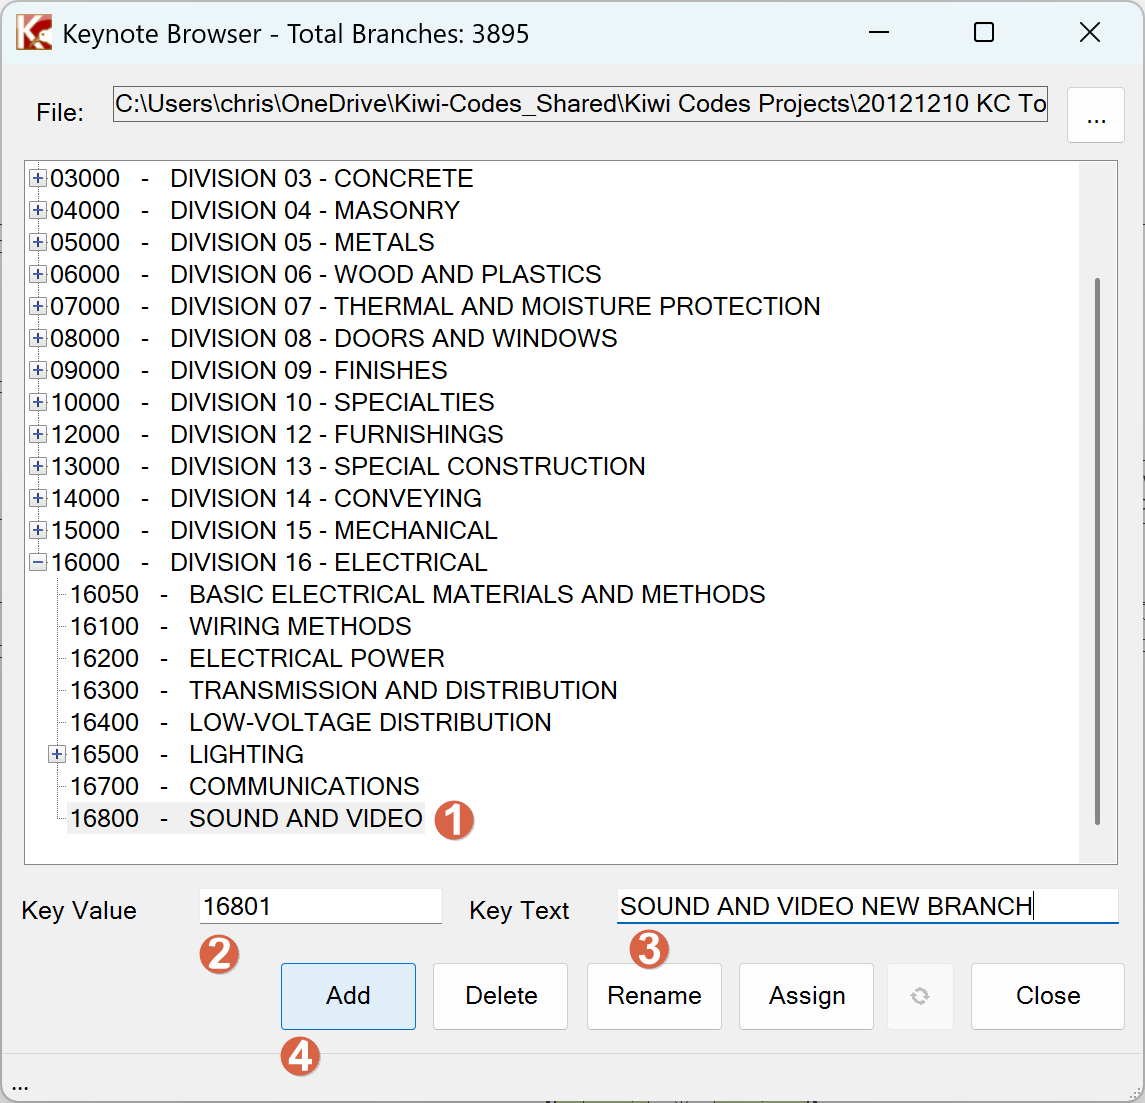
Adding a Keynote
- Optionally select a parent node in the tree to nest the new keynote beneath it. If nothing is selected, the new keynote is added at the root level.
- Type the Key Value (the code, e.g.
1210) into the Key Value field. - Type the Key Text (the description, e.g.
Brick Masonry) into the Key Text field. - Click Add.
The tool validates that the Key Value is unique before adding. Duplicate values are not permitted.
Renaming / Renumbering a Keynote
- Select the keynote in the tree — the Key Value and Key Text fields will populate automatically.
- Edit the Key Value and/or Key Text fields as required.
- Click Rename.
If you change the Key Value (renumber), you will be asked whether you also want Keynote Browser to update all elements in the project that carry the old keynote value. This renumbering operation runs a transaction across all element types in the project.
Deleting a Keynote
Select the keynote and click Delete, or press the Delete key. You will be asked to confirm before deletion.
Converting Case
Use the context menu to convert all keynote text in the file at once:
- Convert All to UPPER CASE
- Convert All to lower case
- Convert All to Title Case
Find and Replace
Select Find/Replace from the context menu to open a floating Find/Replace dialog. This searches and replaces text across all keynote text entries in the tree.
Drag and Drop Reordering
While the Assign panel is closed, you can drag any keynote node and drop it onto another node to re-parent it. A confirmation dialog confirms the move before it is applied.
Assigning Keynotes
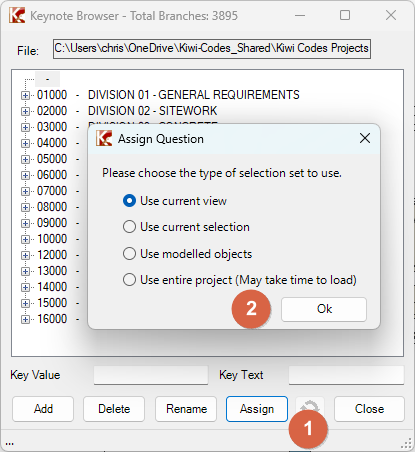
Click Assign ► to open the Assign Keynotes panel on the right side of the window.
Step 1 — Choose a Selection Set
A dialog asks which elements to load into the Assign panel:

| Option | Description |
|---|---|
| Use current view | Only elements visible in the active Revit view |
| Use current selection | Only elements currently selected in Revit |
| Use modelled objects | All placed instances that already have a keynote or key source parameter |
| Use entire project | Every element type in the project (may take longer on large models) |
Step 2 — The Assign Panel
After loading, the right panel shows all family types organised by Category → Family → Type. Each type row is colour-coded:

| Colour | Meaning |
|---|---|
| 🟠 Orange | Unassigned — the type has no keynote value |
| 🟢 Green | Connected — the type has a keynote that exists in the current file |
| 🔵 Blue | Broken Link — the type has a keynote value that does not exist in the current file |
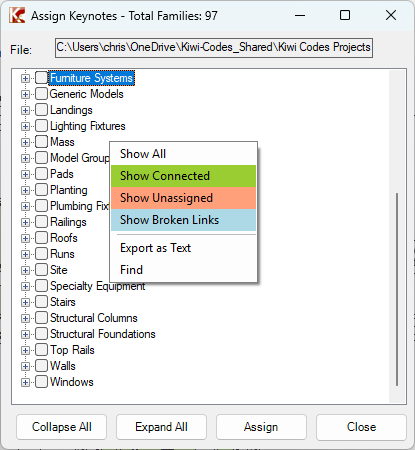
Use the context menu on the Assign panel to filter the view:
Step 3 — Drag to Assign
Drag a type row from the right panel and drop it onto a keynote in the left tree. A confirmation dialog will appear:
Click Yes to apply. The type row will immediately update to green (connected) and display the keynote number beside the type name.
Go To Element
Select a type row in the Assign panel and click ⊕ Go To to select and zoom to the first placed instance of that type in the Revit model.
Export Assign List
Right-click the Assign panel and choose Export as Text to save the current assign tree as a plain text file for reporting.
Find in Assign Panel
Right-click and choose Find to search for a family type by name within the Assign panel.
Hiding the Assign Panel
Click ◄ Hide to collapse the Assign panel and return the window to its normal width.
Merging Another File
Select Merge Other File from the context menu to open the Merge Selection List dialog.
- Click ... to browse for the second keynote file to merge from.
- The file loads into the tree with a checkbox next to each entry.
- Check the keynotes you want to import. Checking a parent automatically checks its children; checking a child automatically checks its parent.
- Click Merge. Only keynotes with unique Key Values (not already present in your current file) will be inserted. A summary reports how many entries were inserted and how many were skipped.
Use Collapse All / Expand All to navigate large files, and the Find context menu option to search within the merge list.
File Synchronisation
Keynote Browser monitors the file modification date. If another user edits the .txt file while you have it open, the synchronisation button turns orange and the status bar shows a warning message.
Click the ↻ button to reload the latest version of the file from disk. Any changes you have not yet saved will be replaced by the current file content.
The synchronise button also becomes active when you hover over the tree view, so the out-of-date warning triggers naturally as you work.
Tips and Best Practices
- Always use unique Key Values. The tool enforces uniqueness on Add and Rename, but keeping values meaningful (e.g. CSI-based codes like
03300) makes the file easier to manage across projects. - Save frequently. Keynote Browser auto-saves on Add, Delete, Rename, and when you close the tool. If you need to undo a change, the file modification date check will prompt you to reload.
- Use Title Case consistently. The Convert All to Title Case function is a quick way to standardise an inherited file that has mixed casing.
- Assign from a filtered view. Using Show Unassigned in the Assign panel gives you a focused list of only the types that still need keynotes, making the assignment process much faster on large projects.
- Broken links (blue) need attention. These indicate that a keynote value exists on a family type but the corresponding entry no longer exists in the text file. Either add the missing entry or reassign the type to an existing keynote.
- Create from Current Project is ideal for handover. It builds a minimal keynote file containing only the entries actually used in the project, which is cleaner than delivering the full master file.
Common Use Cases
Setting up a new project keynote file Use Create → New to start a blank file, or Create → From Existing to copy from your office master file, then link it to the project via Revit's Keynote Settings.
Bulk-assigning keynotes at the start of a project Open the Assign panel with Use Entire Project, filter to Show Unassigned, then systematically drag each family type onto the appropriate keynote in the left tree.
Updating keynote numbering mid-project
Use Rename to change a Key Value. When prompted, choose to renumber elements in the project — this will update the KEYNOTE_PARAM on all matching element types in a single Revit transaction.
Merging keynotes from a consultant's file Use Merge Other File to selectively import entries from a consultant's keynote file, skipping any that would conflict with your existing values.
Auditing keynote coverage before issue Open the Assign panel with Use Entire Project, then export the list with Export as Text to review coverage in a spreadsheet.
Troubleshooting
| Symptom | Likely Cause | Resolution |
|---|---|---|
| File path box is highlighted green | The keynote file path from the Revit project cannot be found at that location | Click ... to manually browse to the correct file |
| "File is readonly" message on save | The .txt file has the read-only attribute set | Check out the file from your document management system or remove the read-only flag |
| Synchronise button turns orange immediately on open | Another user or process has already modified the file | Click ↻ to reload — this is expected in collaborative environments |
| Drag-and-drop reorder not working | The Assign panel is open, which disables left-panel reordering | Close the Assign panel with ◄ Hide first |
| "No elements found" when opening Assign panel | The current view or selection contains no elements with a Keynote or Key Source parameter | Try a different selection type (e.g. Use Entire Project) |
| Blue (broken link) items in Assign panel | A family type references a keynote code that no longer exists in the text file | Either add the missing keynote entry in the left panel, or drag the type to a valid keynote to reassign it |
| Merge reports all items failed | All keynote Key Values in the source file already exist in the current file | Use Find/Replace or manually check for conflicting values before merging |