129 Relationships
Chris McKeown / July 1, 2025
Analysis
Overview
Relationships identifies all elements that Revit considers dependent on — or hosted by — a selected element. The tool performs a safe, rolled-back deletion test: it temporarily deletes the selected element inside a transaction group and captures the DocumentChanged event to record every element Revit would cascade-delete as a consequence, then immediately rolls back so nothing is permanently changed. The resulting list is displayed in an interactive data grid where you can review element details, filter rows, select subsets, navigate to elements in a view, or perform a permanent bulk deletion.
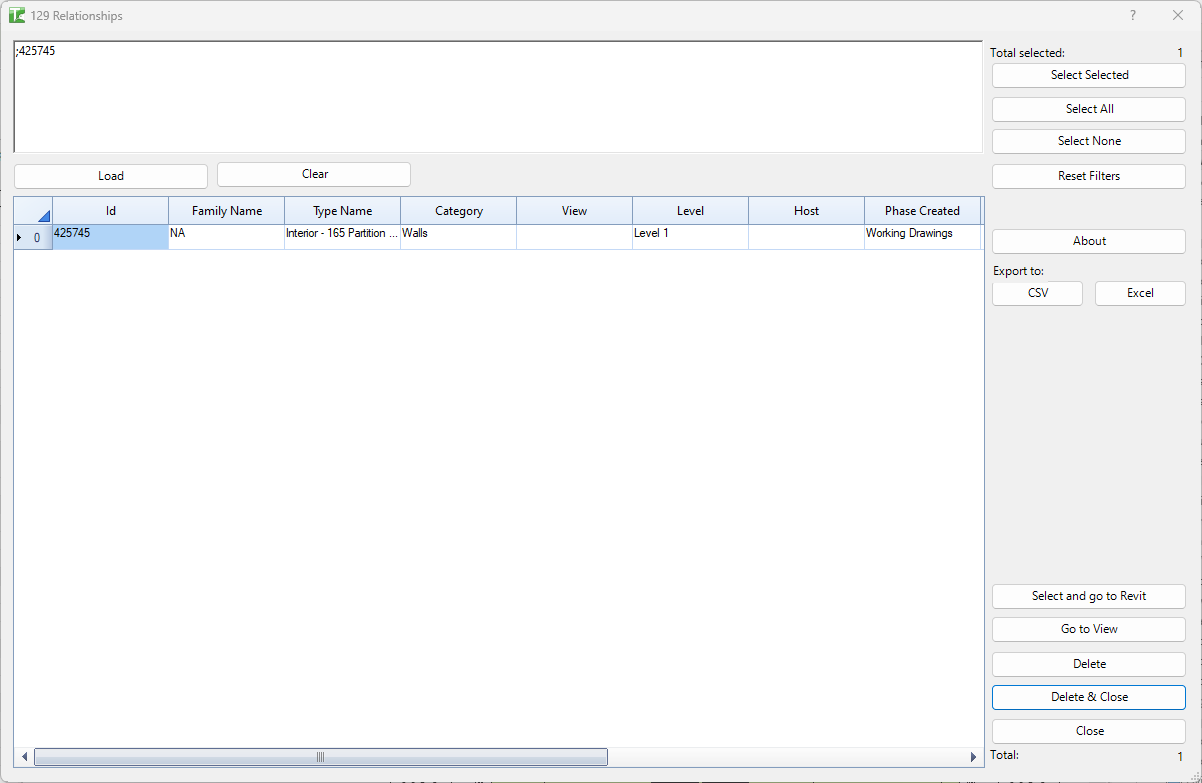
Table of Contents
- Key Features
- Requirements
- Running the Tool
- The Relationships Grid
- Tips and Best Practices
- Common Use Cases
- Troubleshooting
Key Features
- Uses a rolled-back deletion test — no permanent change is made during discovery
- Captures the full cascade: hosted elements, dependent annotations, tags, constraints, and any other element Revit would delete automatically
- Interactive data grid with columns for Id, Family Name, Type Name, Category, View, Level, Host, Phase Created, Phase Demolished, Location, Is Grouped, and Workset
- Select checkbox column for marking individual rows
- Filter, sort, and search within the grid to narrow large dependency lists
- Go to View — opens the active view containing the selected element
- Select and go to Revit — sets the Revit selection to the checked rows and brings Revit to the foreground
- Export the dependency list to CSV or Excel
- Delete and Delete & Close — permanently removes the selected element and all its dependents in one transaction
Requirements
- Select one element in Revit before running the tool — the tool reads the current selection on launch
- Must be run in a project document (not the Family Editor)
- The selected element must be in the current project — linked elements cannot be tested
- A valid Kiwi Codes Bonus Tools licence must be active
Running the Tool
Launch
Select an element in Revit, then find Relationships on the Bonus Tools Ribbon or use 115 Search Tools.
Step 1 — Select an element first
Before launching, select exactly one element in Revit. The tool reads the current Revit selection on startup.
If no element is selected when the tool runs, the message "Please select an Element first." is shown and the tool exits.
Step 2 — Dependency discovery
Once launched, the tool performs the rolled-back deletion test automatically. It opens a transaction group, deletes the element, captures the list of cascade-deleted elements from the DocumentChanged event, then rolls back the entire transaction group — leaving the project unchanged.
If the element has no dependents, the message "No valid relationships found." is shown and the tool exits.
Step 3 — Review the Relationships grid
The 129 Relationships window opens showing all dependent elements:
The Relationships Grid
Columns
| Column | Description |
|---|---|
| Id | Revit Element Id of the dependent element |
| Family Name | Family name of the element type |
| Type Name | Type name within the family |
| Category | Revit category (e.g. Doors, Structural Framing, Tags) |
| View | The view in which the element resides (if view-specific) |
| Level | The level the element is associated with |
| Host | The host element, if the dependent is hosted |
| Phase Created | Project phase in which the element was created |
| Phase Demolished | Project phase in which the element is demolished (if set) |
| Location | Coordinates or location description |
| Is Grouped | Whether the element belongs to a Revit group |
| Workset | The workset the element belongs to (workshared projects only) |
| Select | Checkbox for marking rows for batch actions |
Click any column header to sort. Use the built-in grid filter row to narrow results by category, family, level, or any other column value.
Action Panel — Selection
| Button | Action |
|---|---|
| Select Selected | Sets Revit's selection to the rows with the Select checkbox ticked |
| Select All | Ticks the Select checkbox on all visible rows |
| Select None | Clears the Select checkbox on all rows |
| Reset Filters | Clears all active column filters and restores the full list |
Action Panel — Navigation
| Button | Action |
|---|---|
| Go to View | Opens the view associated with the currently highlighted row |
| Select and go to Revit | Applies the checkbox selection in Revit and brings Revit to the foreground |
Action Panel — Export
| Button | Action |
|---|---|
| Export CSV | Saves the grid contents as a CSV file |
| Export Excel | Saves the grid contents as an Excel workbook |
Action Panel — Deletion
| Button | Action |
|---|---|
| Delete | Permanently deletes the original element and all its dependents — the grid remains open |
| Delete & Close | Permanently deletes the original element and all its dependents, then closes the dialog |
Warning: Delete and Delete & Close permanently modify the project. These actions cannot be undone once the transaction is committed. Use Revit's Undo (
Ctrl+Z) immediately if deletion was performed in error.
Manual Element Load
An Element IDs field at the top of the dialog accepts a semicolon-separated list of Element IDs. Click Load to add additional elements to the grid, or Clear to remove them.
Tips and Best Practices
- Check before deleting floors or walls. Relationships is most valuable before deleting host elements (floors, walls, roofs) — it shows every hosted door, window, opening, structural framing, or tag that would be lost.
- Use Reset Filters to restore the full list. If you filter by category and then want to see everything again, Reset Filters clears all active grid filters in one click.
- Export first, then delete. Before using Delete or Delete & Close, export the list to Excel or CSV as a record of what will be removed. This is especially useful for project audits or when working in a BIM Execution Plan environment.
- Select and go to Revit for visual review. Use the Select checkboxes + Select and go to Revit to highlight specific dependents in the Revit canvas and zoom in to review them before committing to a deletion.
- Grouped elements may not delete cleanly. If Is Grouped is checked for a dependent element, deleting the host may fail or require ungrouping first. Review grouped dependents before proceeding.
- No dependents = tool exits. If the selected element has no cascade dependencies, the tool immediately reports "No valid relationships found." This is expected for standalone elements like rooms or free-standing furniture.
Common Use Cases
Pre-delete dependency check for floors — Before deleting a floor slab, run Relationships on it to see every structural framing member, opening, hosted family, and floor tag that would also be removed. Review the list, relocate critical elements if needed, then proceed.
Auditing hosted annotation clutter — Select a grid or reference line that is heavily tagged. Run Relationships to see every tag, dimension, and detail item that references it, then export the list to Excel for review with the project team.
Understanding constraint chains — Select a reference plane or datum element and run Relationships to discover which walls, structural columns, or other elements are constrained to it. Useful before renaming or repositioning datums.
Bulk cleanup with selective deletion — Run Relationships on an element you plan to delete, filter the grid to a specific category (e.g. Tags only), tick those rows, and use Select and go to Revit to visually confirm — then use Delete to clean up everything in one step.
Worksheet impact assessment — In a workshared project, check the Workset column in the Relationships grid to determine whether dependents belong to worksets you don't currently own before attempting a deletion that would require borrowing multiple elements.
Troubleshooting
"Please select an Element first." No element was selected in Revit when the tool launched. Click Cancel on any open dialogs, select one element in the Revit canvas, and run Relationships again.
"No valid relationships found." The selected element has no cascade-dependent elements. This is normal for standalone or freestanding elements (e.g. furniture, rooms, or standalone annotations). No action is needed.
"Action not available in the Family Environment." The tool was launched while a Family document was active. Close the Family Editor and run from within a project document.
The grid opens but some columns are empty Certain columns — such as View, Level, Host, or Workset — are only populated when the dependent element has that property. Empty cells are normal for element types that don't have a hosting relationship or level association.
Delete fails with a Revit error Some elements cannot be deleted via the API (e.g. elements in read-only worksets, pinned elements, or elements owned by another user in a workshared project). Review the Revit error dialog for the specific cause. Release ownership or unpin the affected elements before retrying.
Grouped element prevents deletion If a dependent element belongs to a Revit group (Is Grouped = true), Revit may block deletion. Ungroup the element first, then re-run Relationships and attempt deletion again.
"Error whilst running the tool. If the problem persists please contact chris@kiwicodes.com" An unexpected error occurred during the dependency discovery phase. Check the Revit journal file for details and contact support at chris@kiwicodes.com.