128 Filter Usage
Chris McKeown / July 1, 2025
Sheet & View Manipulation
Overview
Filter Usage gives you a complete picture of how Revit's view filters are applied across the project. The two-panel interface lists every ParameterFilterElement in the project alongside a count of attached views, and clicking a filter shows exactly which views use it. From there you can copy filter visibility overrides from a reference view to multiple targets, add a filter to new views in bulk, remove it from views that don't need it, or delete unused filters entirely — all without leaving the dialog.
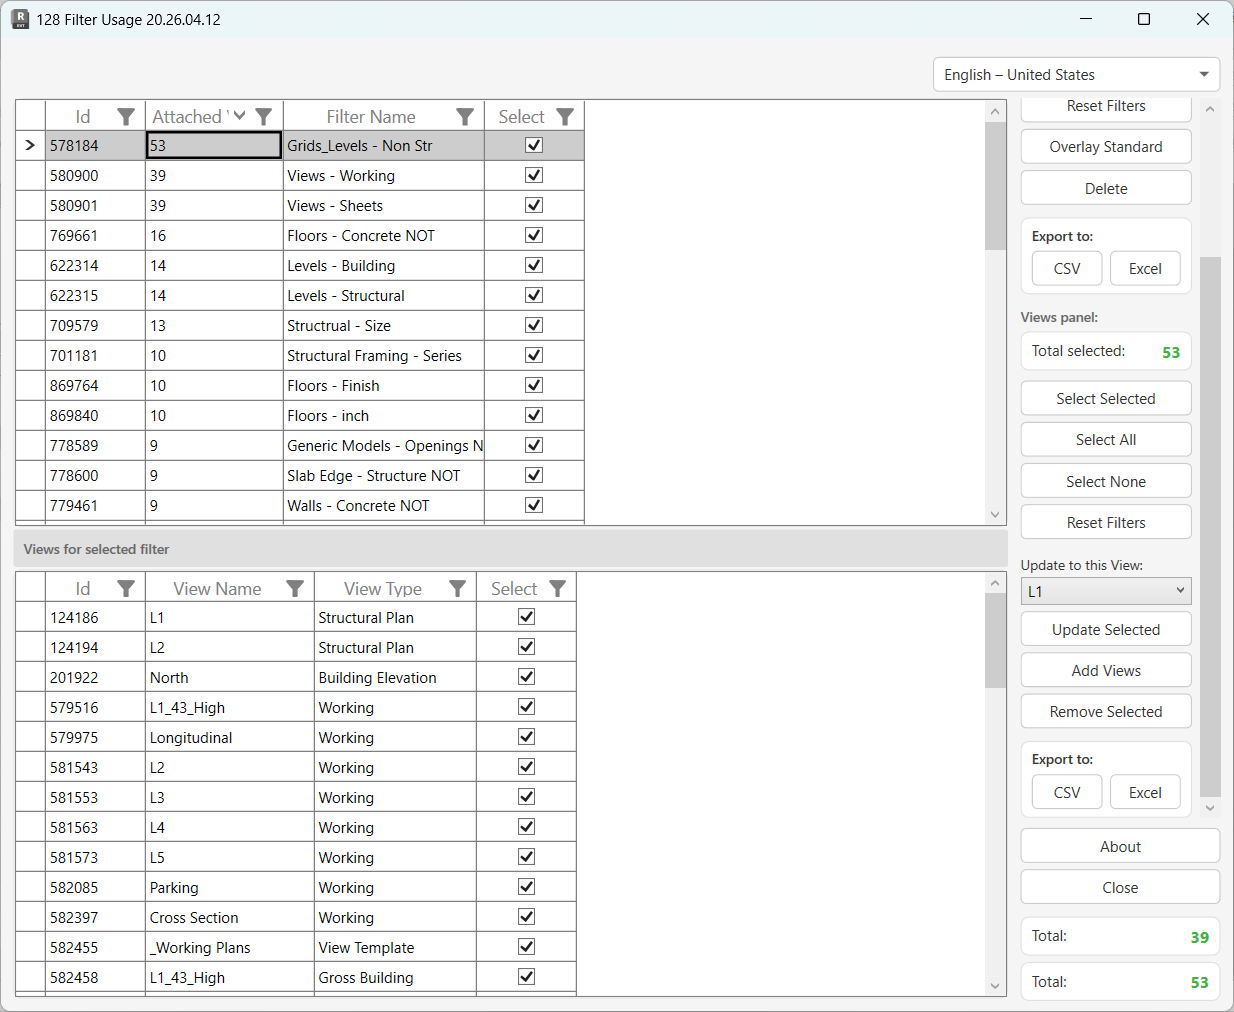
Table of Contents
Key Features
- Lists all
ParameterFilterElementview filters in the project with an Attached Views count (when details are loaded) - Two-panel layout — top grid lists filters; bottom grid shows all views that use the currently selected filter, including View Templates
- Update Selected — copies the exact filter overrides and visibility setting from a chosen source view to all selected target views
- Add Views — attaches a filter to additional views selected from a project-wide view picker, optionally inheriting overrides from the current source view
- Remove Selected — detaches the filter from selected views without deleting the filter definition
- Delete — permanently deletes selected filters from the project
- Overlay Standard — loads a list of approved filter names from an Excel worksheet and auto-selects any filter not in the list, making it easy to find and clean up non-standard filters
- Column filtering on both grids for targeted analysis
- Export both grids to CSV or Excel
- Settings (Excel file path and tab name) are persisted in Extensible Storage on the project so they survive between sessions
Requirements
- Must be run from a Project document — not available in the Family Editor
- No specific active view requirement
- Load Details mode scans every view in the project to build the Attached Views count — this can be slow on large projects but is required for the Views panel to be interactive
- Overlay Standard requires an Excel (
.xlsx) file with filter names listed in column A of a named worksheet tab
Running the Tool
Launch
Find Filter Usage on the Bonus Tools Ribbon or use 115 Search Tools.
The dialog opens and immediately loads all filters. A prompt asks whether to load view details.
Step 1 — Choose Whether to Load Details
When the dialog first opens, a confirmation prompt asks "Load details?"
| Choice | Behaviour |
|---|---|
| Yes | Scans every view in the project to find which filters are applied. The Attached Views column shows the count. The Views panel becomes fully interactive. |
| No | Loads the filter list instantly with Attached Views = 0 for all rows. The Views panel, Update Selected, Add Views, and Remove Selected are disabled. Use this mode for a quick overview or to delete filters without needing view details. |
Choosing Yes on a project with thousands of views can take several minutes. A cancellable progress bar is shown throughout. No model changes are made during this phase.
Step 2 — Review the Filters Grid
The top grid lists every view filter defined in the project.
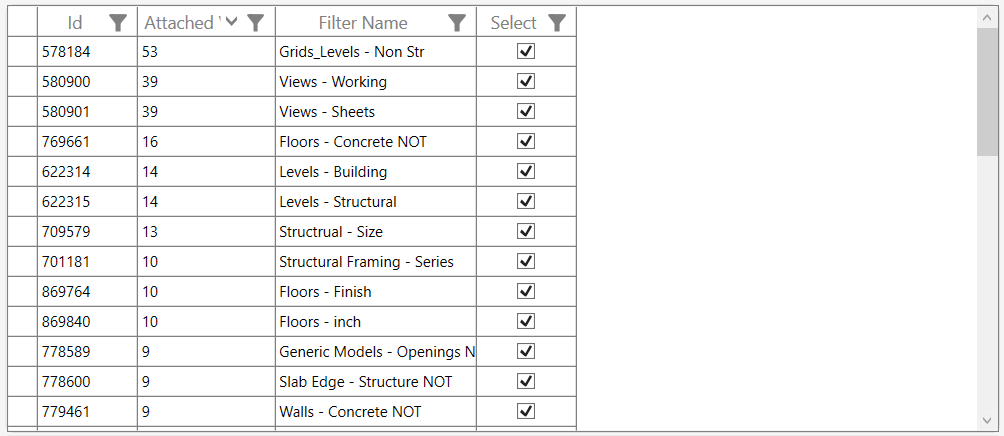
| Column | Description |
|---|---|
| Id | Revit Element ID of the filter |
| Attached Views | Number of views (and view templates) that use this filter |
| Filter Name | Name of the ParameterFilterElement |
| Select | Checkbox — tick to include in Delete or Overlay Standard operations |
Click any row to load the views for that filter into the Views panel below.
Filter panel controls:
- Select Selected — toggles the Select checkbox for highlighted rows
- Select All / Select None — check or uncheck all rows
- Reset Filters — clears active column header filters
- Overlay Standard — compare against an Excel standards list (see Step 4)
- Delete — permanently removes selected filters from the project (see Step 5)
- Export to CSV / Excel — exports the filters grid
The Total Selected counter updates as you change selections. The Total counter at the bottom shows how many filters are in the project.
Step 3 — Inspect and Manage Views for a Filter
Click a filter row to populate the Views panel with all views that currently use that filter.
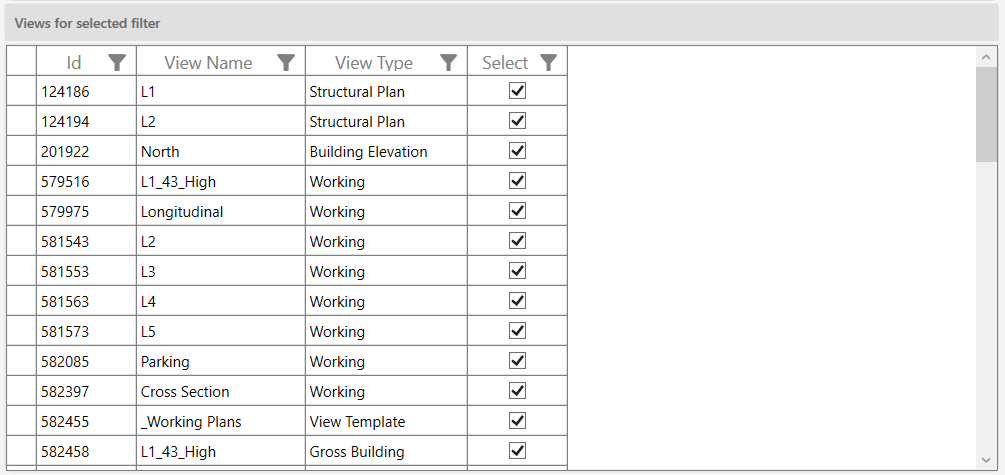
| Column | Description |
|---|---|
| Id | Revit Element ID of the view |
| View Name | Name of the view or view template |
| View Type | Revit view type (e.g. Floor Plan, Section, View Template) |
| Select | Checkbox — tick to include in update/remove operations |
Views panel controls:
- Select Selected / Select All / Select None — standard selection helpers
- Reset Filters — clears active column filters on the Views grid
- Export to CSV / Excel — exports the views grid
Step 3a — Copy Overrides to Selected Views (Update Selected)
The Update to this View dropdown lists all views currently attached to the selected filter. Choose the view whose filter overrides should act as the template, then select the target views in the grid and click Update Selected.

The tool copies both the filter override settings (colour, line weight, pattern) and the filter visibility (on/off) from the source view to every selected target view. The source view itself is skipped automatically.
Use this when the correct override appearance has been set up in one view (or view template) and needs to be propagated consistently across many others.
Step 3b — Attach the Filter to Additional Views (Add Views)
Click Add Views to open the WPF All Views picker dialog. Views already attached to the filter are excluded from the selection list.
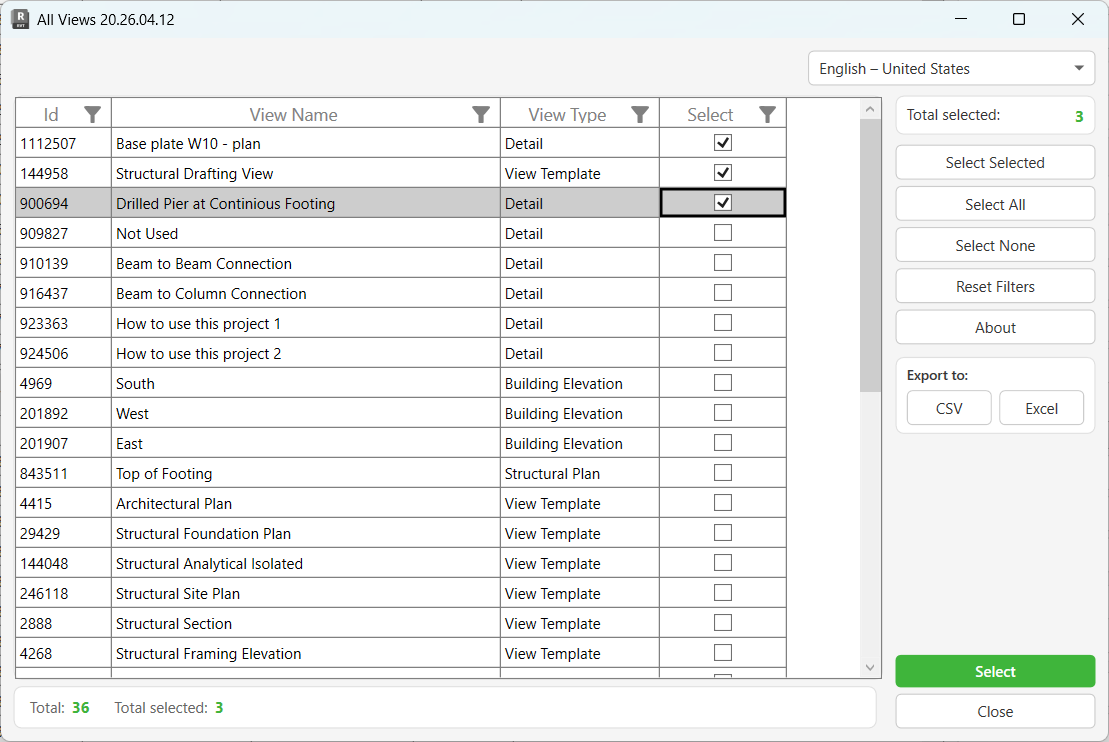
Supported view types for adding: Area Plan, Ceiling Plan, Column Schedule, Detail, Drafting View, Elevation, Engineering Plan, Floor Plan, Legend, Section, 3D View, Walkthrough.
When views are confirmed:
- The filter is attached to each selected view
- If the Update to this View dropdown has a source view selected, the overrides and visibility from that source view are automatically copied to each newly added view
After the operation, the views grid is refreshed and a summary reports "X Views updated. Y Views failed."
Step 3c — Remove the Filter from Views (Remove Selected)
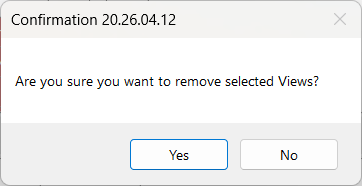
Select the views in the Views grid from which the filter should be detached, then click Remove Selected. A confirmation prompt appears before any changes are made.
Removal detaches the filter from each view (equivalent to unchecking it in Visibility/Graphics). The filter definition remains in the project. After removal, the views grid and the Attached Views count are refreshed.
Step 4 — Overlay Standard (Optional)
Overlay Standard compares the project's filter names against an approved list from an Excel file, automatically flagging and selecting any non-standard filters.
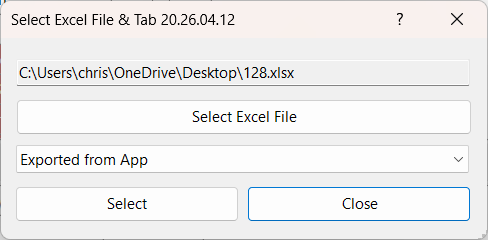
Click Overlay Standard to open the Excel file picker. Select the .xlsx file and the worksheet tab that contains the approved filter name list (one name per row in column A).
Once confirmed:
- Filters whose names appear in the list are deselected and marked as standard
- Filters whose names do not appear are selected and marked as non-standard
- The message "Standards updated." is shown on completion
The Excel file path and worksheet tab are saved in Extensible Storage on the project, so the same file is pre-selected the next time you run Overlay Standard.
After reviewing the auto-selected non-standard filters, use Delete to remove them from the project.
Step 5 — Delete Filters
Select the filters to delete in the top grid and click Delete. A confirmation prompt appears before anything is removed.
Each filter is deleted in its own sub-transaction. If one fails, it is rolled back individually and processing continues. Results are logged to the Output panel, and a summary dialog reports "X items deleted. Y items failed."
Deleting a filter removes it from every view that uses it simultaneously — Revit handles this automatically as part of the deletion. You do not need to remove it from views manually first.
Tips and Best Practices
- Always load details before managing views. Without loading details, the Views panel is disabled and the Attached Views count shows zero. The extra load time is worth it for any task involving view-level operations.
- Use Update Selected to propagate from a View Template first. If your project uses view templates, set the filter overrides correctly on the template, then use this tool to push those overrides to individual views that override the template.
- Overlay Standard is most powerful after imports. When linking or importing models from consultants, new filters may enter the project. Run Overlay Standard immediately after import to identify and remove filters that aren't part of your project standard.
- Filter by Attached Views = 0 to find unused filters. After loading details, apply a column filter on the Attached Views column for
0to isolate filters that are defined but not used anywhere. Select all and delete them. - The source view in Update to this View matters. Choose the most authoritative view for your project — typically the view template or the view that BIM management has signed off on — so overrides propagate from a single source of truth.
- Add Views copies overrides automatically. When adding views, ensure the "Update to this View" dropdown is set to your reference view before clicking Add Views. This saves a separate Update Selected step.
- Export before deleting. Export the filters grid to Excel as a record of what was removed. This is valuable for audit trails on shared or client-managed projects.
Common Use Cases
Standardising filter overrides after a design change — The project colour scheme for structural elements has been updated. The correct override is set in the primary floor plan. Select that filter in the top grid, load views, select all floor plans in the Views grid, set the source view in the dropdown, and click Update Selected. All floor plans now show the updated colour.
Adding a new filter to all views in a package — A new clash detection filter needs to be added to every section view. Click the filter, use Add Views with the source view set to the standard section, and multi-select all relevant sections in the picker. The filter is attached to all of them with the correct overrides in one operation.
Cleaning up non-standard filters after a consultant handover — A consultant's linked model has been detached, but their filters remain. Use Overlay Standard with your studio's approved filter list. All non-approved filters are auto-selected. Review the list, then Delete.
Auditing filter coverage before issue — Before a drawing issue, load details and export the filters grid to Excel. Review which filters have a low Attached Views count — these may be filters that should appear on more views. Use Add Views to fill the gaps.
Removing a deprecated filter from specific views — A filter that was used only for a particular design phase needs to be removed from the issued sheets' views. Select the filter, load details, filter the Views grid by View Type to show only floor plans, select them all, and click Remove Selected.
Troubleshooting
"No Filters in the Project."
The project has no ParameterFilterElement elements defined. Create view filters in Revit's Visibility/Graphics dialog (Filters tab) first.
Views panel is greyed out / disabled You chose No when prompted to load details. Close and reopen the dialog, then choose Yes when prompted. The Views panel and all associated buttons are only active when details are loaded.
"No Views assigned to this Filter." The selected filter is not applied to any view (Attached Views = 0). Either load details if you skipped it, or the filter genuinely has no views. Use Add Views to attach it to the appropriate views.
"No Views selected." You clicked Add Views but did not select any views in the picker dialog. Reopen Add Views and select at least one view before confirming.
"Could not find a valid Filter." The filter selected in the top grid could not be retrieved from the document — this can happen if the filter was deleted externally while the dialog was open. Close and reopen the dialog to refresh the list.
"Operation Failed." / "Deletion failed. Gain ownership of elements and try again." The Revit transaction could not be committed due to a workset ownership conflict. Use the Worksets dialog in Revit to borrow or take ownership of the relevant elements, then retry.
"X items deleted. Y items failed." Some filters could not be deleted individually. Check the Output panel for specific filter names and reasons. Common causes: the filter is in use by a view that is locked or on a non-owned workset.
"Standards Excel file not found." The previously saved Excel file path no longer exists. Click Overlay Standard again and re-select the file from its current location.
"Worksheet: [tab] not found." The Excel file was found but the saved worksheet tab name does not match any tab in the file. Click Overlay Standard, re-select the file, and pick the correct tab from the dropdown.
"Error processing the Excel file: [message]"
The Excel file may be open in another application, corrupted, or in an unsupported format. Close the file in Excel, ensure it is saved as .xlsx, and try again.
Attached Views count does not match what Revit shows The count is built by scanning views at load time. If filters were added or removed from views after loading, the count is stale. Close and reopen the dialog to refresh.