122 Element Usage
Chris McKeown / July 1, 2025
Power
Overview
Element Usage gives you a complete picture of how seven categories of Revit project elements are used across your model. Select an element type from the dropdown, optionally load full dependency details, and see exactly which elements reference each entry. Unused elements are automatically flagged for selection so you can bulk-delete them in a single transaction — eliminating the tedious trial-and-error of Revit's built-in Purge Unused.
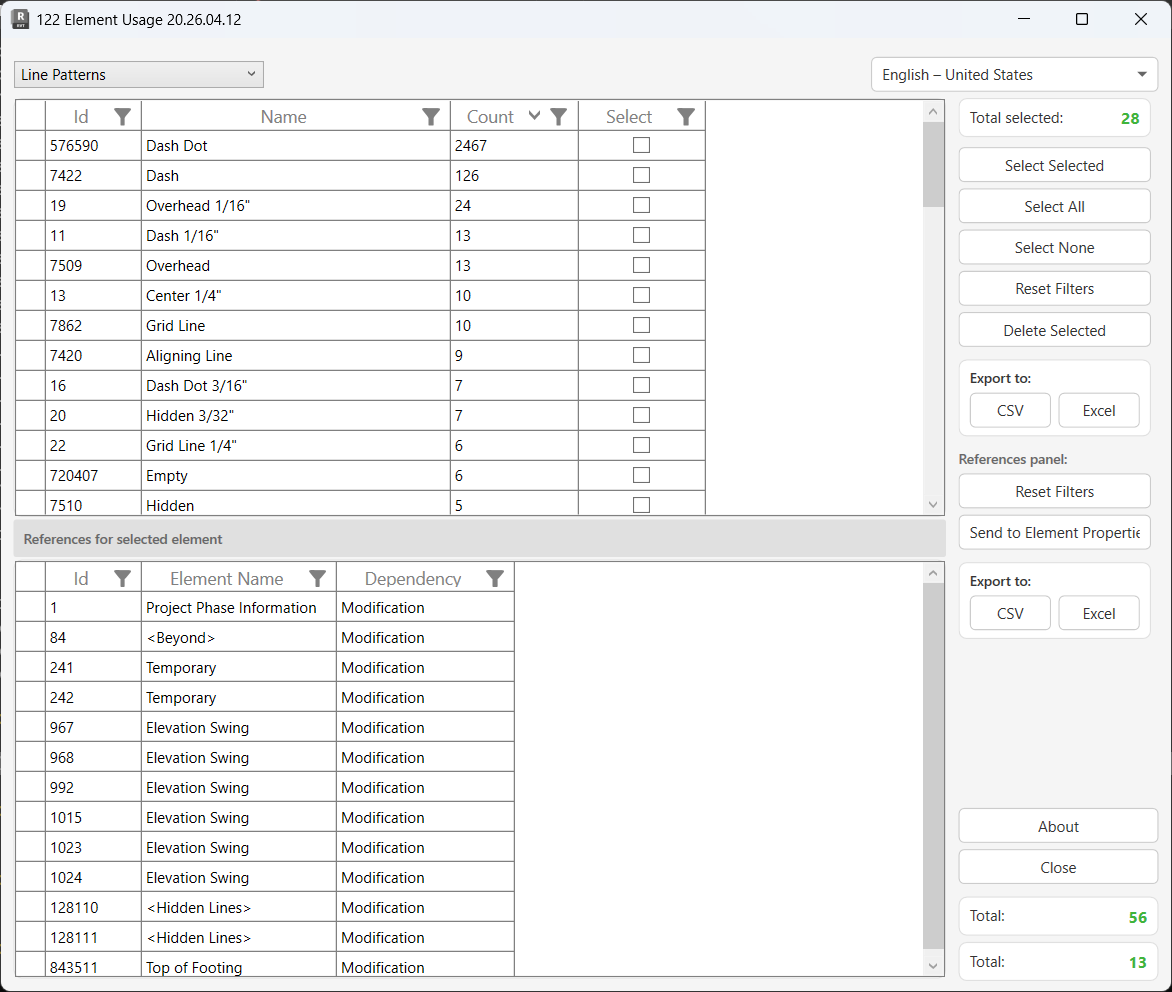
Table of Contents
Key Features
- Audits seven element categories: Materials, Material Assets, Filled Regions, Fill Patterns, Line Patterns, Reference Planes, and Filters
- Optional Load Details mode — performs temporary test-deletions (automatically rolled back) to discover every element that would be modified or deleted as a side effect
- Two-panel layout — top grid lists all elements with a usage count; bottom grid shows all references for the selected element, including Modification and Deletion dependency types
- Unused elements (zero references) are automatically pre-selected when detail loading is enabled
- Bulk delete selected elements in a single Revit transaction with confirmation prompt
- Select Selected / Select All / Select None for rapid check-box management
- Column filtering on both grids for targeted analysis
- Export both the elements grid and the references grid to CSV or Excel
- Send to Element Properties — forwards all reference elements to 113 Dockable Element Dialog for deeper inspection
- Results shown in the dockable Output panel with per-element pass/fail logging
- Built-in language selector for multi-language support
Requirements
- Must be run from a Project document — not available in the Family Editor
- No specific active view requirement; the tool works from any context in a project
- Load Details mode uses temporary transactions and may take significant time on large projects — a cancellable progress bar is shown throughout
Running the Tool
Launch
Find Element Usage on the Bonus Tools Ribbon or use 115 Search Tools.
The dialog opens and immediately loads the element list for the default type (Materials).
Step 1 — Select the Element Type
Use the dropdown at the top-left of the dialog to choose which category of elements to audit.

| Option | Revit Class / Source |
|---|---|
| Materials | OST_Materials category |
| Material Assets | AppearanceAssetElement |
| Filled Regions | FilledRegionType |
| Fill Patterns | FillPatternElement |
| Line Patterns | LinePatternElement |
| Reference Planes | ReferencePlane |
| Filters | ParameterFilterElement |
Changing the selection reloads the top grid. If Load Details was previously run for a type, the cached results are restored instantly without re-processing.
Step 2 — Decide Whether to Load Details
When you load or switch element types, a confirmation prompt asks "Load details?"
| Choice | Behaviour |
|---|---|
| Yes | Performs a temporary test-deletion for each element (rolled back immediately). The Count column shows the number of dependent elements found. Unused elements are pre-checked. Results are cached for the session. |
| No | Loads the element list quickly with Count = 0 for all rows. The References panel will be empty. Use this mode for a fast overview or when you already know which elements to delete. |
Loading details on a project with hundreds of materials can take several minutes. Use the cancellable progress bar to abort at any time — no changes are made to the model during this phase.
Step 3 — Review Elements in the Top Grid
The Elements grid lists all elements of the selected type with four columns:
| Column | Description |
|---|---|
| Id | Revit Element ID |
| Name | Element name as it appears in Revit |
| Count | Number of references found (requires Load Details) |
| Select | Checkbox — tick to include in the delete operation |
Click any row to populate the References panel at the bottom with the dependencies for that element.
Use the column header filters to narrow down the list — for example, filter Count to 0 to show only unused elements.
Click Reset Filters to clear all active column filters.
Selection controls (right panel):
- Select Selected — toggles the Select checkbox for all rows currently highlighted in the grid
- Select All — checks all visible rows
- Select None — unchecks all rows
- The Total Selected counter at the top of the right panel updates as you change selections
Step 4 — Inspect References in the Bottom Grid
Click an element row to view its dependencies in the References panel.
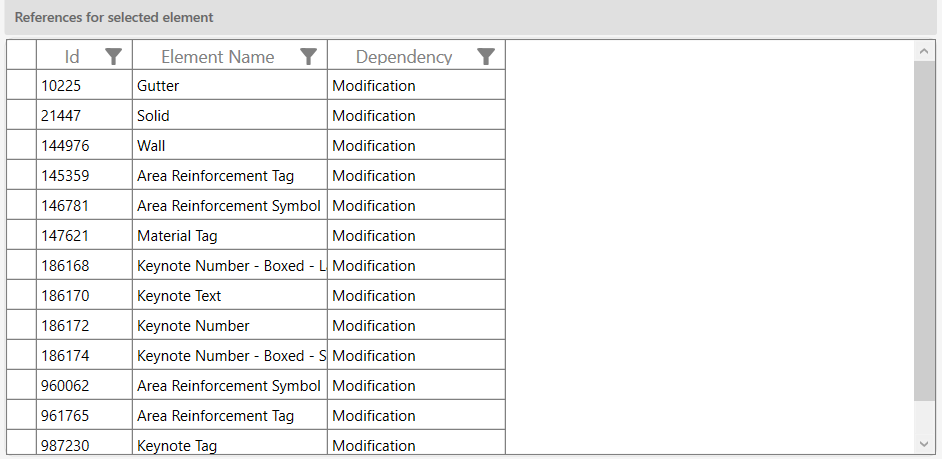
| Column | Description |
|---|---|
| Id | Revit Element ID of the dependent element |
| Element Name | Name of the dependent element |
| Dependency | Modification — the element would be changed; Deletion — the element would be deleted as a side effect |
Use Reset Filters (References panel) to clear filters applied to the References grid.
Click Send to Element Properties to open all reference elements in 113 Dockable Element Dialog for a detailed parameter-level view.
Export options are available for both grids independently — click CSV or Excel under the relevant "Export to:" section.
Step 5 — Delete Selected Elements
Once you have reviewed and confirmed your selection, click Delete Selected.
A confirmation prompt appears: "Are you sure you want to delete selected items?"
- Click Yes to proceed. A progress bar tracks the deletion. Each element is deleted in its own sub-transaction; if one fails, it is rolled back individually and the operation continues with the remaining items.
- The Output panel logs each deletion as green (success) or reports the failure reason.
- On completion, a summary message reports: "X items deleted. Y items failed."
- The Elements grid is updated immediately — successfully deleted rows are removed.
If the overall transaction fails (for example due to a workset ownership conflict), the message "Deletion failed. Gain ownership of elements and try again." is shown and no changes are committed.
Tips and Best Practices
- Always load details before deleting. Without detail loading, the Count column shows zero for every element — you have no way to distinguish used from unused. Take the time to load details so pre-selection is accurate.
- Start with Fill Patterns and Line Patterns. These accumulate quickly through imports and are rarely audited. They are also less likely to have complex dependency chains, making them safe to clean up first.
- Use column filters before bulk-selecting. Filter the Name column for imported or non-standard naming conventions, then use Select All to target them without touching project standards.
- Check the References panel before deleting anything with a Count > 0. The Dependency type tells you whether the referencing element will be silently modified or fully deleted — the latter may have unintended consequences.
- Use "Send to Element Properties" for deeper investigation. When a reference element is unfamiliar, sending it to the Dockable Element Dialog lets you inspect its parameters and locate it in the model before committing to a deletion.
- Cached results persist for the session. If you switch away from a type and back again, results reload from cache instantly. Re-run the tool (close and reopen) if the model has changed significantly and you need fresh data.
- Export before deleting. Export the elements grid to Excel as a record of what was removed. This is valuable for audit trails on shared or client-managed projects.
- Workset ownership matters. If your project uses worksets, make sure you own or have borrowed the relevant worksets before attempting deletion. Elements not owned by you will fail individually and be reported in the Output panel.
Common Use Cases
Cleaning up after file imports — DWG and RVT links often bring in duplicate Fill Patterns, Line Patterns, and Materials. Select "Fill Patterns" or "Line Patterns", load details, and delete everything with a Count of 0. Projects imported from consultants regularly carry hundreds of redundant patterns that Revit's Purge Unused misses.
Pre-handover model hygiene — Before issuing a model to a client or archiving, run Element Usage across all seven categories to find and remove unused elements. This reduces file size and prevents future users from inheriting clutter.
Auditing filter creep — Over the course of a project, view filters accumulate. Select "Filters" and load details to see which filters are not applied to any view. Delete unused filters to simplify the Visibility/Graphics overrides interface for the whole team.
Identifying reference plane sprawl — Large projects often accumulate dozens of unnamed or poorly named reference planes. Select "Reference Planes", review which ones have zero references, and delete the abandoned ones. Use the Name column filter to target specific naming patterns.
Material Asset cleanup — When materials are deleted via other tools, their associated appearance assets (Material Assets) may remain orphaned. Select "Material Assets" and load details to find and remove them, keeping the material library clean.
Troubleshooting
"Action not available in the Family environment." Element Usage only works in project documents. Close the Family Editor, open a project, and relaunch the tool.
"Project contains no Elements." The selected element type has no instances in the current project. Switch to a different element type from the dropdown, or check that the correct project is active.
Count column shows 0 for all elements after loading You chose No when prompted to load details. Close and reopen the tool, switch element type or reselect the current one, and choose Yes when prompted.
Detail loading is very slow Each element requires a temporary transaction to determine its dependencies. For types with hundreds of elements (e.g. Materials in a template-heavy project), this can take several minutes. Use the progress bar's Cancel button to stop at any point — no model changes are made during this phase.
"Deletion failed. Gain ownership of elements and try again." The Revit transaction could not be committed, most likely due to workset ownership conflicts. Use Worksets in Revit to borrow or take ownership of the relevant elements, then retry.
Individual items fail during deletion Failed items are reported in the Output panel. Common causes include: the element is used by a system family that cannot be deleted, workset ownership is required, or Revit blocked deletion due to an internal constraint. The successfully deleted items are still committed — only the failed ones remain in the grid.
"Send to Element Properties" opens no dialog The References panel for the selected element is empty (Count = 0, or detail loading was not run). Select an element that has known references, or run Load Details first.
Grid filters not clearing Click Reset Filters in the right-hand panel for the relevant grid (there is a separate Reset Filters button for the Elements grid and the References panel).