116 Line Styles
Chris McKeown / July 1, 2025
Lists
Overview
Line Styles lists every line style (sub-category of the Lines category) in the active Revit project, showing its line weight, RGB colour, and associated line pattern. The tool automatically highlights duplicate styles — those sharing identical weight, colour, and pattern — so consolidation opportunities are immediately visible. From the same dialog you can load detailed usage information for any style, merge duplicates into a single target style, bulk delete unused styles, and compare the library against an Excel standards list.
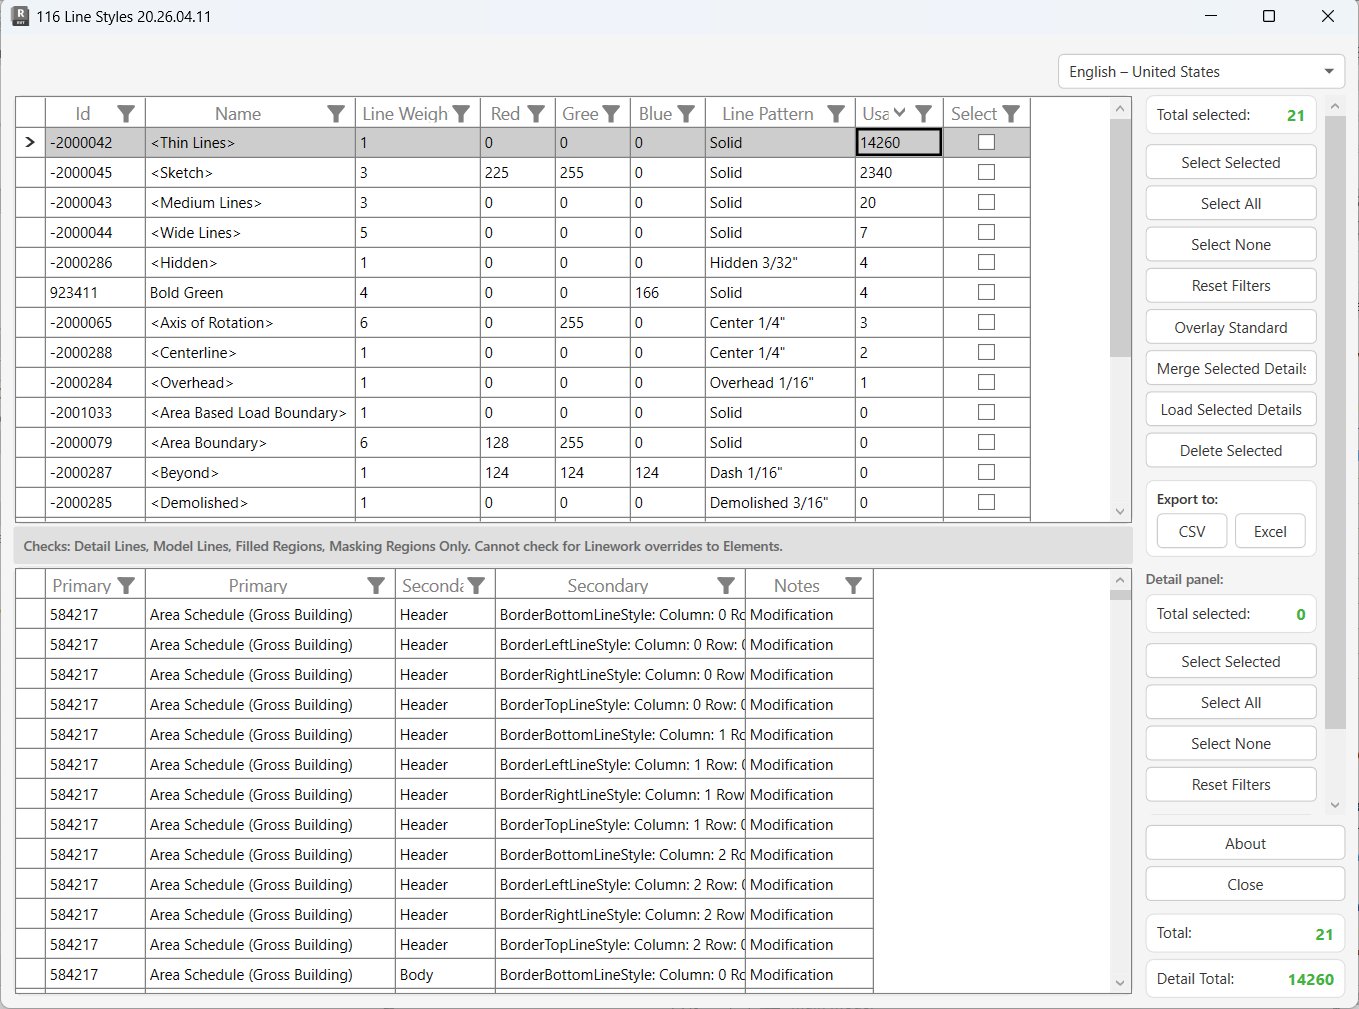
Table of Contents
Key Features
- Lists all line styles sorted alphabetically with line weight, RGB colour components, line pattern, and usage count
- Duplicate detection on load — groups of styles with identical line weight, colour, and pattern are highlighted with a shared colour, making consolidation candidates immediately visible
- Load Selected Details — traces where selected styles are used: Detail Lines, Model Lines, Detail Arcs, Model Arcs, and Schedule border line styles (header, footer, body, summary, and none sections)
- Merge Selected Details — reassigns all usages from multiple selected styles onto a single target style, then allows the now-unused styles to be deleted
- Overlay Standard — compares the style library against an Excel column of approved names and auto-selects any non-standard entries
- Bulk delete with per-style sub-transactions — failures don't block the rest of the batch
- Export the styles list or the usage detail panel to CSV or Excel
- Excel file and tab for the standards check persists between sessions via Revit Extensible Storage
Requirements
- Must be run from a Project document — no specific active view required
- Load Selected Details uses a temporary delete-and-observe technique; it requires model ownership of elements that reference the style in workshared environments
- Overlay Standard requires an Excel file with approved line style names listed in column A of a chosen worksheet
- Known limitation: The usage scan covers Detail Lines, Model Lines, Filled Regions, Masking Regions, and Schedule borders. It cannot detect Linework tool overrides applied to individual elements in views
Running the Tool
Launch
Find Line Styles on the Bonus Tools Ribbon or use 115 Search Tools.
On load, the tool reads all line styles, sorts them alphabetically, runs the duplicate detection pass, and — if a standards Excel file is already configured — applies the Overlay Standard comparison automatically. No usage scan runs at launch; usage data must be loaded on demand per style.
Step 1 — Review the Line Styles List
The top grid lists every line style in the project. Each row shows:
| Column | Description |
|---|---|
| Id | Revit element ID of the line style's sub-category |
| Name | Line style display name |
| Line Weight | Revit line weight number |
| Red / Green / Blue | RGB colour components (0–255) |
| Line Pattern | Name of the associated line pattern (e.g. Solid, Dashed) |
| Usage | Number of references found — populated after running Load Selected Details |
| Select | Checkbox — tick rows to mark for actions |
Duplicate groups are highlighted with a shared background colour. Any two or more rows with the same line weight, line pattern, and RGB values share a colour, making them immediately identifiable as candidates for merging.
Use column headers to sort or filter. Click Reset Filters to clear all active column filters.
Step 2 — Load Usage Details
Usage data is not loaded automatically — it must be requested for the styles you want to investigate.
- Tick the styles you want to analyse using the Select checkboxes, Select All, or Select None.
- Click Load Selected Details.
A progress bar tracks the scan. For each selected style, the tool performs a temporary delete in a rolled-back transaction and observes which elements Revit reports as modified or deleted. It also scans all schedule border cell styles directly.
After the scan completes, click any row in the top grid to load its usage results into the bottom panel.
The usage scan covers: Detail Lines, Model Lines, Detail Arcs, Model Arcs, and Schedule cell borders (header, body, footer, summary, and none sections — all four border positions per cell).
It does not detect the Linework tool overrides applied to individual elements in views.
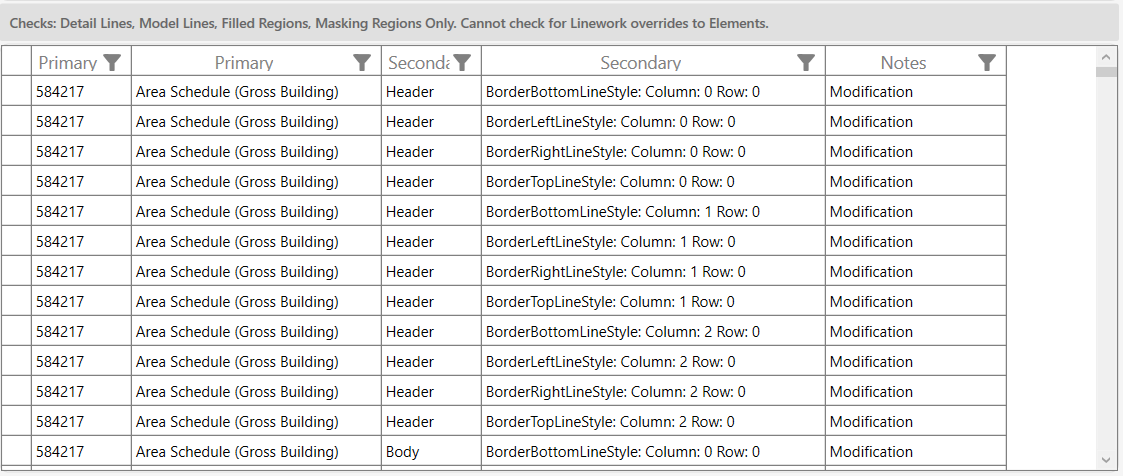
Step 3 — Inspect the Usage Detail Panel
The bottom panel shows the usage references for the currently selected line style. Columns:
| Column | Description |
|---|---|
| Primary Id | Element ID of the referencing object (line element or schedule) |
| Primary | Description, e.g. Detail Lines: <name>, Schedule: Sheet Schedule |
| Secondary Id | View ID or schedule section name |
| Secondary | View or section context, e.g. Level 1 or Body |
| Notes | Type of reference: Modification (element would be changed) or Deletion (element would be removed) |
A Modification note means the element references the style and would be updated if the style was deleted (Revit would reassign it). A Deletion note means the element would be removed entirely if the style were deleted.
Detail Total at the bottom-right of the right panel shows how many references are in the current detail view.
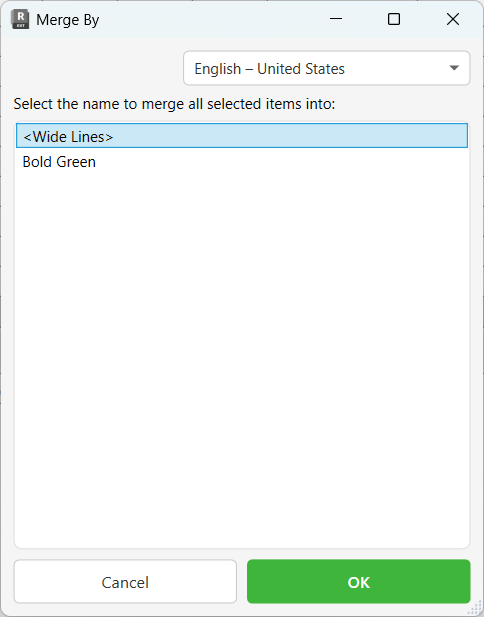
Step 4 — Merge Duplicate Styles (Optional)
Merge Selected Details consolidates multiple selected line styles into one target style, reassigning all usages before deletion.
Load Selected Details must be run before merging. The merge operation reassigns line elements and schedule borders based on the loaded usage data.
- Tick the styles you want to consolidate — these should be the duplicates (same visual appearance).
- Click Load Selected Details to scan their usages.
- Click Merge Selected Details.
- In the Merge By dialog that opens, choose which of the selected styles to keep as the target.
- Click OK. The tool reassigns all Detail Lines, Model Lines, Detail Arcs, Model Arcs, and schedule border cell styles from the other selected styles to the target, then marks the now-empty styles with
select = falseso they are ready to be deleted.
After merging, review the usage counts (they should drop to 0 for the merged-away styles), then use Delete Selected to remove them.
Step 5 — Overlay Standard (Optional)
Overlay Standard marks any line style whose name is not in your approved standards list, so you can identify and remove non-standard entries.
- Click Overlay Standard.
- Browse to your standards Excel file and select the worksheet tab whose column A contains the list of approved line style names.
- Click OK. Every style not in the list is ticked in the Select column.
The selected Excel file and tab are saved to the project (via Extensible Storage) and reloaded automatically the next time the tool opens.
Step 6 — Delete Selected Styles
- Ensure the styles you want to remove are ticked.
- Click Delete Selected.
- Confirm the prompt: "Are you sure you want to delete selected items?"
Each style is deleted in its own sub-transaction. If Revit blocks a deletion (e.g. because the style is still in use), that item is skipped and logged as failed, while the rest continue. A summary message shows the counts on completion.
Tips and Best Practices
- Check duplicate colours first. On load, duplicate groups are already highlighted — start there before running any scans. If the duplicates are genuinely the same style under different names, merge them before deleting.
- Load details before merging. The merge operation relies on the loaded usage data. If you skip Load Selected Details, lines and schedule borders may not be reassigned correctly.
- Merge before deleting. If a style has usages, delete directly will fail or leave Revit to auto-assign a fallback. Merge first to control what the elements switch to.
- Schedule borders are a hidden source of line style usage. Check the detail panel for schedule references — these are often overlooked and will block deletion.
- Use Overlay Standard at the start of a model audit. Pre-loading your standards workbook auto-selects non-standard styles immediately, giving you a focused list to investigate.
- Export before deleting. Use Export to Excel on the styles grid to capture a before/after record of the library — useful for audit trails.
- The usage count updates after Load Selected Details. If the Usage column shows 0 and you haven't run the scan, the count is not yet populated — run the scan to confirm.
Common Use Cases
Identifying and removing duplicate line styles — On a project where multiple team members added similar line styles independently, open the tool and look for colour-highlighted groups in the list. Select the duplicates, load their details, merge them into the approved name, and delete the redundant entries.
Pre-handover cleanup — Select all styles, run Load Selected Details, then filter by Usage = 0. Delete unused styles to reduce the project's line style library to only what is actively referenced.
Enforcing office standards — Configure Overlay Standard with the firm's styles workbook. Any style added during the project that falls outside the approved list is automatically flagged for review and removal.
Tracing an unexpected line appearance — A line element appears with the wrong visual style. Select the style in question, run Load Selected Details, and inspect the detail panel to find all Detail Lines and Model Lines that reference it.
Cleaning up schedule borders — After merging styles, confirm the old style has no remaining schedule references by checking the detail panel for Schedule entries before deleting.
Troubleshooting
Usage column stays 0 after loading The style has no detected usages in Detail Lines, Model Lines, Detail Arcs, Model Arcs, or schedule borders. Remember that Linework tool overrides on individual elements are not detectable — a 0 count is a strong indicator but not a guarantee the style is fully unused.
"Name cannot be null." when using Merge Selected Details No target name was selected in the Merge By dialog (the dialog was dismissed without making a selection). Re-open Merge Selected Details and pick a target style before clicking OK.
Merge completes but lines still reference the old style Load Selected Details must be run before merging. If the usage data was not loaded, the merge has no references to reassign. Re-select the styles, run Load Selected Details, then run Merge Selected Details again.
"[n] items merged. [n] items failed." with failures Some usages could not be reassigned. This may occur for line elements on non-editable worksets in a workshared model. Ensure you have ownership of the affected elements' worksets and retry.
Delete fails — style remains in the list Revit blocked the deletion because the style is still referenced. Run Load Selected Details for that style and check the detail panel — schedule borders are a common hidden reference. Merge or manually reassign any remaining usages before retrying.
"Deletion failed. Gain ownership of elements and try again." The transaction could not commit due to worksharing ownership conflicts. Acquire ownership of the worksets containing the elements that reference the style, then retry.
"Operation Failed." with no further detail An unexpected error occurred in the transaction. Check the Output panel for the exception text. Close and reopen the dialog, then retry on a smaller selection.
"Worksheet: [tab name] not found." in a message dialog The Excel tab saved from a previous session no longer exists in the selected file. Click Overlay Standard again and re-select the correct file and tab.
Duplicate highlighting doesn't appear The duplicate detection groups styles by line weight + line pattern + all three RGB values. If two styles look visually similar but differ in even one channel (e.g. one is RGB 0,0,0 and another is RGB 1,0,0), they will not be grouped. Use the Red/Green/Blue columns and sort to spot near-duplicates manually.