114 Fill Patterns
Chris McKeown / July 1, 2025
Lists
Overview
Fill Patterns lists every Drafting and Model fill pattern in the active Revit project and traces where each one is referenced — across Materials, Filled Regions, View Filters, category and sub-category graphic overrides, View Templates, and per-element overrides in views. Patterns with no references can be selected and deleted in bulk, keeping the project library clean. An optional Overlay Standard feature cross-references patterns against an Excel standards list and automatically flags anything that falls outside your office standard.
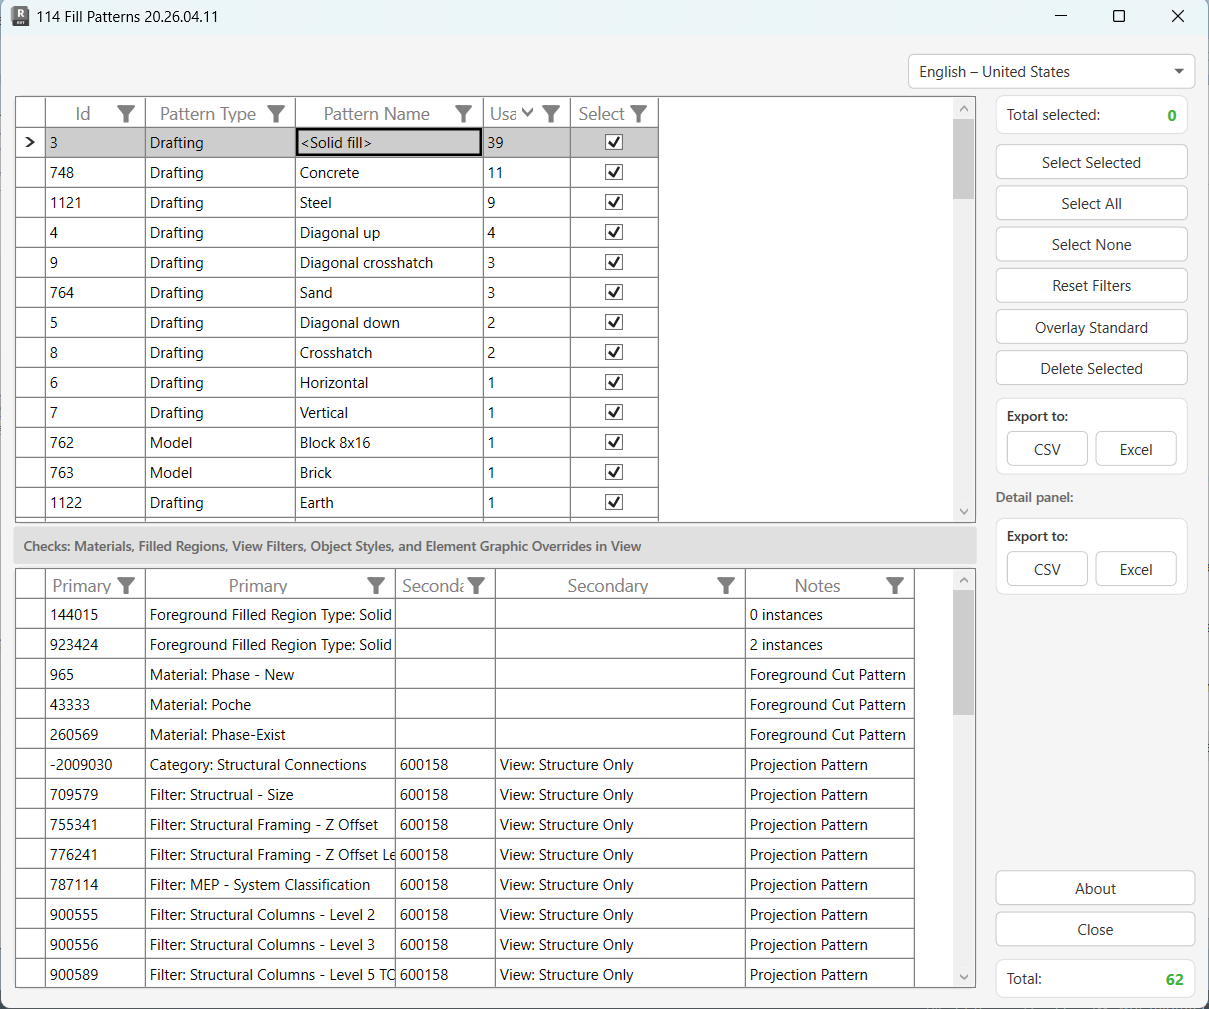
Table of Contents
Key Features
- Lists all fill patterns in the project with their type (Drafting or Model), name, and usage count
- Drill-down usage panel shows exactly where each pattern is referenced — Material, Filled Region Type, View Filter, Category or Sub-Category override, View Template, or per-element graphic override
- Usage scan covers: Materials (cut/surface, foreground/background), Filled Region Types (foreground/background), View Filters, Category overrides, Sub-Category overrides, and element-level overrides in every view
- Overlay Standard — compare the pattern library against an Excel column of approved names; non-standard patterns are automatically ticked for review
- Bulk delete selected patterns with per-item sub-transactions (failures don't block the rest)
- Export the patterns list or the usage detail to CSV or Excel
- Optional usage scan on load — skip it for a fast pattern inventory, run it when you need full traceability
- Excel file and tab selection for the standards check persists between sessions via Revit Extensible Storage
Requirements
- Must be run from a Project document — no specific active view required
- The usage scan (detail loading) can be slow on large models with many views and materials — the progress bar shows progress and a Cancel button is available
- Overlay Standard requires an Excel file with pattern names listed in column A of a worksheet
Running the Tool
Launch
Find Fill Patterns on the Bonus Tools Ribbon or use 115 Search Tools.
On launch, the dialog loads all fill patterns from the model. A confirmation prompt asks whether to load the full usage details immediately.
- Click Yes to scan all views, materials, and filled regions and populate the usage count and detail panel. This can take time on large models.
- Click No to load the pattern list only — you can still select and delete patterns, but usage details will be empty. Usage is not required for deletion.
Step 1 — Review the Fill Patterns List
The top grid lists every fill pattern in the model. Each row shows:
| Column | Description |
|---|---|
| Id | Revit element ID of the fill pattern |
| Pattern Type | Drafting or Model |
| Pattern Name | The pattern's display name |
| Usage | Number of references found during the usage scan (0 if scan was skipped) |
| Select | Checkbox — tick rows to mark for deletion |
Use column headers to sort or apply inline filters. Click Reset Filters to clear all active column filters.
Total at the bottom-right of the right panel shows the number of patterns loaded. Total selected updates as you tick rows.
Step 2 — Inspect Usage for a Pattern
Click any row in the Fill Patterns grid to load its usage detail in the bottom panel. The panel header notes that checks cover: Materials, Filled Regions, View Filters, Object Styles, and Element Graphic Overrides in View.
| Column | Description |
|---|---|
| Primary Id | Element ID of the referencing object (Material, Filled Region Type, Category, Filter, or Element) |
| Primary | Description of the primary reference (e.g. Material: Concrete, Filter: Sprinklers, Category: Walls) |
| Secondary Id | Element ID of the secondary context (e.g. the View that holds a category override) |
| Secondary | Description of the secondary context (e.g. View: Level 1, View Template: Structural) |
| Notes | How the pattern is used (e.g. Projection Pattern, Cut Pattern, Foreground Cut Pattern, Background Surface Pattern) |
Usage count of 0 after a full scan means the pattern is not referenced anywhere the tool can detect. These are safe candidates for deletion.
The usage scan checks foreground and background variants separately for both cut and surface patterns in Materials, Filled Region Types, and graphic overrides.
Step 3 — Overlay Standard (Optional)
Overlay Standard compares the loaded pattern names against a reference list from an Excel file and automatically selects any pattern that is not in the approved list.
- Click Overlay Standard to open the Excel file and tab selector.
- Browse to your standards Excel file and select the worksheet tab whose column A contains the list of approved fill pattern names.
- Click OK. The tool reads column A of that worksheet and ticks (selects) every pattern in the grid whose name is not present in the list.
The selected Excel file and tab are remembered between sessions — the next time you open the tool in this project, the same file and tab are pre-loaded and the comparison runs automatically on startup.
Use this feature during model audits to quickly isolate fill patterns that were not part of the office or project standard and are candidates for cleanup.
Step 4 — Delete Selected Patterns
- Tick the patterns you want to remove using the Select checkboxes, Select All, Select None, or Select Selected (toggles the highlighted rows).
- Click Delete Selected.
- Confirm the prompt: "Are you sure you want to delete selected items?"
Each pattern is deleted in its own sub-transaction. If a deletion fails (e.g. because the pattern is still in use and Revit prevents the deletion), that item is skipped and the others continue. Results are logged to the Output panel — green for success, with a final summary showing counts.
Revit may block deletion of patterns that are in use. Run the usage scan first and review the detail panel to confirm a pattern has no active references before deleting.
In workshared models, deletion requires ownership of the elements that reference the pattern. Ensure you have edit access before proceeding.
Tips and Best Practices
- Always run the usage scan before deleting. A pattern with a Usage count of 0 is not referenced in any location the tool can check — but confirm by reviewing the detail panel before committing to deletion.
- Use Overlay Standard before a model audit. Load your office standards Excel file to instantly flag non-standard patterns. The file path persists, so subsequent runs are one click.
- Export to Excel first. Before deleting anything, export the patterns grid to capture a snapshot. This serves as an audit trail and can be shared with the project team.
- Skip the detail scan for a quick inventory. If you only need a list of pattern names and types, click No on the detail prompt. The scan can be re-triggered by reopening the dialog.
- Large models are slow to scan. The tool iterates every view, every category override, and every element override. On models with hundreds of views, the scan may take several minutes. Use Cancel if needed — no changes are made during the scan phase.
- Pattern Type column helps target cleanup. Drafting patterns are used in 2D views only; Model patterns appear in 3D and section views. Filter by type to focus on one group at a time.
- The Overlay Standard pre-ticks patterns for review, not deletion. After running it, inspect the ticked patterns' usage before deleting — a non-standard name does not automatically mean the pattern is unused.
Common Use Cases
Pre-handover cleanup — Run the tool with a full usage scan, export the list to Excel, then filter by Usage = 0. Delete all unused patterns, reducing the file's pattern library to only what is actively referenced.
Enforcing office standards — Point Overlay Standard at the firm's pattern standards workbook. Any pattern that accumulated during the project and falls outside the approved list is automatically flagged. Review and delete as appropriate.
Tracing a specific pattern — A pattern appears visually wrong on-screen but you can't find where it's applied. Select it in the top grid and review the detail panel — the Primary/Secondary columns show every Material, View Filter, or per-element override that references it.
Identifying patterns imported with families — Families sometimes bring in fill patterns. After loading new families, run the tool and sort by name to spot unfamiliar entries. Compare them against the standards list and remove any duplicates.
Bulk cleanup of Drafting patterns — Filter the top grid to show only Drafting type patterns, then run Select All, review the usage panel for each, and delete any with 0 usage.
Troubleshooting
"No Fill Patterns in the Project." The model contains no fill pattern elements. This can happen in a freshly created project before any patterns have been loaded or transferred.
Usage count is 0 but the pattern is visually used in the model The usage scan covers Materials, Filled Regions, View Filters, category overrides, sub-category overrides, and element-level overrides. It does not check every possible location — for example, patterns embedded in families or applied via certain system family types may not be detected. A 0 count is a strong indicator of an unused pattern but is not a guarantee.
Deletion fails — "[pattern name] failed." in Output panel Revit blocked the deletion, typically because the pattern is still referenced somewhere. Use the detail panel to check for remaining usages. In workshared models, ownership locks can also prevent deletion — ensure you have edit access.
"Deletion failed. Gain ownership of elements and try again." The transaction could not commit due to worksharing ownership conflicts. Borrow or take ownership of the relevant worksets and retry.
"Operation Failed." with an error detail An unexpected error occurred during the deletion transaction. The full exception text is shown — check the Output panel for details. Close and reopen the dialog, then retry.
Overlay Standard shows no patterns selected after running All pattern names in the project already match entries in the Excel standards list, or the wrong worksheet tab was selected. Verify the Excel file contains pattern names in column A (one per row, no header row required) and that the correct tab is selected.
"Worksheet: [tab name] not found." in the Output panel The tab name saved from a previous session no longer matches a tab in the selected Excel file. Click Overlay Standard again and re-select the correct file and tab.
Detail scan is very slow or appears frozen The tool is scanning views, categories, and element overrides. On large models this is expected. The progress bar advances as each view/material/filled region is processed. Click Cancel if needed — the dialog will remain open with the patterns list intact, and no model changes are made.