111 Shared Parameter Usage
Chris McKeown / July 1, 2025
Parameters
Overview
Shared Parameter Usage gives you a complete picture of every Project and Shared Parameter bound to the active Revit model. Select any parameter to see which categories it is attached to, how many elements exist in each category, and what distinct values are currently stored — all without leaving Revit. From the same dialog you can delete parameters you no longer need, reassign category bindings for Shared Parameters, and export the data to CSV or Excel for reporting.
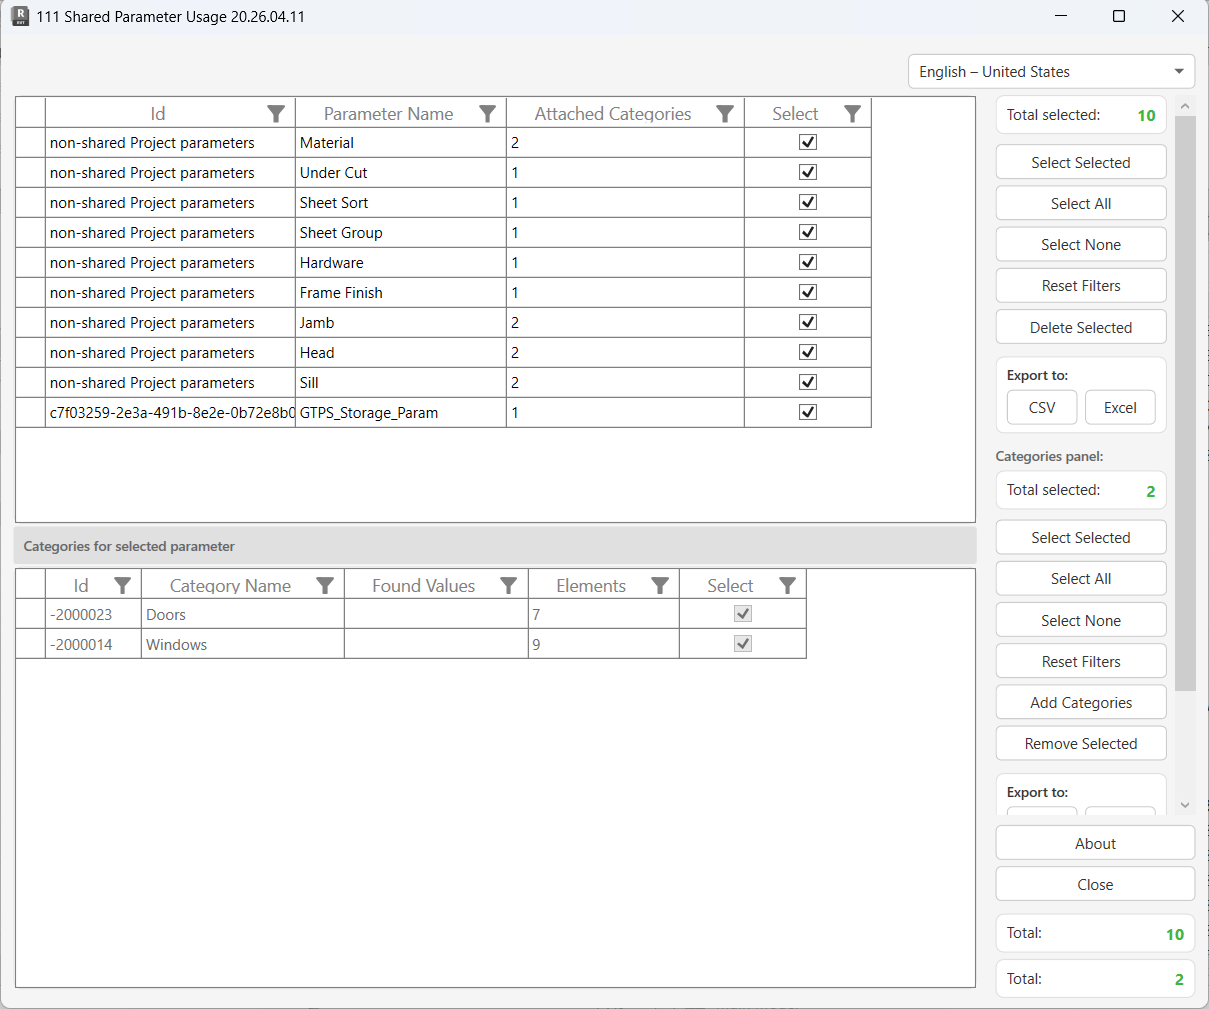
Table of Contents
Key Features
- Lists every Project and Shared Parameter currently bound to the model
- Shows the GUID for Shared Parameters and "Project Parameter" for non-shared ones
- Displays the number of categories attached to each parameter
- Drill-down panel shows per-category element counts and all distinct values stored in that parameter
- Delete selected parameters directly from the model (both types)
- Add or remove category bindings for Shared Parameters
- Filterable grids — filter by name, ID, or any column in both panels
- Export the Parameters list or the Categories detail to CSV or Excel
- Progress bar with cancel support for large models
- Window state (size, position) persists between sessions
Requirements
- Must be run from a Project document — not available in the Family Editor
- No active view restriction — the tool can be opened from any view
- Deleting parameters requires model ownership in workshared environments
- Category binding edits (Add Categories, Remove Selected) are only available for Shared Parameters — Project Parameters are read-only via the Revit API
Running the Tool
Launch
Find Shared Parameter Usage on the Bonus Tools Ribbon or use 115 Search Tools.
On opening, the tool scans all parameter bindings in the model. A progress bar tracks the scan — click Cancel at any time to abort loading.
Step 1 — Review the Parameters List
The top grid lists every parameter bound to the model. Each row shows:
| Column | Description |
|---|---|
| Id | GUID for Shared Parameters; "Project Parameter" for non-shared ones |
| Parameter Name | The parameter's display name |
| Attached Categories | Number of Revit categories the parameter is currently bound to |
| Select | Checkbox — tick rows to mark them for bulk actions |
Use the column headers to sort or apply inline filters. Click Reset Filters to clear all active filters.
The Total count at the bottom-right of the panel reflects the number of parameters loaded. Total selected updates as you tick rows.
Step 2 — Inspect Categories for a Parameter
Click any row in the Parameters grid to load its category detail in the bottom panel. The panel header updates to "Categories for selected parameter" and shows:
| Column | Description |
|---|---|
| Id | Revit BuiltInCategory integer ID |
| Category Name | Human-readable category name (e.g. Walls, Doors) |
| Found Values | Semicolon-separated list of all distinct non-empty values stored in elements of this category |
| Elements | Total number of elements in the model belonging to this category |
| Select | Checkbox — tick rows to mark them for category-level actions |
Found Values helps identify whether a parameter is actually in use before you delete it. An empty Found Values column means no elements in that category carry data in this parameter.
The Categories panel is read-only for Project Parameters. To edit category bindings, the parameter must be a Shared Parameter.
Step 3 — Manage Parameters (Top Panel)
Use the right-side action panel under the Parameters section to act on the top grid:
| Button | Action |
|---|---|
| Select Selected | Toggles the Select checkbox for all highlighted rows |
| Select All | Ticks every parameter in the list |
| Select None | Clears all ticked parameters |
| Reset Filters | Removes all active column filters from the Parameters grid |
| Delete Selected | Permanently removes ticked parameters from the model after confirmation |
| CSV / Excel | Exports the current Parameters grid (including any active filters) |
Deleting parameters opens a confirmation prompt before proceeding. Each deletion is attempted in its own sub-transaction — if one fails (e.g. due to ownership lock), it is rolled back individually and the rest continue. Results are logged to the Output panel.
Step 4 — Manage Category Bindings (Bottom Panel)
Use the right-side action panel under the Categories section to act on the bottom grid:
| Button | Action |
|---|---|
| Select Selected | Toggles the Select checkbox for highlighted category rows |
| Select All | Ticks every category shown for the current parameter |
| Select None | Clears all ticked categories |
| Reset Filters | Removes all active column filters from the Categories grid |
| Add Categories | Opens the All Categories picker to bind additional categories to this Shared Parameter |
| Remove Selected | Unbinds the ticked categories from this Shared Parameter |
| CSV / Excel | Exports the current Categories grid |
Add Categories and Remove Selected are only enabled when the selected parameter is a Shared Parameter. The buttons are greyed out for Project Parameters.
When Add Categories is clicked, a sub-dialog opens showing all available Revit categories not already attached. Select one or more and confirm — each category is added in its own transaction and logged to the Output panel.
When Remove Selected is clicked, a confirmation prompt appears. The remaining (unselected) categories are kept; the ticked ones are unbound and removed from the list.
Tips and Best Practices
- Check Found Values before deleting. If every category for a parameter shows an empty Found Values column, the parameter holds no data and is safe to remove. If values exist, verify with the project team before deleting.
- Use filters to focus on a subset. Filter the Parameters grid by name to quickly find all parameters matching a naming convention, then use Select All to batch-select them.
- Export before deleting. Use Export to Excel on both grids to capture a snapshot of what existed before you make changes — useful for audit trails or BIM Execution Plan compliance.
- Ownership matters in workshared models. If a deletion fails with "failed" in the Output panel, ensure you own the relevant element worksets before retrying.
- Project Parameters are read-only. The tool can delete them but cannot modify their category bindings. If you need to add or remove categories from a Project Parameter, convert it to a Shared Parameter first (via Manage → Project Parameters → Modify).
- Cancel mid-load is safe. If loading takes too long on a large model, clicking Cancel rolls back any temporary transactions used during probing — no changes are committed to the model during the scan.
- GUID column identifies true shared parameters. Any row showing a valid GUID (e.g.
3f2a1b...) is a Shared Parameter; rows showing"Project Parameter"are not backed by a shared parameter file.
Common Use Cases
Pre-deletion audit — Before removing unused parameters from a project, run the tool to check which categories have data. Rows with zero values in Found Values for all categories are safe candidates for removal.
Category binding cleanup — A Shared Parameter was accidentally attached to dozens of categories during initial setup. Use the tool to select the unwanted categories in the bottom panel and click Remove Selected to tighten the binding.
Adding categories to a Shared Parameter — A new category of elements needs to carry an existing parameter. Click Add Categories and pick the category — no need to re-open the Manage → Shared Parameters dialog.
Documentation and reporting — Export the full Parameters list to Excel as a reference document for the BIM Execution Plan, showing all parameters, their GUIDs, and the categories they are assigned to.
Identifying orphaned parameters — Parameters that show 0 in the Attached Categories column (unlikely but possible after model merges) are immediately visible and can be selected for deletion.
Troubleshooting
"Action not available in the Family Environment." The tool does not work inside a Family file. Open a Project document first, then run the tool.
No parameters appear in the list The model has no parameters bound via the ParameterBindings map. Check Manage → Project Parameters to confirm parameters exist. If you are working in a template or freshly created model, this is expected.
Delete fails — "[parameter name] failed." appears in Output panel The parameter could not be removed. In workshared models this typically means another user owns elements in the parameter's scope. Sync, acquire ownership of the relevant worksets, then retry.
"Deletion failed. Gain ownership of elements and try again." The overall transaction could not commit. Ensure you have edit access to the elements associated with the parameters being deleted in workshared models.
Add Categories / Remove Selected buttons are greyed out The selected parameter is a Project Parameter, not a Shared Parameter. The Revit API only permits category binding modifications on Shared Parameters. The note at the bottom of the right panel ("Only Shared Parameters can be modified via the API. Project Parameter details are Read-Only.") confirms this.
"No Categories selected." message after clicking Remove Selected No rows are ticked in the Categories grid. Tick at least one category row before clicking the button.
Found Values column is empty for a category No elements in that category currently have a value stored for this parameter. This does not mean the parameter is unused globally — check other categories in the list.
Tool is slow to load on large models The tool scans every element in every category for each parameter to build the Found Values list. On models with many parameters and large element counts this can take time. Use the Cancel button if needed — no changes are made during the scan phase.