108 Add Project Shared Parameters
Chris McKeown / July 1, 2025
Parameters
Overview
Add Project Shared Parameters replaces the repetitive Revit workflow of loading shared parameters one at a time. You load a shared parameter file, select which parameters to add and configure their type/instance binding and parameter group, then choose the project categories they should be applied to — and the tool binds all combinations in a single operation. This is especially valuable when setting up a new project template or applying a client-specific parameter set across dozens of categories at once.
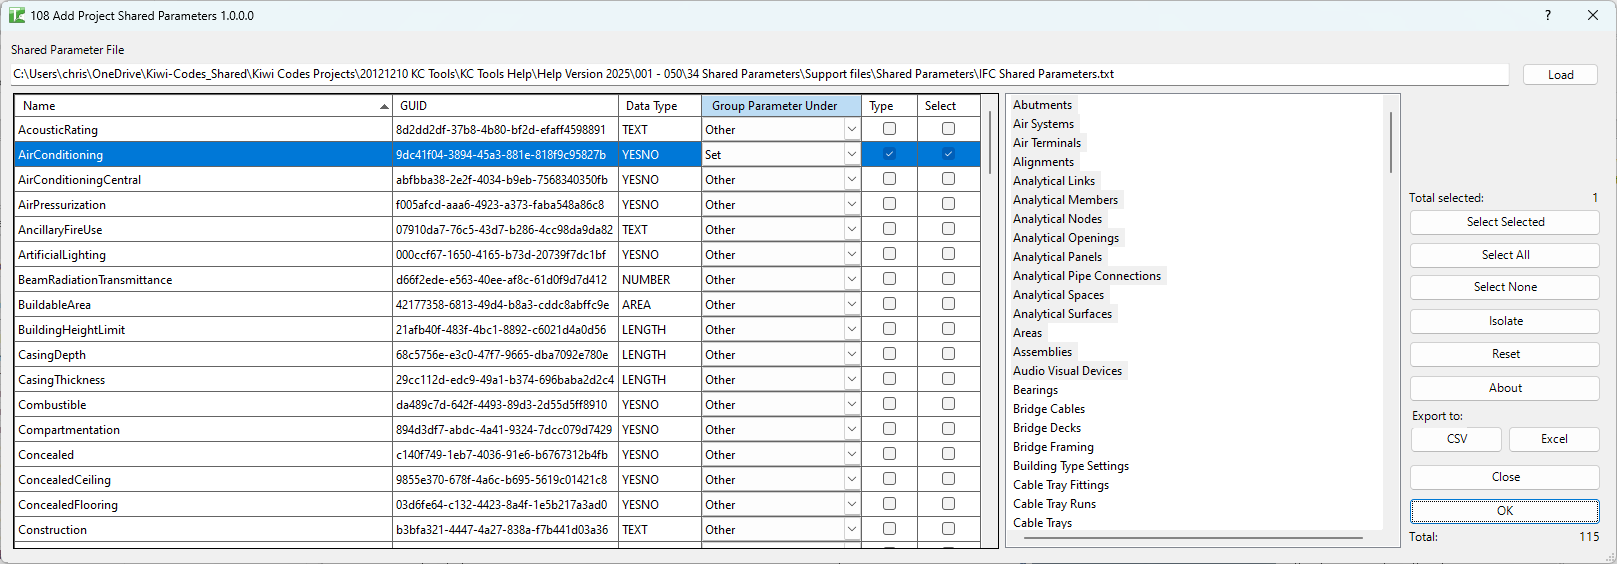
Table of Contents
Key Features
- Load any Revit shared parameter .txt file via a standard file dialog
- Categories list on the left: all project categories that support parameter binding — select one or more to target
- Parameters grid on the right: shows all parameters from the loaded file with:
- Select checkbox — tick to include in the binding operation
- GUID — shared parameter unique identifier
- Name — parameter name
- DataType — parameter data type (Text, Integer, Length, etc.)
- TypeInstance — checkbox: ticked = Type parameter, unticked = Instance parameter
- Group Under — dropdown with all Revit parameter groups (40+ options including Identity Data, Dimensions, Constraints, etc.)
- Select Selected / Select All / Select None buttons for the parameters grid
- Isolate and Reset buttons
- Export CSV / Export Excel for exporting the parameter list
- Runs one transaction per parameter: "Adding Shared Parameter: [name]"
- Reports completion: "X added and Y failed." to the Output log
Requirements
- Must be run in a project document (not a Family document)
- A valid Revit shared parameter file (.txt) must be available
- The shared parameter file must be accessible (not locked by another application)
- At least one category and one parameter must be selected before running
- A valid Kiwi Codes Bonus Tools licence must be active
Running the Tool
Launch
Find Add Project Shared Parameters on the Bonus Tools Ribbon or use 115 Search Tools.
Step 1 — Load the shared parameter file
Click the Load button next to the shared parameter file path field. A file dialog opens — navigate to and select the shared parameter .txt file.
Once loaded, the Parameters grid populates with all parameters defined in the file.
Step 2 — Configure the parameters
For each parameter in the grid, configure:
| Column | Description |
|---|---|
| Select | Tick to include this parameter in the binding operation |
| GUID | Read-only unique identifier of the shared parameter |
| Name | Read-only parameter name |
| DataType | Read-only data type from the shared parameter file |
| TypeInstance | Check = Type parameter; uncheck = Instance parameter |
| Group Under | Dropdown — choose the parameter group in Revit's Properties panel (e.g. Identity Data, Dimensions, Constraints) |
Use the Select All / Select None buttons to tick or clear all parameters at once. Use the Select checkbox on individual rows to choose a subset.
The Group Under dropdown includes all standard Revit parameter groups, including:
- Identity Data
- Dimensions
- Constraints
- Structural
- Electrical, Mechanical, Plumbing (discipline groups)
- Construction
- Energy Analysis
- and many more
Step 3 — Select target categories
In the Categories list on the left, click to highlight the project categories you want to bind the parameters to. Use Ctrl+Click or Shift+Click to select multiple categories.
Only categories that support project parameter binding are shown.
Step 4 — Execute
Click Execute (or the OK button). The tool processes each selected parameter in turn:
- Retrieves the shared parameter definition from the file by GUID
- Creates an instance or type binding for the selected categories
- Adds the parameter definition to the project
A separate transaction is used for each parameter: "Adding Shared Parameter: [name]". If a parameter already exists on a category, Revit skips it silently.
When complete, the Output log reports: "X added and Y failed."
Tips and Best Practices
- Use a single shared parameter file for each project or client standard. This makes it straightforward to add the same parameter set to multiple projects consistently.
- Group parameters under Identity Data for most scheduling use cases. Parameters under Identity Data appear first in Revit's Properties panel and are easiest to access in schedules.
- Instance vs Type — choose carefully. Instance parameters vary per element; Type parameters are shared across all elements of the same type. Use Instance for data that changes element-by-element (e.g. room-specific notes) and Type for data constant across a family type (e.g. manufacturer).
- Select all required categories in one run. The tool binds to multiple categories simultaneously — there is no need to run separately for Walls, Floors, and Ceilings if all three need the same parameter.
- If a parameter already exists on a category, it is skipped without error. Re-running the tool after adding new categories is safe — existing bindings are not duplicated.
- Check the Output log after running. Failed parameters are reported individually — a failed binding usually means the category does not support that data type or the parameter file entry is malformed.
Common Use Cases
Setting up a new project template — A practice has a standard shared parameter file defining 20+ project parameters. Run Add Project Shared Parameters to bind all of them to the relevant categories in a new project template in a single operation.
Applying a client BIM requirement — A client mandates specific shared parameters on all Wall, Floor, and Ceiling categories. Load the client's parameter file, select all three categories, configure instance/type bindings, and execute.
Adding parameters to a received model — A consultant model is missing parameters required for the coordination workflow. Load the shared parameter file and add the missing parameters without disturbing existing project data.
Bulk-adding a new parameter across all categories — A new project-wide parameter (e.g. "Package") needs to be on every scheduleable category. Select all categories and add the parameter in one step rather than using the Revit Manage tab for each category individually.
Troubleshooting
"Please select at least one Shared Parameter." No parameters are checked in the Parameters grid. Tick the Select checkbox for at least one parameter before running.
"Please select a valid Shared Parameter File." No shared parameter file has been loaded, or the path field is empty. Click Load and select a valid .txt shared parameter file.
"File is in use. Please check." The shared parameter file is locked by another application (e.g. it is currently set as Revit's active shared parameter file and cannot be read simultaneously). Close any other tools using the file, or copy the file to a different location before loading it here.
"X added and Y failed." with failures Check the Output log for red entries identifying which parameters failed. Common causes include:
- The category does not support the parameter's data type
- The shared parameter definition in the file is malformed or references a group that does not exist
- Revit version incompatibility with the parameter data type
Parameters were added but do not appear in the Properties panel The parameter was bound successfully but may be grouped under a category that is collapsed in the Properties panel. Scroll through all groups, or use Revit's Edit Type / Instance Properties dialog to find the parameter. Also verify the correct Type vs Instance setting was used.
No parameters appear in the grid after loading the file
The selected file is not a valid Revit shared parameter .txt file, or it contains no parameter definitions. Verify the file is the correct format by opening it in a text editor — it should contain [PARAMS] and [GROUPS] sections.