106 Schedule Browser
Chris McKeown / July 1, 2025
Sheet & View Manipulation
Overview
Schedule Browser provides a dockable panel that lists every schedule in your Revit project, organised by Revit category, in a collapsible tree. You can optionally expand each schedule to see which sheets it appears on, and double-click any node to navigate directly to that schedule view or sheet — without hunting through the Project Browser.
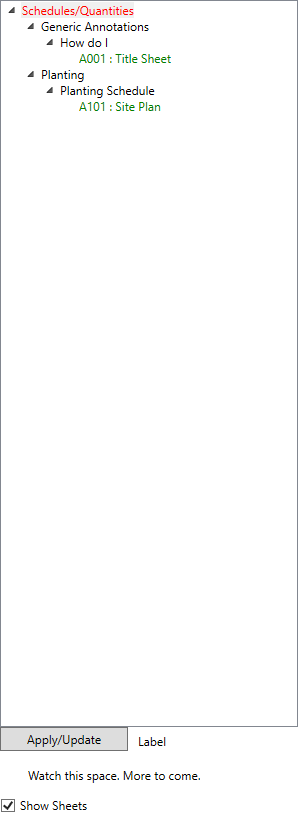
Table of Contents
Key Features
- Dockable panel — tabs alongside the Project Browser for persistent access
- Schedules organised under Schedules/Quantities → Category → Schedule Name
- Schedules without a matching Revit category are grouped under Multi-Category
- Show Sheets checkbox expands each schedule node to list every sheet it is placed on
- Sheets displayed as
Sheet Number : Sheet Nameand sorted alphabetically - Double-click a schedule node to set that schedule as the active view
- Double-click a sheet node to navigate to that sheet
- Apply/Update button refreshes the tree to reflect any changes made since the panel was opened
- Excludes schedule templates and titleblock revision schedules automatically
Requirements
- Must be run from a Revit project document — not available in the Family Editor
- Schedules must exist in the project for the tree to populate
- Sheet placement data is only shown when Show Sheets is checked and the schedule is placed on at least one sheet
Running the Tool
Launch
Find Schedule Browser on the Bonus Tools Ribbon or use 115 Search Tools.
The panel opens docked alongside the Project Browser. If the panel was previously shown, running the tool again brings it back into view.

Step 1 — Browse Schedules by Category
The tree is structured as three levels:
| Level | Label | Colour |
|---|---|---|
| Root | Schedules/Quantities | Red |
| Category | Revit category name (e.g. Walls, Rooms, Doors) | Default |
| Schedule | Schedule name | Default |
Click any category node to expand it and see the schedules it contains. Schedules within each category are sorted alphabetically.

Step 2 — Show Sheet Placements (Optional)
Check Show Sheets then click Apply/Update to expand each schedule node with its sheet placements.

Sheet nodes appear in green text in the format Sheet Number : Sheet Name, sorted alphabetically. A schedule with no placements shows no child sheet nodes.
Step 3 — Navigate by Double-Clicking
- Double-click a schedule node → Revit switches the active view to that schedule
- Double-click a sheet node → Revit navigates to that sheet
This works from any level of the tree without needing to scroll through the Project Browser.
Step 4 — Refresh After Changes
After renaming, adding, or deleting schedules, click Apply/Update to rebuild the tree with the current project state.

Tips and Best Practices
- Keep the panel open throughout a session. Because it docks alongside the Project Browser, it does not interrupt your workspace — leave it visible as a permanent schedule reference.
- Use Show Sheets to audit schedule placement. Before issuing drawings, enable Show Sheets and check that every schedule appears on at least one sheet.
- Click Apply/Update after bulk edits. The panel does not auto-refresh when schedules change — always update manually after creating or renaming schedules.
- Multi-Category schedules appear under their own group. Schedules that span multiple categories (e.g. a custom multi-category schedule) are grouped under Multi-Category rather than a specific category.
- Titleblock revision schedules are hidden by design. These are internal Revit schedules and are excluded to keep the list clean.
Common Use Cases
Locating a schedule quickly — In large projects with dozens of schedules across multiple categories, expand the relevant category in the browser and double-click to open the schedule directly, bypassing the Project Browser entirely.
Checking which sheets a schedule is placed on — Enable Show Sheets to see all sheet placements at a glance. Useful when coordinating drawing issues and ensuring every required schedule is placed.
Navigating between a schedule and its sheet — Double-click the schedule to review its content, then double-click the sheet node to jump to the drawing that includes it — without manually searching in the Project Browser.
Auditing schedule coverage — Expand all categories and check for schedules that have no sheet children (when Show Sheets is enabled), indicating schedules that exist in the project but have not been placed on any sheet.
Troubleshooting
Panel does not appear after clicking the button The dockable panel may be hidden behind another panel or minimised. Look for the Schedule Browser tab along the edge of the Revit window. If it still does not appear, restart Revit and run the tool again.
Tree is empty The project contains no schedules, or all schedules are templates or titleblock revision schedules, which are excluded. Create at least one regular schedule and click Apply/Update.
Sheet nodes do not appear after enabling Show Sheets Click Apply/Update after checking the Show Sheets checkbox — the tree does not rebuild automatically. Also confirm that the schedule is actually placed on a sheet in the project.
Tool is not available (greyed out) Schedule Browser cannot run in a Family Document. Open a project file and try again.