100 Schedule Usage
Chris McKeown / July 1, 2025
Sheet & View Manipulation
Overview
Schedule Usage scans the entire project for ViewSchedule elements and displays each one alongside a count of how many times it has been placed on sheets, plus a row for each individual sheet placement. This gives you an instant overview of schedule coverage before deleting or reorganising schedules. From the same dialog you can select any combination of schedules and delete them in a single operation.
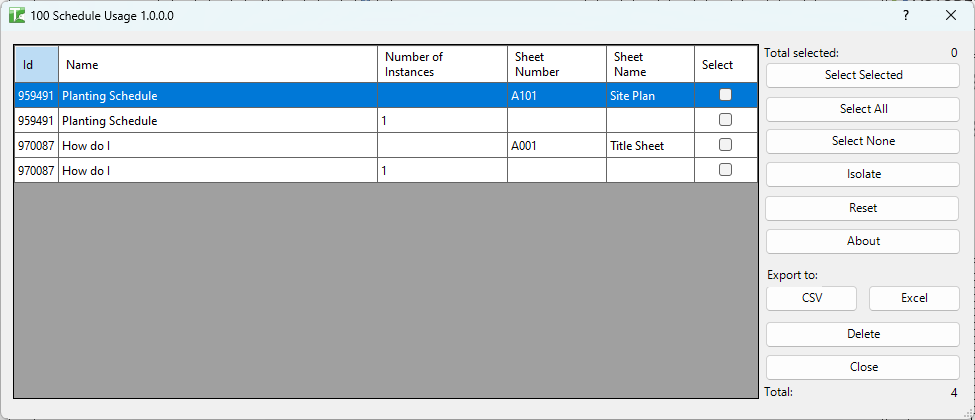
Table of Contents
Key Features
- Lists all ViewSchedule elements in the project (excluding title block revision schedules)
- Shows Number of Instances — how many ScheduleSheetInstance placements each schedule has
- One summary row per schedule plus an individual row per sheet placement (Sheet Number, Sheet Name)
- Select checkbox column for picking schedules to delete
- Select All / Select None toggle buttons for bulk selection
- Isolate button — selects the highlighted schedule in the Revit canvas
- Delete button removes all checked schedules; each runs in its own SubTransaction so a failure on one does not prevent the others
- Progress bar with Cancel button — cancelling rolls back all changes made in the current run
- Export CSV / Export Excel buttons for exporting the full grid to a spreadsheet
Requirements
- Must be run in a project document (not a Family document)
- A valid Kiwi Codes Bonus Tools licence must be active
- To delete schedules, you must have write access to the model (in a workshared project, no other user may own the schedules)
Running the Tool
Launch
Find Schedule Usage on the Bonus Tools Ribbon or use 115 Search Tools.
Step 1 — Review the schedule grid
The dialog opens and immediately populates the grid with all schedules in the project. Each row shows:
| Column | Description |
|---|---|
| Id | Revit element ID of the schedule |
| Name | Schedule name as shown in the Project Browser |
| Number of Instances | Total count of times the schedule is placed on sheets |
| Sheet Number | Sheet number of a specific placement (blank on the summary row) |
| Sheet Name | Sheet name of a specific placement (blank on the summary row) |
| Select | Checkbox — tick to mark the schedule for deletion |
Schedules with 0 instances are not placed on any sheet.
Step 2 — Select schedules
Use the checkbox in the Select column to mark individual schedules, or use the toolbar buttons:
- Select Selected — ticks the checkbox for the currently highlighted row
- Select All — ticks all schedules
- Select None — clears all selections
Step 3 — Delete selected schedules
Click Delete. A progress bar tracks each deletion. For each selected schedule:
- A SubTransaction is started
- The schedule element is deleted from the project
- The result (pass or fail) is logged
Click Cancel at any time to stop and roll back all changes — no schedules are permanently deleted.
When complete, a message reports the totals: "X passed. Y failed."
Export
Click Export CSV or Export Excel to save the full grid (including all placement rows) to a file. This is useful for creating a schedule audit log before performing deletions.
Tips and Best Practices
- Check instance count before deleting. A schedule with 0 instances is safe to remove. A schedule with many instances may be relied upon by sheets you haven't reviewed — use the placement rows to identify exactly which sheets would be affected.
- Use Select None after reviewing. If you accidentally tick the wrong schedule, use Select None to clear all checkboxes and start the selection again.
- Export before deleting. Use Export CSV or Export Excel to create a record of all schedules and their sheet placements before any deletions, providing an audit trail.
- Workshared models. If other team members have schedules checked out, the Delete operation will fail for those elements. Synchronise and ensure you have ownership before running.
- Isolate to confirm. Click Isolate on any row to jump to that schedule in the Revit canvas before deciding to delete it.
Common Use Cases
Project cleanup — removing unused schedules — At the end of a design stage, run Schedule Usage to identify all schedules with 0 sheet placements. Select them and delete in a single step rather than hunting through the Project Browser manually.
Pre-handover audit — Export the full grid to Excel and use it as evidence that all required schedules are placed on the correct sheets before issuing a drawing package.
Tracking down orphaned schedules — Some schedules accumulate over a project's life without ever being placed. Schedule Usage surfaces all of them immediately so you can make an informed decision about which to keep.
Verifying schedule coverage — Confirm that a specific schedule (e.g. a Door Schedule) is placed on the expected sheets by reviewing its placement rows in the grid.
Troubleshooting
Deletion fails with a worksharing message The tool could not commit the transaction because some schedules were owned by another user. Request ownership, synchronise, and try again.
"X passed. Y failed." — some schedules were not deleted Check the Output log for red entries. Common causes include elements owned by another user or Revit refusing to delete a schedule that is referenced by a keynote or linked annotation. Review each failure individually.
Grid is empty after opening The project contains no ViewSchedule elements, or all schedules are title block revision schedules (which are excluded). Verify via the Project Browser that schedules exist.
Schedule still appears after deletion If Cancel was clicked during the run, all changes were rolled back. Re-run the deletion without clicking Cancel, or check whether the transaction failed silently and review the Output log.