007 Window Watcher Settings
Chris McKeown / July 1, 2025
Settings
Overview
Window Watcher Settings configures the Window Watcher service built into Bonus Tools. For each nominated Revit window (matched by its title-bar name), you can block the window and replace it with a policy warning, record that a user opened it (silently or with a visible notification), or both. Activation logs and Revit warning logs are written as dated files to configurable directories that can be opened in Excel. No Kiwi Codes licence is required to use this settings dialog.
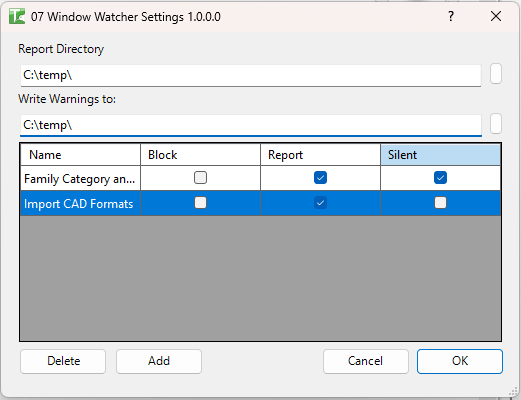
Table of Contents
Key Features
- Window rule grid — list of Revit window title-bar names with per-row Report, Silent, and Block options
- Report — records window activations (project name + user) to a dated log file in the Report Directory
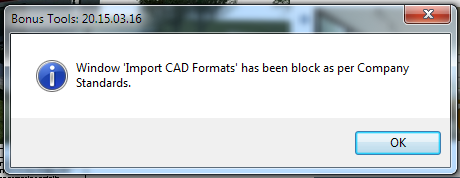
- Block — replaces the Revit window with a company-policy warning; the original dialog is not shown
- Silent — suppresses the in-session notification toast; logging still occurs
- Report Directory — configurable folder for window-activation log files (one file per date)
- Write Warnings to — configurable folder for Revit warning logs (one file per date, per user)
- Add / Delete — add new rules or remove rows from the grid
- Settings saved to
C:\Users\%username%\AppData\Roaming\KCApps\Settings.json; applied at next Revit start
Requirements
- Bonus Tools must be installed and running on every workstation (the Window Watcher service is part of the Bonus Tools add-in)
- The Report Directory and Write Warnings directory must have write permissions for the logged-in user
- No Kiwi Codes Bonus Tools licence required for this settings dialog
Running the Tool
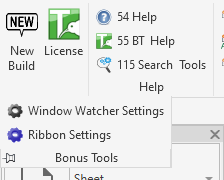
Launch
Find Window Watcher Settings on the Bonus Tools Ribbon under the About dropdown.
The dialog opens showing the current rules, the Report Directory path, and the Write Warnings path.
Step 1 — Set the Report Directory
The Report Directory is where window-activation log files are written. Each entry records the project name, the user who activated the window, and a timestamp.
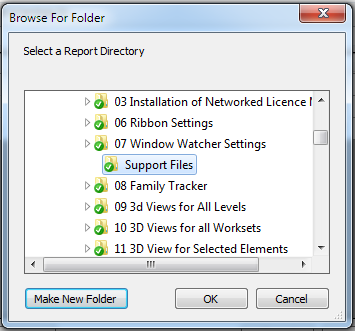
Click the folder button to the right of the Report Directory field:

Browse to and select the destination folder:

If no valid directory is set, window activations will not be recorded. The directory must have write permissions.
Default path: C:\Users\%username%\AppData\Roaming\KCApps\WindowUsage\
Step 2 — Set the Write Warnings Directory
The Write Warnings directory is where Revit warning logs are written — one file per date, per user.
Click the folder button to the right of the Write Warnings to field:

Browse to and select the destination folder:
If no valid directory is set, warnings will not be recorded. The directory must have write permissions.
Default path: C:\Users\%username%\AppData\Roaming\KCApps\RevitWarnings\
Step 3 — Configure window rules
Each row in the grid defines a monitoring rule for a specific Revit window:
| Column | Description |
|---|---|
| Window Name | The exact title-bar text of the Revit dialog to monitor |
| Report | Tick to log when this window is activated |
| Silent | Tick to suppress the in-session notification — logging still occurs |
| Block | Tick to prevent the window from opening and show a company-policy warning instead |
To add a rule:
- Click Add — a new empty row appears in the grid
- Type the exact Revit window title in the Window Name cell
- Tick Report, Silent, and/or Block as required
Common windows to monitor:
Family Category and Parameters— triggers when a user creates an in-place familyImport CAD Formats— triggers when a user imports a CAD file
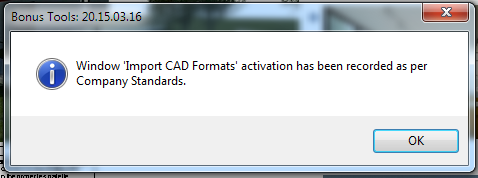
When a window is reported (and not silent):
When a window is blocked:
To remove a rule, select the row and click Delete.
Step 4 — Save settings
Click OK. Settings are written to:
C:\Users\%username%\AppData\Roaming\KCApps\Settings.json
Restart Revit for the new rules to take effect. Changes do not apply to the currently running session.
Sample Output Files
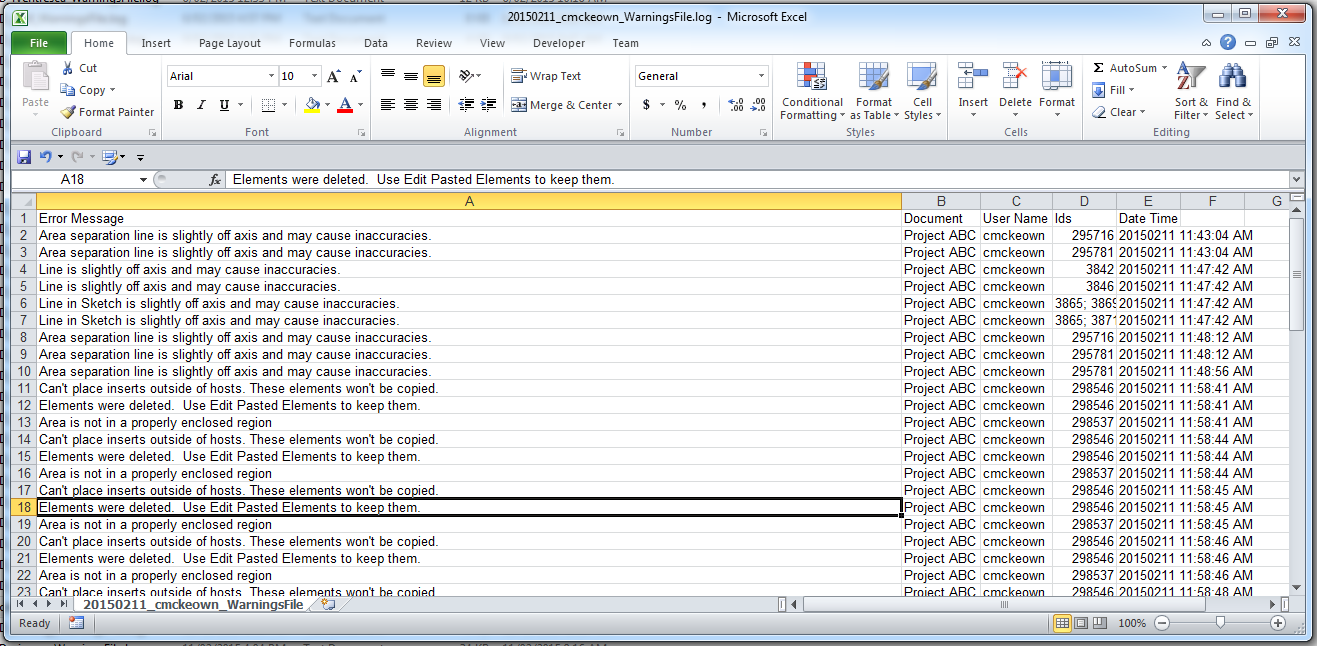
Warning log — one file per date and user, listing Revit warnings generated during the session:
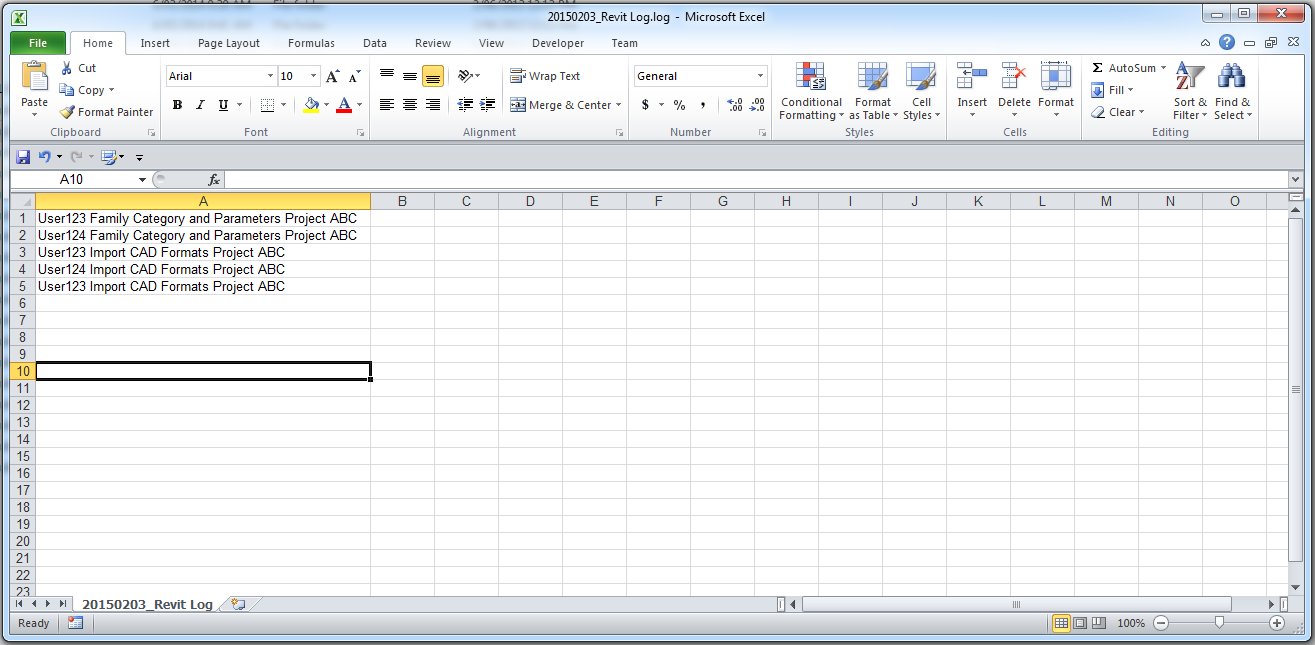
Window Watcher log — one file per date, listing window activations by project and user:
Both file types can be opened directly in Excel for review and analysis.
Tips and Best Practices
- Use exact window title-bar names. The Window Watcher matches on the full title string. Open the target Revit dialog, note its exact title-bar text, and enter it verbatim.
- Use Silent + Report for background auditing. If you want to log activations without interrupting users, tick Report and Silent together. Users will not see a notification but the log will record every activation.
- Block is absolute. A blocked window cannot be opened by any user while the rule is active. Use this only for workflows firmly prohibited on managed projects.
- Put log directories on a shared network drive. If the Report Directory and Write Warnings paths point to a shared folder, all users' logs are aggregated centrally for easy review.
- Deploy the settings file centrally. The settings file is per-user at
%AppData%\KCApps\Settings.json. For team-wide deployment, copy a pre-configured file to each workstation or use a login script.
Common Use Cases
Blocking in-place family creation — Add Family Category and Parameters as a blocked window so no user on a managed project can create in-place families. A clear policy message is shown in place of the dialog.
Auditing CAD import usage — Add Import CAD Formats with Report enabled (and Silent if preferred) to build a log of which users and projects are importing CAD, without blocking the workflow outright.
Tracking window activations over time — Point the Report Directory to a shared network folder. Periodically open the dated log files in Excel to review activation trends by user and project.
Capturing Revit warnings for QA — Set the Write Warnings directory to a shared location to collect warning logs from all workstations for quality assurance review.
Troubleshooting
Changes have no effect after clicking OK Settings are applied at next Revit launch. Close and reopen Revit after saving to activate the new rules.
"Settings saved successfully. Please restart Revit for the changes to take effect." This is the expected success message. Restart Revit to apply the new rules.
"Failed to save settings."
The settings file could not be written. Verify that C:\Users\%username%\AppData\Roaming\KCApps\ exists and the current user has write permissions.
"Window Watcher Setting failed to initialize."
The settings file could not be read on dialog open. The file may be corrupted or inaccessible. Check C:\Users\%username%\AppData\Roaming\KCApps\Settings.json.
"Please select a valid row." A Delete action was triggered without a row selected. Click a row to select it before clicking Delete.
Window activations are not being logged Verify the Report Directory path is set, the folder exists, and the logged-in user has write permissions.
Warning logs are not being written Verify the Write Warnings directory is set, the folder exists, and the logged-in user has write permissions.